안녕하세요.
오늘은 EVE-NG에 PaloAlto Firewall를 설치해보겠습니다.
1. 공식사이트 링크는 아래와 같습니다.

2. PaloAlto 방화벽 폴더 이름 이미지 파일 이름 및 확장자 정보입니다.
Qemu folder name EVE Vendor Qemu image. qcow2 name
| a10- | A10-vthunder | hda |
| acs- | ACS | hda |
| asa- | ASA ported | hda |
| asav- | ASAv | virtioa |
| ampcloud- | Ampcloud Private | hda, hdb, hdc |
| alteon- | Radware | virtioa |
| barracuda- | Barracuda FW | hda |
| bigip- | F5 | virtioa, virtiob |
| brocadevadx- | Brocade | virtioa |
| cda- | Cisco CDA | hda |
| cips- | Cisco IPS | hda, hdb |
| clearpass- | Aruba ClearPass | hda, hdb |
| aruba- | Aruba Virtual Mobility Controller | hda, hdb |
| arubacx- | Aruba CX Switch | virtioa |
| coeus- | Cisco WSA coeus | virtioa |
| phoebe- | Cisco ESA | virtioa |
| cpsg- | Checkpoint | hda |
| csr1000v- | Cisco CSR v1000 3.x |
virtioa |
| csr1000vng- | Cisco CSR v1000 16.x, 17.x |
virtioa |
| csr1000vng- | Cisco CSR v1000 16.x SD-WAN |
virtioa |
| prime- | Cisco Prime Infra | virtioa |
| cucm- | Cisco CUCM | virtioa |
| cumulus- | Cumulus | virtioa |
| extremexos- | ExtremeOS | sataa |
| extremevoss- | Extreme VOSS SW | hda |
| esxi- | VM Ware ESXi | hda, hdb, hdc… |
| firepower- | Cisco FirePower 5.4 NGIPS | scsia |
| firepower- | Cisco FirePower 5.4 FMC | scsia |
| firepower6- | Cisco FirePower 6.x NGIPS | sataa |
| firepower6- | Cisco FirePower 6.x FMC | virtioa |
| firepower6- | Cisco FirePower 6.x FTD | virtioa |
| ftd7- | Cisco Firepower 7 FTD | virtioa |
| fmc7- | Cisco Forepower 7 FMC | virtioa |
| fortinet- | Fortinet FW | virtioa |
| fortinet- | Fortinet SGT | virtioa |
| fortinet- | Fortinet mail | virtioa, virtiob |
| fortinet- | Fortinet manager | virtioa |
| fpfw- | Forcepoint NGFW | hda |
| fpsmc- | Forcepoint Security Manager | hda |
| hpvsr- | HP virt router | hda |
| huaweiar1k- | Huawei AR1000v | virtioa |
| huaweiusg6kv- | Huawei USG6000v | hda |
| ise- | ISE 1.x cisco | hda |
| ise- | ISE 2.x cisco | virtioa |
| jspace- | Junos Space | virtioa |
| infoblox- | Infoblox | virtioa |
| junipervrr- | Juniper vRR | virtioa |
| kerio- | Kerio Control Firewall | sataa |
| linux- | any linux | virtioa |
| mikrotik- | Mikrotik router | hda |
| nsvpx- | Citrix Netscaler | virtioa |
| nsx- | VM Ware NSX | hda |
| nxosv9k- | NX9K Cisco Nexus ( SATA best perf) |
sataa |
| olive- | Juniper | hda |
| ostinato- | Ostinato traffic generator | hda |
| osx- | Apple OSX | hda + kernel.img |
| paloalto- | PaloAlto FW | virtioa |
| panorama- | PaloAlto Panorama | virtioa, virtiob |
| pfsense- | pFsense FW | virtioa |
| prime- | Cisco Prime Infra | virtioa |
| pulse- | Pulse Secure | virtioa |
| riverbed- | vRiverbed | virtioa, virtiob |
| scrutinizer- | Plixer Scrutinizer Netflow | virtioa |
| silveredge- | Silver Peak Edge | hda |
| silverorch- | Silver Peak Orchestrator | hda |
| sonicwall- | FW Sonicwall | sataa |
| sourcefire- | Sourcefire NGIPS | scsia |
| sterra- | S-terra VPN | hda |
| sterra- | S-terra Gate | virtioa |
| stealth- | Cisco StealthWatch | hda |
| timos- | Alcatel Lucent Timos | hda |
| timoscpm- | Nokia Timos 19 | virtidea |
| timosiom- | Nokia Timos 19 | virtidea |
| titanium- | NXOS Titanium Cisco | virtioa |
| vcenter- | VMWare vCenter | sataa ( 12G ) satab ( 1.8G ) satac ( 15G ) satad ( 25G ) satae ( 25G ) sataf ( 10G ) satag ( 10G ) satah ( 15G ) satai ( 10G ) sataj ( 1.0G ) satak ( 10G ) satal ( 10G ) satam ( 100G ) |
| veos- | Arista SW | hda, cdrom.iso |
| veloedge- | Velocloud Edge | virtioa |
| velogw- | Velocloud Gateway | virtioa |
| veloorch- | Velocloud Orchestrator | virtioa, virtiob, virtioc |
| versaana- | Versa Networks Analayzer | virtioa |
| versadir- | Versa Networks Director | virtioa |
| versavnf- | Versa Networks FlexVNF Edge | virtioa |
| vios- | L3 vIOS Cisco Router | virtioa |
| viosl2- | L2 vIOS Cisco SW | virtioa |
| vtbond- | Viptela vBond | virtioa |
| vtedge- | Viptela vEdge | virtioa |
| vtsmart- | Viptela vSmart | virtioa |
| vtmgmt- | Viptela vManage | virtioa, virtiob |
| vmx- | Juniper vMX router | hda |
| vmxvcp- | Juniper vMX-VCP | virtioa, virtiob, virtioc |
| vmxvfp- | Juniper vMX-VFP | virtioa |
| vnam- | Cisco VNAM | hda |
| vqfxpfe- | Juniper vQFX-PFE | hda |
| vqfxre- | Juniper vQFX-RE | hda |
| vsrx- | vSRX 12.1 Juniper FW/router | virtioa |
| vsrxng- | vSRX v15.x Juniper FW/router | virtioa |
| vwaas- | Cisco WAAS | virtioa,virtiob,virtioc |
| vwlc- | vWLC Cisco WiFi controller | megasasa |
| vyos- | VYOS | virtioa |
| win- | Windows Hosts (Not Server Editions) | hda or virtioa(using driver) |
| winserver- | Windows Server Editions | hda or virtioa(using driver) |
| xrv- | XRv Cisco router | hda |
| xrv9k- | XRv 9000 Cisco router |
virtioa |
| zabbix- | Zabbix Monitoring | virtioa |
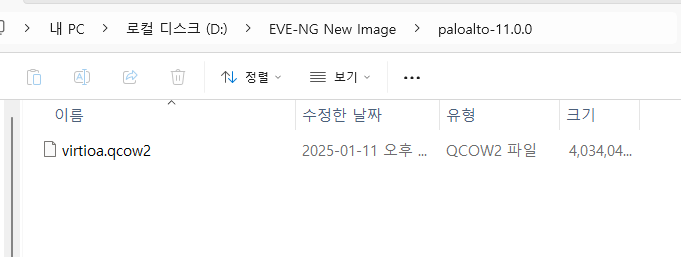
아래 사진처럼 폴더이름은 paloalto- 으로 시작해야 하고 파일 이름은 virtioa이고 확장자는 qcow2입니다.

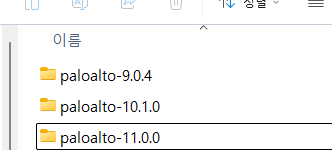
3. 아래 사진처럼 paloalto 폴더를 준비 합니다. 위에 표에 있는 이미지 말고 다른 이미지 버전도 지원하고 참고 부탁드립니다.
4. paloalto-11.0.0 폴더를 클릭해서 파일이름과 확장자를 확인합니다.
5. winscp를 이용해서 EVE-NG에 접속 합니다.

6. 폴더 위치.
/opt/unetlab/addons/qemu/
여기를 클릭후 위에 팔로알토 폴더를 이동 합니다

7. putty를 이용해서 EVE-NG 접속 합니다.
| /opt/unetlab/wrappers/unl_wrapper -a fixpermissions *** System restart required *** Last login: Mon Dec 23 04:56:18 2024 from 172.16.10.19 root@eve-ng:~# /opt/unetlab/wrappers/unl_wrapper -a fixpermissions root@eve-ng:~# root@eve-ng:~# |
8. EVE-NG GUI 접속 합니다.

9. 아래처럼 3개 버전을 Node를 생성하고 MGMT Interface에 연결 합니다.

Default login
admin/admin
10. 아래처럼 MGMT IP를 설정 합니다.
PA01 - 192.168.10.161/24 - 9.0.4 version
PA02 - 192.168.10.162/24 - 10.1.0 version
PA03 - 192.168.10.163/24 - 11.0.0 version
| login : admin Password: admin Enter old password : admin Enter new password: confirm password: admin@PA-VM> cpmfogire admin@PA-VM# set deviceconfig system type static admin@PA-VM# set deviceconfig system ip-address 192.168.10.161 netmask 255.255.255.0 default-gateway 192.168.10.253 admin@PA-VM# commit |
PC에서 ping를 시도 합니다.
ping 192.168.10.161

위와 같이 다른 version에 paloalto도 MGMT 설정 합니다.
11. 아래 처럼 GUI로 접속 합니다.


정상적으로 동작 합니다. 다른 버전들도 이렇게 확인 가능 합니다.
지금까지 [2024][EVE-NG #19] PaloAlto 설치하기 글을 읽어주셔서 감사합니다.
'EVE-NG' 카테고리의 다른 글
| [2024][EVE-NG #18] Virtual PC(VPCS) (0) | 2024.11.06 |
|---|---|
| [2024][EVE-NG #18] EVE-NG에 C9800CL Install (2) | 2024.10.07 |
| [2024][EVE-NG #17] Upgrade EVE-NG version (0) | 2024.07.18 |
| [2024][EVE-NG #16] Juniper QFX 스위치 설치하기 (0) | 2024.07.12 |
| [2024][EVE-NG #15] Juniper MX 라우터 설치하기 (0) | 2024.07.11 |


