이유는 cisco ASA에서 dns를 설정해야지 domain으로 tools.cisco.com 또는 cisco license portal에 접속 가능 합니다
asa/act/pri(config)# dns domain-lookup untrust asa/act/pri(config)# dns server-group DefaultDNS asa/act/pri(config-dns-server-group)# name-server 8.8.8.8 asa/act/pri(config-dns-server-group)# end
asa/act/pri# ping google.com Type escape sequence to abort. Sending 5, 100-byte ICMP Echos to 142.251.12.100, timeout is 2 seconds: !!!!! Success rate is 100 percent (5/5), round-trip min/avg/max = 1/6/10 ms asa/act/pri# asa/act/pri# asa/act/pri# ping tools.cisco.com Type escape sequence to abort. Sending 5, 100-byte ICMP Echos to 72.163.4.38, timeout is 2 seconds: !!!!!
Example: Device# license smart reservation request local Enter this request code in the Cisco Smart Software Manager portal: CP-ZC9300-24U:FCW2125L046-AK9A6sMTr-47
Device> enable Device# show license reservation Overall status: Active: PID:C9300-24U,SN:FCW2125L046 License reservation: ENABLED Reservation status: RESERVATION IN PROGRESS on Jun 12 15:36:04 2018 UTC Export-Controlled Functionality: Not Allowed Request code: CP-ZC9300-24U:FCW2125L046-AK9A6sMTr-47
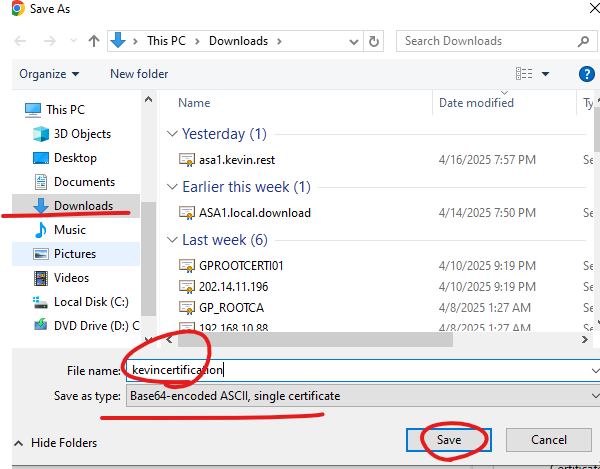
위에처럼 Download as File버튼을 클릭 합니다.
USB에 파일을 저장하고 9200CX 스위치에 연결 합니다.
BG148HN2#dir usbflash0: | in Auth 318 -rwx 1178 Jun 19 2025 18:28:36 +08:00 AuthorizationCode_SN_XXX.txt
BG148HN2#show license reservation Overall status: Active: PID:C9200CX-12T-2X2G,SN:XXXXX Status: SPECIFIC INSTALLED on Jun 19 10:32:32 2025 SGT Last Confirmation code: XXXX
Specified license reservations: C9200CX DNA Essentials - 12 Ports (C9200CX_DNA_E_12): Description: C9200CX Compact 12 Port DNA Essentials License Total reserved count: 1 Enforcement type: NOT ENFORCED Term information: Active: PID:C9200CX-12T-2X2G,SN:XXXXX Authorization type: SPECIFIC INSTALLED on Jun 19 10:32:32 2025 SGT License type: TERM Start Date: 2025-APR-05 UTC End Date: 2028-APR-04 UTC Term Count: 1 C9200CX Network Essentials - 12 Ports (C9200CX_NW_E_12): Description: C9200CX Compact 12 Port Network Essentials License Total reserved count: 1 Enforcement type: NOT ENFORCED Term information: Active: PID:C9200CX-12T-2X2G,SN: XXXXX Authorization type: SPECIFIC INSTALLED on Jun 19 10:32:32 2025 SGT License type: PERPETUAL Term Count: 1
지금까지 [9200CX]-offline smart license install 글을 읽어주셔서 감사합니다.
2. 현재 고객사 비지니스가 너무 중요하기 때문에, Risk를 가지고 것을 원하지 않습니다.
3. 더 좋은 방화벽이 벤더가 있더라고 다른 벤더 방화벽 교체를 원하지 않습니다.
4. FPR은 FTD 차세대 방화벽인데, 차세대 방화벽 기능 사용 하고 싶지 않습니다. 이유는 이미 인터넷 방화벽이 팔로알토이기 때문에, 단순히 Remote Access VPN용으로만 사용하고 유저를 인증하고 싶습니다.
Certificate는 Godaddy에서 인증받고 보안강화를 위해서 2FA Okta SSO를 사용 합니다.
5. 똑같은 ASA 버전을 사용 하고 싶습니다.
6. 똑같은 설정값을 복사 붙여넣기 해서 위험을 최대한 줄이길 원합니다.
ASA vs FTD 차이
Cisco Secure Firewall 3100 시리즈는 **ASA(Adaptive Security Appliance)**와 FTD(Firepower Threat Defense) 소프트웨어를 모두 지원합니다.FPR3105-ASA-K9는 ASA 소프트웨어를 실행하는 모델로, 전통적인 방화벽 기능에 중점을 둡니다.반면, FTD 소프트웨어를 실행하는 모델은 고급 위협 방어 기능과 통합된 보안 관리를 제공합니다.따라서, FPR3105-ASA-K9는 ASA 소프트웨어 기반의 보안 솔루션을 제공합니다.cisco.com+6sec.cloudapps.cisco.com+6compsource.com+6
요약하면, FPR3105-ASA-K9는 Cisco ASA 소프트웨어를 실행하는 장비로, 고성능 방화벽 기능을 제공하며, Cisco Secure Firewall 3100 시리즈의 일부입니다.
항목 ASA 소프트웨어 FTD 소프트웨어
기능 초점
전통적 방화벽, VPN, ACL
차세대 방화벽, IDS/IPS, URL 필터링, AMP
관리
CLI 또는 ASDM (GUI)
FMC(Firepower Management Center) 또는 FDM
변환 가능
–
ASA → FTD는 가능 (단, 포맷 및 재설치 필요)
장비를 구매 할때 아래처럼 FPR3105-ASA-K9으로 구매를 하면 별도로 FTD를 ASA로 변환하지 않아도 됩니다. 이미 ASA버전으로 이미지가 설치 되어서 배달됩니다.
예, FPR3105-ASA-K9는 Cisco의 ASA(Adaptive Security Appliance) 소프트웨어를 실행하는 장비입니다.
FPR3105-ASA-K9 개요
모델명: FPR3105-ASA-K9
제품군: Cisco Secure Firewall 3100 시리즈
운영 체제: Cisco ASA 소프트웨어
형태: 1U 랙 장착형 보안 어플라이언스
주요 사양:
방화벽 처리량: 최대 10 Gbps
동시 연결 수: 최대 150만
VPN 처리량: 최대 5.5 Gbps
포트 구성: 8x1G RJ45, 8x1/10G SFP+
스토리지: 900GB SSD
운영 온도: 0~40°C
소프트웨어: Cisco ASA 소프트웨어
이 모델은 Cisco ASA 소프트웨어를 실행하며, Cisco Secure Firewall 3100 시리즈의 일부로서 고성능 방화벽 기능을 제공합니다.
만약에 FTD버전에 방화벽을 원하시면 아래처럼 구매 합니다.
FPR3105-NGFW-K9는 Cisco Firepower Threat Defense (FTD) 소프트웨어를 실행하는 차세대 방화벽(NGFW) 장비입니다.
회사에서 FPR3105-ASA-K9 개봉해서 콘솔포트에 연결한 사진 입니다.
자세한 부팅 과정은 생략.
아래처럼 자동으로 firepower로그인 되면서 아래처럼 Cisco ASA로 부팅을 시도 합니다.
그리고 아래처럼 cisco asa로 부팅된것을 확인 가능 합니다.
ciscoasa>
firepower-3105 login: admin (automatic login)
Last login: Mon Apr 28 19:29:59 UTC 2025 on ttyS0 Successful login attempts for user 'admin' : 1 System Mode Check: NATIVE mode assigned INFO: System Disk /dev/md0 present. Status: Operable. System Mode Check: NATIVE mode assigned System Mode Check: NATIVE mode assigned kaslr nopti page_poison=1 console=ttyS0,9600n81 boot_cfg= boot_img=disk0:installables/switch/fxos-k8-fp3k-lfbff.2.13.0.198.SPA src=0 rw loglevel=2 auto kstack=128 reboot=force panic=1 iommu=soft security=smack libata.allow_tpm=1 pti=off :installables/switch/fxos-k8-fp3k-lfbff.2.13.0.198.SPA platform=FPR-3105
Waiting for Application infrastructure to be ready... Verifying the signature of the Application image... Creating FXOS swap file ... Please wait for Cisco ASA to come online...1... Please wait for Cisco ASA to come online...2... Please wait for Cisco ASA to come online...3... Please wait for Cisco ASA to come online...4... Please wait for Cisco ASA to come online...5... Please wait for Cisco ASA to come online...6... Please wait for Cisco ASA to come online...7... Please wait for Cisco ASA to come online...8...
Cisco ASA: CMD=-bootup, CSP-ID=cisco-asa.9.19.1__asa_001_ FLAG='fromHconfFile' Cisco ASA booting up ... ASA start done pre ASA Clear status Memory allocated to application in kbytes: 54812672 CPU cores allocated to application: 4,16,5,17,6,18,7,19,8,20,9,21,10,22,11,23 Deleting previous CGroup Configuration ... Cisco ASA started successfully. lina_init_env: memif is not enabled. System Cores 24 Nodes 1 Max Cores 128 IO Memory Nodes: 1 IO Memory Per Node: 2147483648 bytes num_pages = 524288 page_size = 4096
Global Reserve Memory Per Node: 2147483648 bytes Nodes=1
LCMB: got DMA 2147483648 bytes on numa-id=0, phys=0x0000000200000000, virt=0x00007fc500000000 LCMB: HEAP-CACHE POOL got 2147483648 bytes on numa-id=0, virt=0x00007fc440000000
total_reserved_mem = 2147483648
total_heapcache_mem = 2147483648 ERROR: fail to open /var/run/lina/meminfo_new ERROR: fail to open /var/run/lina/meminfo_old total mem 54608998400 system 67282931712 kernel 134217728 image 113332648 new 54608998400 old 2260816296 reserve 4294967296 priv new 50448248832 priv old 0 Processor memory: 54608998400 M_MMAP_THRESHOLD 65536, M_MMAP_MAX 833267 POST started... POST finished, result is 0 (hint: 1 means it failed)
Cisco Adaptive Security Appliance Software Version 9.19(1)
Compiled on Mon 28-Nov-22 16:15 GMT by builders FPR-3105 platformNic assigned 0
Total NICs found: 5 cpss_poll_devmain success!! en_vtun rev00 Backplane Ext-Mgmt Interface @ index 03 MAC: 9ca9.b88c.7a82 en_vtun rev00 Backplane Tap Interface @ index 04 MAC: 0000.0100.0001 livecore intialized Counter ID 'TLS13_DOWNSTREAM_CLIENT_CERTIFICATE_VERIFY' is too long must be 40 characters or less WARNING: Attribute already exists in the dictionary. ILK enabled for instance 0 with lane mask 0xF speed 6250 MHz Init ILK - NPS_CORE_GBL_VFCFG 0X00000000 Configure the GSER registers ILK configured on QLM 0 with ref_clk 156250000 Hz, baud 6250 MHz, instance 0 QLM0: Lane 0: TX_SWING=16, TX_PRE=0, TX_POST=4, TX_GAIN=-1, TX_VBOOST=-1 QLM0: Lane 1: TX_SWING=16, TX_PRE=0, TX_POST=4, TX_GAIN=-1, TX_VBOOST=-1 QLM0: Lane 2: TX_SWING=16, TX_PRE=0, TX_POST=4, TX_GAIN=-1, TX_VBOOST=-1 QLM0: Lane 3: TX_SWING=16, TX_PRE=0, TX_POST=4, TX_GAIN=-1, TX_VBOOST=-1 ILK configured on QLM 1 with ref_clk 156250000 Hz, baud 6250 MHz, instance 0 Clear TX/TX calendars Configure the SERDES for all possible lanes Configure TX / RX Calendars Enable per lane RX error counts Bring up the TX side Configure the RX lanes RX equalization for speeds > 5G QLM0: Lane 0 RX equalization complete QLM0: Lane 1 RX equalization complete QLM0: Lane 2 RX equalization complete QLM0: Lane 3 RX equalization complete Bring up RX link ILK0: Lane alignment complete
Cisco Adaptive Security Appliance Software Version 9.19(1)
****************************** Warning ******************************* This product contains cryptographic features and is subject to United States and local country laws governing, import, export, transfer, and use. Delivery of Cisco cryptographic products does not imply third-party authority to import, export, distribute, or use encryption. Importers, exporters, distributors and users are responsible for compliance with U.S. and local country laws. By using this product you agree to comply with applicable laws and regulations. If you are unable to comply with U.S. and local laws, return the enclosed items immediately.
If you require further assistance please contact us by sending email to export@cisco.com. ******************************* Warning ******************************* Cisco Adaptive Security Appliance Software, version 9.19 Copyright (c) 1996-2022 by Cisco Systems, Inc. For licenses and notices for open source software used in this product, please visit http://www.cisco.com/go/asa-opensource
Restricted Rights Legend Use, duplication, or disclosure by the Government is subject to restrictions as set forth in subparagraph (c) of the Commercial Computer Software - Restricted Rights clause at FAR sec. 52.227-19 and subparagraph (c) (1) (ii) of the Rights in Technical Data and Computer Software clause at DFARS sec. 252.227-7013.
Cisco Systems, Inc. 170 West Tasman Drive San Jose, California 95134-1706
Reading from flash... !!!..... flow-offload is already disabled. *** Output from config line 325, "no flow-offload enable"
Cryptochecksum (changed): 2b4c5c7d 2dd6fdf2 b97fe682 272a0f04 INFO: File /mnt/disk0/.private/dynamic-config.json not opened; errno 2 INFO: Network Service reload not performed.
INFO: Power-On Self-Test in process. ........................ INFO: Power-On Self-Test complete.
INFO: Starting HW-DRBG health test... INFO: HW-DRBG health test passed.
INFO: Starting SW-DRBG health test... INFO: SW-DRBG health test passed. User enable_1 logged in to ciscoasa Logins over the last 1 days: 1. Failed logins since the last login: 0. Type help o' for a list of available commands. ciscoasa> Attaching to ASA CLI ... Press 'Ctrl+a then d' to detach. Type help or '?' for a list of available commands.
지금까지 [FTD#6]-FPR FTD ASA Version Order - FPR3105-ASA-K9 글을 읽어주셔서 감사합니다.
필요하시면 특정 장비 모델에 대한 전환 절차(예: FPR 2110, FPR 4100 등)도 제공드릴 수 있어요. 장비 모델 알려주시면 그에 맞는 절차를 안내드릴게요.
나의 말:
FPR3105
ChatGPT의 말:
Cisco Firepower 3100 시리즈(FPR3105)는 **FTD(Firepower Threat Defense)**와 ASA(Adaptive Security Appliance) 소프트웨어를 모두 지원하는 멀티모드 플랫폼입니다.따라서 FTD에서 ASA로의 전환은 비교적 간단하며, 다음 절차를 따르면 됩니다.Cisco
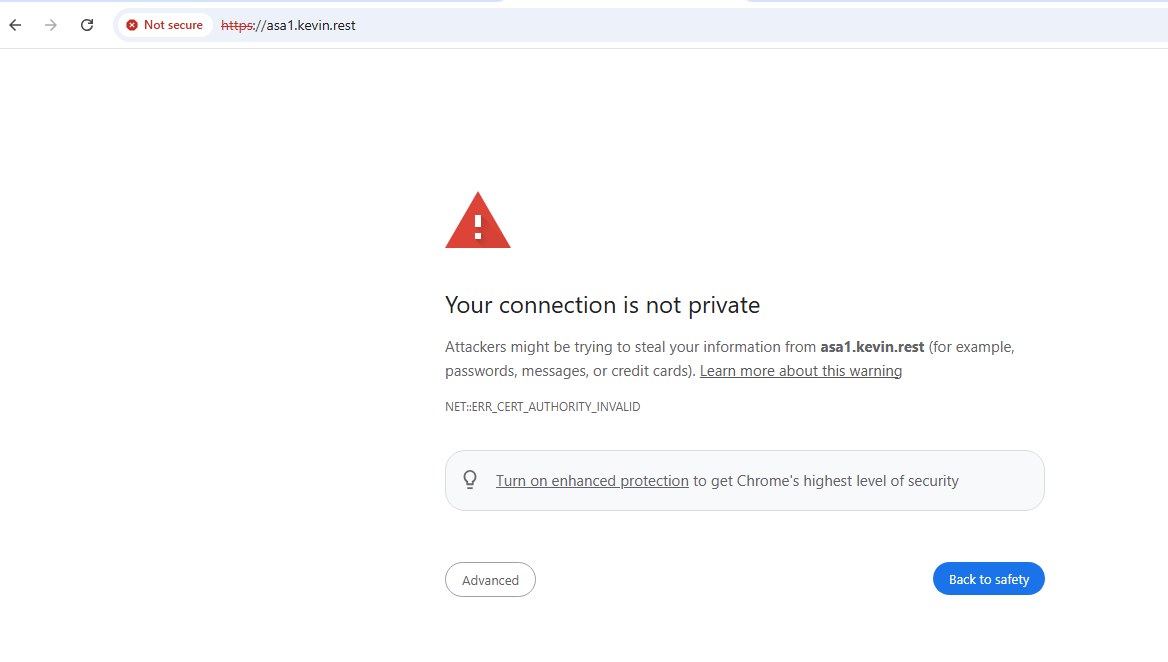
2. 인증 가능한 공인 기관에 SSL Certificate를 구매하고 도메인에 연결 합니다.
이미 인증된 기간에서 SSL Certificate를 구매했기 때문에 더 이상 경고 메시지가 발생 하지 않습니다.
이번에는 2번째 방법에 대해서 알아보겠습니다.
1. cisco ASA에서 key를 생성 합니다.
asa(config)# crypto key generate rsa label vpn modulus 2048 INFO: The name for the keys will be: vpn Keypair generation process begin. Please wait... asa(config)#
asa(config)# crypto ca trustpoint asa_sp_saml asa(config-ca-trustpoint)# enrollment terminal asa(config-ca-trustpoint)# keypair vpn asa(config-ca-trustpoint)# crl configure asa(config-ca-crl)# crypto ca enroll asa_sp_saml
% Start certificate enrollment .. % The subject name in the certificate will be: CN=asa.XXXX.today % The fully-qualified domain name in the certificate will be: asa.XXX.today % Include the device serial number in the subject name? [yes/no]: no Display Certificate Request to terminal? [yes/no]: yes Certificate Request follows: -----BEGIN CERTIFICATE REQUEST----- MIICtjCCAZ4CAQAwNjEWMBQGA1UEAxMNYXNhLmthcC50b2RheTEcMBoGCSqGSIb3 DQEJAhYNYXNhLmthcC50b2RheTCCASIwDQYJKoZIhvcNAQEBBQADggEPADCCAQoC ggEBAIoZaFJPVEKrS5YpTZLDiw2tFnI1OQUnK12BFcOpySz7wLXohmzpqj/pG/DK 1eXugF9GbPU4L8cvNfQOf9qTSie3g6Boghb5cFsrc1nDBwXU+LuMgs7wPpC56JyA Lerq8Pxi1Pe0MU5uwmnWY3ENsauxWXDZHEizsME9gbM7pQjfVpeFz2IUZLe+pznF B1f+XcXGzK/QgarBZ+WkAZztlma5teCjpiKWZ+1nvp9kR35usx+LTyEpx1+UWnF4 AQEFBQADggEBAFRgqpYb10CPCfqNYp0rELW6tiCJMB0NeVwUKmVDgZGm7v7s3Hwh e3UO+rpcQdqDe8fLQUhD+kgVVPPXxPabD/T2DA9rxdDY+L05+HHjKLR1PqIMT/fS wdtt70HHuwSYp3g5Su9DGudPOBJ+cHj8767D8P6a1aLLd5yphIw3UPHx+g9yc176 9waHB1NJlrEavYRKceVVkM2HVN4HtbwlifUnzDT6F+R4UEqd+lp89qgseYhCkZvS Fnk4fMwS9KCcKTbziKmLGpqc6XZWX5bioObJBERcHcMZdd9+6nl6dev9PTRE80wE fkZkaj+K1EfExyUNP2/ZKKYW+XCsCGrikOU= -----END CERTIFICATE REQUEST-----
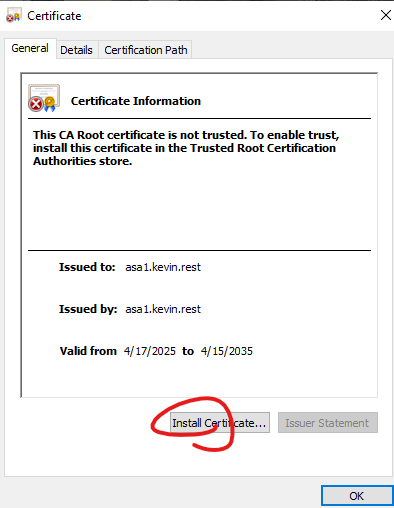
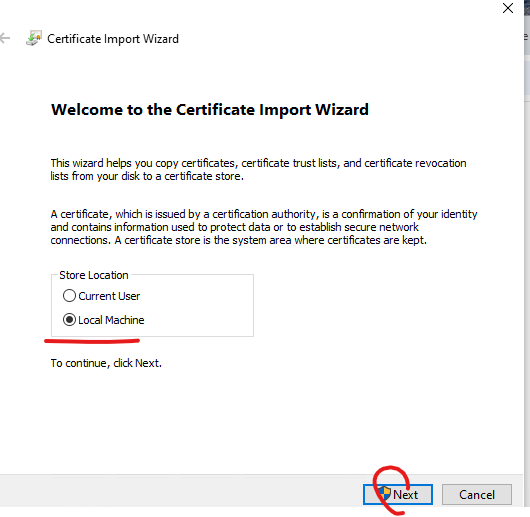
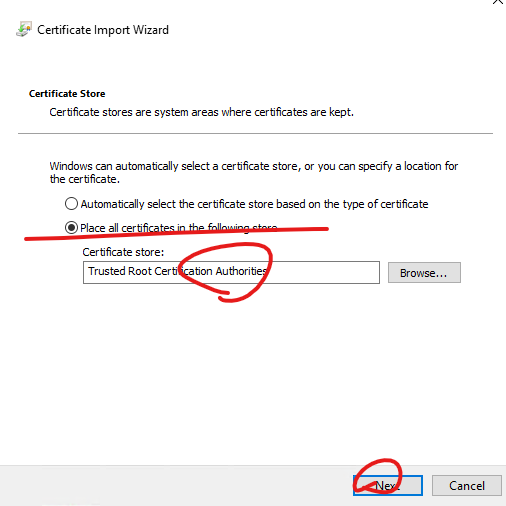
오늘은 Cisco ASA Remote Access VPN에서 사용할 인증서 Self Signed Certificate를 생성하고 이 인증서는 Remote Access VPN용으로 사용해 보겠습니다.
1. 시간을 설정합니다.
conf t clock set 13:48:00 17 Apr 2025
or
ntp server 64.235.61.113
2. Hostname이랑 Domain-name를 설정합니다.
conf t hostname asa1 domain-name kevin.rest
3. key 생성 - key name: VPN-RSA-KEY
asa1(config)# crypto key generate rsa label VPN-RSA-KEY modulus 1024 INFO: The name for the keys will be: VPN-RSA-KEY Keypair generation process begin. Please wait... asa1(config)#
asa1(config)# show crypto key mypubkey rsa | begin VPN-RSA-KEY Key name: VPN-RSA-KEY Usage: General Purpose Key Modulus Size (bits): 1024 Storage: config Key Data:
오늘은 Cisco ASA에서 NTP Server 설정과 NTP Zone를 설정해 보겠습니다.
1. 싱가폴 NTP Server List 확인
google 에서 Singapore NTP server 검색
server 0.sg.pool.ntp.org server 1.sg.pool.ntp.org server 2.sg.pool.ntp.org server 3.sg.pool.ntp.org
IP주소 확인
C:\Users\admin>ping 0.sg.pool.ntp.org
Pinging 0.sg.pool.ntp.org [173.234.15.82] with 32 bytes of data: Reply from 173.234.15.82: bytes=32 time=40ms TTL=55 Reply from 173.234.15.82: bytes=32 time=38ms TTL=55 Reply from 173.234.15.82: bytes=32 time=39ms TTL=55 Reply from 173.234.15.82: bytes=32 time=40ms TTL=55
Ping statistics for 173.234.15.82: Packets: Sent = 4, Received = 4, Lost = 0 (0% loss), Approximate round trip times in milli-seconds: Minimum = 38ms, Maximum = 40ms, Average = 39ms
Router#license smart trust idtoken OGJjMmQwZDgtMWY3Zi00ZTdlLTk1YzctYjRjMzQ0Y all force
Router# *Mar 4 04:56:30.279: %CRYPTO_ENGINE-5-KEY_DELETED: A key named SLA-KeyPair has been removed from key storage[OK] *Mar 4 04:56:32.118: %CRYPTO_ENGINE-5-KEY_ADDITION: A key named SLA-KeyPair has been generated or imported by crypto-engine *Mar 4 04:56:32.177: %PKI-6-CONFIGAUTOSAVE: Running configuration saved to NVRAM *Mar 4 04:56:34.590: %SYS-6-PRIVCFG_ENCRYPT_SUCCESS: Successfully encrypted private config file *Mar 4 04:56:37.118: %SMART_LIC-6-TRUST_INSTALL_SUCCESS: A new licensing trust code was successfully installed on P:C8200-1N-4T,S:XXXXXX. Router# Router# Router# Router#
WLC01#show ip int brie Interface IP-Address OK? Method Status Protocol GigabitEthernet1 unassigned YES unset up up GigabitEthernet2 unassigned YES unset up up GigabitEthernet3 192.168.10.182 YES NVRAM up up Loopback10 1.1.1.1 YES TFTP up up Port-channel1 unassigned YES unset up up Vlan1 unassigned YES NVRAM up up Vlan100 192.168.100.182 YES NVRAM up up Vlan110 192.168.110.254 YES NVRAM up up Vlan120 192.168.120.254 YES NVRAM up up Vlan130 192.168.130.254 YES NVRAM up up WLC01#
10. Client 에서 TEST01를 접속하고 IP주소를 확 합니다.
11. WLC에서 DHCP Binding 확인
WLC01#show ip dhcp binding Bindings from all pools not associated with VRF: IP address Client-ID/ Lease expiration Type State Interface Hardware address/ User name 192.168.110.11 0056.6c31.3130 Mar 01 2025 12:48 PM Automatic Selecting Vlan110 WLC01#
지금까지 [C9800CL][#14]- DHCP - WLC Internal DHCP - option 5 글을 읽어주셔서 감사합니다.
Security -> Layter2 -> None를 설정해서 SSID 패스워드 없이 접속 가능 하게 합니다.
테스트 용도이기 때문에 이렇게 설정합니다.
그리고 Save버튼을 클릭 합니다.
4. VLAN 설정
Configuration -> Layer2 -> VLAN
Add버튼을 클릭 합니다.
4. Policy 설정
아래처럼 설정합니다.
아래처럼 VLAN를 설정하고 나머지를 디폴트 값으로 두고 SAVE버튼을 클릭 합니다.
5. TAG설정 - POLICY
Name: TEST01-POLICY-TAG
WLAN: TEST01
PLOICY: TEST01_POLICY
6. TAG 설정 - SITE
Name: TEST_SITE_TAG
아래처럼 설정 합니다.
6. AP에 TAG 설정
7. 설정값을 적용하면 AP가 재부팅이 됩니다.
8. DC SWITCH에서 DHCP 설정
DHCP ip dhcp excluded-address 192.168.110.1 192.168.110.230 ! ip dhcp pool VL110 network 192.168.110.0 255.255.255.0 default-router 192.168.110.1 dns-server 8.8.8.8 ! VLAN 110 ! Int vlan 110 ip add 192.168.110.1 255.255.255.0 no shutdown
9. DHCP Binding 확인
SW01#show ip dhcp binding Bindings from all pools not associated with VRF: IP address Client-ID/ Lease expiration Type State Interface Hardware address/ User name SW01#
10. Client 에서 TEST01를 접속하고 IP주소를 확 합니다.
11. DC BackBone Swtich에서 DHCP Binding 확인
SW01#show ip dhcp binding Bindings from all pools not associated with VRF: IP address Client-ID/ Lease expiration Type State Interface Hardware address/ User name 192.168.110.239 011e.e792.411c.f0 Mar 02 2025 06:56 AM Automatic Active Vlan110 SW01#
SW01#ping 192.168.110.239 Type escape sequence to abort. Sending 5, 100-byte ICMP Echos to 192.168.110.239, timeout is 2 seconds: !!!!! Success rate is 100 percent (5/5), round-trip min/avg/max = 12/19/48 ms SW01#
지금까지 [C9800CL][#10]- DHCP Bridging - Option1 - BackBone SW DHCP 글을 읽어주셔서 감사합니다.
오늘은 C8200라우터는 smart licensing using policy 모드를 사용 합니다.
IOS XE버전별로 License 동작하는 방식이 다릅니다.
IOS XE Release
Platform Requirements
CUBE Licensing
16.6.1 to 16.9.x
Smart Licensing mode is optional
RTU licensing only
16.10.x
Smart Licensing mode only
RTU licensing only
16.11.1a to 17.1.x
Smart Licensing mode only
Continued registration is required to enable CUBE features
Smart Licensing only*
Trunk license requests are set by manual configuration
No license policing if out of compliance
SIP processing disabled in the 'Eval-Expired' state
17.2.1r to 17.3.1a
Smart Licensing mode only
Continued registration is required in order to enable CUBE features
Smart Licensing only*
Trunk license requests are set dynamically by usage
No license policing if out of compliance
SIP processing disabled in the 'Eval-Expired' state
17.3.2 onwards
Smart Licensing with the use of Policy mode only
License use must be reported within the account policy to enable CUBE features
Smart Licensing only*
Trunk license use is measured periodically and reported as per the Smart Account policy
In accordance with policy, license policing reports are not acknowledged (SIP processing is disabled otherwise)
Step Summary
conf t
license boot level network-essentials
interface GigabitEthernet 0/0/0
ip add [IP address] [subnet] or ip add dhcp
no shutdown
exit
ip name-server 8.8.8.8
ip domain lookup source-interface GigabitEthernet 0/0/0
ip http client source-interface GigabitEthernet 0/0/0
license smart transport smart
license smart url default
ip route 0.0.0.0 0.0.0.0 [nexthop] if dhcp no need ip route command
end
show run
show ip int brie
show ip route
확인 후 저장 그리고 재부팅
write memory
reload
1. show version를 통해서 IOS XE버전을 확인 합니다.
2. 기본 설정을 합니다.
conf t license boot level network-essentials interface GigabitEthernet 0/0/0 ip add dhcp no shutdown exit ip name-server 8.8.8.8 ip domain lookup source-interface GigabitEthernet0/0/0 ip http client source-interface GigabitEthernet0/0/0 license smart transport smart license smart url default
3. 인터페이스 상태 확인 라우팅 상태 확인
그리고 외부 통신 확인
Router#show ip int brie Interface IP-Address OK? Method Status Protocol GigabitEthernet0/0/0 172.20.10.3 YES DHCP up up GigabitEthernet0/0/1 unassigned YES unset administratively down down GigabitEthernet0/0/2 unassigned YES unset administratively down down GigabitEthernet0/0/3 unassigned YES unset administratively down down
Router#show ip route Codes: L - local, C - connected, S - static, R - RIP, M - mobile, B - BGP D - EIGRP, EX - EIGRP external, O - OSPF, IA - OSPF inter area N1 - OSPF NSSA external type 1, N2 - OSPF NSSA external type 2 E1 - OSPF external type 1, E2 - OSPF external type 2, m - OMP n - NAT, Ni - NAT inside, No - NAT outside, Nd - NAT DIA i - IS-IS, su - IS-IS summary, L1 - IS-IS level-1, L2 - IS-IS level-2 ia - IS-IS inter area, * - candidate default, U - per-user static route H - NHRP, G - NHRP registered, g - NHRP registration summary o - ODR, P - periodic downloaded static route, l - LISP a - application route + - replicated route, % - next hop override, p - overrides from PfR & - replicated local route overrides by connected
Gateway of last resort is 172.20.10.1 to network 0.0.0.0
S* 0.0.0.0/0 [254/0] via 172.20.10.1 172.20.0.0/16 is variably subnetted, 2 subnets, 2 masks C 172.20.10.0/28 is directly connected, GigabitEthernet0/0/0 L 172.20.10.3/32 is directly connected, GigabitEthernet0/0/0 Router#ping 8.8.8.8 Type escape sequence to abort. Sending 5, 100-byte ICMP Echos to 8.8.8.8, timeout is 2 seconds: !!!!!
license smart trust idtoken ODVkNDkyYmUtNzc4MS00OWZiLWEzMzMtZTY2YmZhYTQxNjA5LTE3NDEzMzc2%0AMDYzNzN8L0pjaVh0K09pT3J1XXXXXXXXXXXXXXXXXXXXXXXXXXXXXXXXXXXXXXXXXXX all force
Router# *Feb 13 01:38:52.352: %CRYPTO_ENGINE-5-KEY_ADDITION: A key named SLA-KeyPair has been generated or imported by crypto-engine *Feb 13 01:38:52.414: %PKI-6-CONFIGAUTOSAVE: Running configuration saved to NVRAM[OK] *Feb 13 01:38:55.470: %SYS-6-PRIVCFG_ENCRYPT_SUCCESS: Successfully encrypted private config file *Feb 13 01:38:55.493: %CRYPTO_SL_TP_LEVELS-6-VAR_NEW_VALUE: Setting crypto bidir throughput to: 10000 kbps *Feb 13 01:38:58.298: %SMART_LIC-6-TRUST_INSTALL_SUCCESS: A new licensing trust code was successfully installed on P:C8200L-1N-4T,XXXXXXXXXXX Router#
정상적으로 등록 되면 위에처럼 표시 됩니다.
6. License를 확인 합니다.
아래처럼 SA/VA에 고객사 정보가 확인 되면 정상적으로 등록 된것입니다.
Router#show license summary Account Information: Smart Account: 고객사 정보 확인 가능 Virtual Account: XXXXX
License Usage: License Entitlement Tag Count Status ----------------------------------------------------------------------------- network-essentials_10M (ESR_P_10M_E) 1 IN USE Router US Export Lic... (DNA_HSEC) 0 NOT IN USE
또는 아래 명령어도 주로 사용 됩니다.
Router#show license status Utility: Status: DISABLED
Smart Licensing Using Policy: Status: ENABLED
Account Information: Smart Account: 고객사 정보 Virtual Account: XXXXX
Data Privacy: Sending Hostname: yes Callhome hostname privacy: DISABLED Smart Licensing hostname privacy: DISABLED Version privacy: DISABLED
Policy: Policy in use: Merged from multiple sources. Reporting ACK required: yes (CISCO default) Unenforced/Non-Export Perpetual Attributes: First report requirement (days): 365 (CISCO default) Reporting frequency (days): 0 (CISCO default) Report on change (days): 90 (CISCO default) Unenforced/Non-Export Subscription Attributes: First report requirement (days): 90 (CISCO default) Reporting frequency (days): 90 (CISCO default) Report on change (days): 90 (CISCO default) Enforced (Perpetual/Subscription) License Attributes: First report requirement (days): 0 (CISCO default) Reporting frequency (days): 0 (CISCO default) Report on change (days): 0 (CISCO default) Export (Perpetual/Subscription) License Attributes: First report requirement (days): 0 (CISCO default) Reporting frequency (days): 0 (CISCO default) Report on change (days): 0 (CISCO default)
Miscellaneous: Custom Id: <empty>
Usage Reporting: Last ACK received: <none> Next ACK deadline: Feb 13 01:31:19 2026 UTC Reporting push interval: 0 (no reporting) Next ACK push check: Feb 13 02:09:10 2025 UTC Next report push: <none> Last report push: Feb 13 01:39:08 2025 UTC Last report file write: <none>
Trust Code Installed: Feb 13 01:38:58 2025 UTC
Router#
지금까지 [2025][C8200][#2] Register License to CSSM - smart licensing using policy 글을 읽어주셔서 감사합니다.
Router#show version Cisco IOS XE Software, Version 17.06.06a Cisco IOS Software [Bengaluru], c8000be Software (X86_64_LINUX_IOSD-UNIVERSALK9-M), Version 17.6.6a, RELEASE SOFTWARE (fc3) Technical Support: http://www.cisco.com/techsupport Copyright (c) 1986-2023 by Cisco Systems, Inc. Compiled Fri 20-Oct-23 18:26 by mcpre
2. cisco 홈페이지에서 현재 시점에서 8200 router ios xe 추천 버전을 확인 합니다.
3. 파일을 다운로드 받고 파일을 USB에 복사합니다.
4. MD5 Checksum를 확인 합니다. 추후에 파일을 라우터에 복사하고 MD5 Checksum를 이용해서 파일이 잘 복사 되었는지 확인합니다. 만약에 파일이 깨진 상태에서 Upgrdae 업그레이드 하면 Upgrade가 Failed하고 Rommon mode로 빠질수 있습니다. 꼭 업그레이드 또는 다운그레이드 전에 파일 복사 후 MD5 체크섬을 확인 합니다.
C8200 라우터 Firmware Install 방식은 2가지가 있습니다.
1. ios xe file를 파일로 복사하고 boot config를 통해서 부팅 시키는 방법
2. install mode로 펌웨어를 설치하는 방법
현재 라우터 install mode인지 레거시 모드인지 확인하는 방법
아래처럼 표시 되면 install mode입니다.
Router#show install summary [ R0 ] Installed Package(s) Information: State (St): I - Inactive, U - Activated & Uncommitted, C - Activated & Committed, D - Deactivated & Uncommitted -------------------------------------------------------------------------------- Type St Filename/Version -------------------------------------------------------------------------------- IMG C 17.06.06a.0.6
-------------------------------------------------------------------------------- Auto abort timer: inactive --------------------------------------------------------------------------------
Router#
또는 Bin 파일이 없고, Package 파일만 보이면 install mode입니다.
Router#dir flash: Directory of bootflash:/
429089 drwx 57344 Feb 10 2025 05:32:00 +00:00 tracelogs 267169 drwx 4096 Feb 10 2025 05:19:36 +00:00 pnp-tech 11 -rw- 248 Feb 10 2025 05:19:29 +00:00 .iox_dir_list 412897 drwx 4096 Feb 10 2025 05:19:23 +00:00 license_evlog 24295 -rw- 30 Feb 10 2025 05:18:46 +00:00 throughput_monitor_params 24292 -rw- 134899 Feb 10 2025 05:18:40 +00:00 memleak.tcl 24290 -rw- 1092 Feb 10 2025 05:18:09 +00:00 mode_event_log 89057 drwx 4096 Feb 10 2025 05:17:48 +00:00 .installer 12 drwx 4096 Feb 10 2025 04:29:43 +00:00 lost+found 226689 drwx 4096 Aug 26 2024 16:49:41 +00:00 .prst_sync 275265 drwx 4096 Aug 26 2024 16:42:04 +00:00 .dbpersist 437185 drwx 4096 Aug 26 2024 16:33:30 +00:00 sysboot 420993 drwx 4096 Aug 26 2024 16:31:49 +00:00 .rollback_timer 291458 -rw- 9338 Aug 26 2024 16:28:08 +00:00 packages.conf 291478 -rw- 43301928 Aug 26 2024 16:28:08 +00:00 c8000be-rpboot.17.06.06a.SPA.pkg 291477 -rw- 623141956 Aug 26 2024 16:27:18 +00:00 c8000be-mono-universalk9.17.06.06a.SPA.pkg 291476 -rw- 156728 Aug 26 2024 16:27:07 +00:00 c8000be-firmware_sm_nim_adpt.17.06.06a.SPA.pkg 291475 -rw- 2094136 Aug 26 2024 16:27:07 +00:00 c8000be-firmware_sm_dsp_sp2700.17.06.06a.SPA.pkg 291474 -rw- 14259252 Aug 26 2024 16:27:07 +00:00 c8000be-firmware_sm_async.17.06.06a.SPA.pkg 291473 -rw- 11093044 Aug 26 2024 16:27:07 +00:00 c8000be-firmware_sm_1t3e3.17.06.06a.SPA.pkg 291472 -rw- 2475056 Aug 26 2024 16:27:07 +00:00 c8000be-firmware_sm_10g.17.06.06a.SPA.pkg 291471 -rw- 10253360 Aug 26 2024 16:27:07 +00:00 c8000be-firmware_prince.17.06.06a.SPA.pkg 291470 -rw- 5571636 Aug 26 2024 16:27:07 +00:00 c8000be-firmware_nim_xdsl.17.06.06a.SPA.pkg 291469 -rw- 5334068 Aug 26 2024 16:27:06 +00:00 c8000be-firmware_nim_ssd.17.06.06a.SPA.pkg 291468 -rw- 11523124 Aug 26 2024 16:27:06 +00:00 c8000be-firmware_nim_shdsl.17.06.06a.SPA.pkg 291467 -rw- 2966576 Aug 26 2024 16:27:06 +00:00 c8000be-firmware_nim_ge.17.06.06a.SPA.pkg 291466 -rw- 17646644 Aug 26 2024 16:27:06 +00:00 c8000be-firmware_nim_cwan.17.06.06a.SPA.pkg 291465 -rw- 4793400 Aug 26 2024 16:27:06 +00:00 c8000be-firmware_nim_bri_st_fw.17.06.06a.SPA.pkg 291464 -rw- 12870708 Aug 26 2024 16:27:06 +00:00 c8000be-firmware_nim_async.17.06.06a.SPA.pkg 291463 -rw- 11310132 Aug 26 2024 16:27:05 +00:00 c8000be-firmware_ngwic_t1e1.17.06.06a.SPA.pkg 291462 -rw- 18342964 Aug 26 2024 16:27:05 +00:00 c8000be-firmware_dsp_tilegx.17.06.06a.SPA.pkg 291461 -rw- 1963060 Aug 26 2024 16:27:05 +00:00 c8000be-firmware_dsp_sp2700.17.06.06a.SPA.pkg 291460 -rw- 6681656 Aug 26 2024 16:27:05 +00:00 c8000be-firmware_dsp_analogbri.17.06.06a.SPA.pkg 291459 -rw- 54324 Aug 26 2024 16:27:05 +00:00 c8000be-firmware_dreamliner.17.06.06a.SPA.pkg 186209 drwx 4096 Aug 26 2024 16:20:23 +00:00 iox_host_data_share 364321 drwx 4096 Aug 26 2024 16:20:17 +00:00 core 210497 drwx 4096 Aug 26 2024 16:20:02 +00:00 guest-share 170017 drwx 4096 Aug 26 2024 16:19:55 +00:00 onep 129537 drwx 4096 Aug 26 2024 16:19:54 +00:00 pnp-info 121441 drwx 4096 Aug 26 2024 16:19:23 +00:00 virtual-instance 24294 -rw- 1923 Aug 26 2024 16:19:18 +00:00 trustidrootx3_ca_092024.ca 24293 -rw- 20109 Aug 26 2024 16:19:18 +00:00 ios_core.p7b 340033 drwx 4096 Aug 26 2024 16:19:03 +00:00 ss_disc 24291 -rw- 5242880 Aug 26 2024 16:19:03 +00:00 ssd 307649 drwx 4096 Aug 26 2024 16:18:49 +00:00 .ssh
7361155072 bytes total (6161752064 bytes free) Router#
System configuration has been modified. Press Yes(y) to save the configuration and proceed. Press No(n) for proceeding without saving the configuration. Press Quit(q) to exit, you may save configuration and re-enter the command. [y/n/q] y Building configuration... [OK]Modified configuration has been saved
*Feb 10 06:15:04.641: %SYS-6-PRIVCFG_ENCRYPT_SUCCESS: Successfully encrypted private config file *Feb 10 06:15:05.160: %INSTALL-5-INSTALL_START_INFO: R0/0: install_engine: Started install one-shot bootflash:c8000be-universalk9.17.09.05e.SPA.bininstall_add_activate_commit: Adding PACKAGE install_add_activate_commit: Checking whether new add is allowed ....
--- Starting Add --- Performing Add on Active/Standby [1] Add package(s) on R0 [1] Finished Add on R0 Checking status of Add on [R0] Add: Passed on [R0] Finished Add
This operation may require a reload of the system. Do you want to proceed? [y/n] y --- Starting Activate --- Performing Activate on Active/Standby
재부팅이 완료 될때까지 기다립니다.
5. Version 확인
Router# show install summary [ R0 ] Installed Package(s) Information: State (St): I - Inactive, U - Activated & Uncommitted, C - Activated & Committed, D - Deactivated & Uncommitted -------------------------------------------------------------------------------- Type St Filename/Version -------------------------------------------------------------------------------- IMG C 17.09.05e.0.80
-------------------------------------------------------------------------------- Auto abort timer: inactive --------------------------------------------------------------------------------
Router#
6. 기존에 Package가 Flash:에 존재 합니다. 필요없는 파일은 삭제합니다.
Router#dir flash: Directory of bootflash:/
89057 drwx 4096 Feb 10 2025 06:29:40 +00:00 .installer 412897 drwx 4096 Feb 10 2025 06:28:09 +00:00 license_evlog 24295 -rw- 30 Feb 10 2025 06:28:09 +00:00 throughput_monitor_params 24292 -rw- 137940 Feb 10 2025 06:28:05 +00:00 memleak.tcl 226689 drwx 4096 Feb 10 2025 06:27:59 +00:00 .prst_sync 24289 -rw- 1939 Feb 10 2025 06:27:50 +00:00 trustidrootx3_ca_062035.ca 24290 -rwx 1274 Feb 10 2025 06:27:45 +00:00 mode_event_log 429089 drwx 57344 Feb 10 2025 06:27:42 +00:00 tracelogs 64769 drwx 4096 Feb 10 2025 06:27:04 +00:00 SHARED-IOX 420993 drwx 4096 Feb 10 2025 06:25:25 +00:00 .rollback_timer 16 -rw- 9330 Feb 10 2025 06:24:28 +00:00 packages.conf 404802 -rw- 9330 Feb 10 2025 06:18:05 +00:00 c8000be-universalk9.17.09.05e.SPA.conf 226691 -rw- 38283450 Feb 10 2025 06:18:05 +00:00 c8000be-rpboot.17.09.05e.SPA.pkg 404821 -rw- 679469056 Feb 10 2025 06:17:20 +00:00 c8000be-mono-universalk9.17.09.05e.SPA.pkg 404820 -rw- 167936 Feb 10 2025 06:17:08 +00:00 c8000be-firmware_sm_nim_adpt.17.09.05e.SPA.pkg 404819 -rw- 2138112 Feb 10 2025 06:17:08 +00:00 c8000be-firmware_sm_dsp_sp2700.17.09.05e.SPA.pkg 404818 -rw- 14557184 Feb 10 2025 06:17:08 +00:00 c8000be-firmware_sm_async.17.09.05e.SPA.pkg 404817 -rw- 11366400 Feb 10 2025 06:17:07 +00:00 c8000be-firmware_sm_1t3e3.17.09.05e.SPA.pkg 404816 -rw- 2535424 Feb 10 2025 06:17:07 +00:00 c8000be-firmware_sm_10g.17.09.05e.SPA.pkg 404815 -rw- 10432512 Feb 10 2025 06:17:07 +00:00 c8000be-firmware_prince.17.09.05e.SPA.pkg 404814 -rw- 5677056 Feb 10 2025 06:17:07 +00:00 c8000be-firmware_nim_xdsl.17.09.05e.SPA.pkg 404813 -rw- 5431296 Feb 10 2025 06:17:07 +00:00 c8000be-firmware_nim_ssd.17.09.05e.SPA.pkg 404812 -rw- 11714560 Feb 10 2025 06:17:07 +00:00 c8000be-firmware_nim_shdsl.17.09.05e.SPA.pkg 404811 -rw- 2994176 Feb 10 2025 06:17:06 +00:00 c8000be-firmware_nim_ge.17.09.05e.SPA.pkg 404810 -rw- 17960960 Feb 10 2025 06:17:06 +00:00 c8000be-firmware_nim_cwan.17.09.05e.SPA.pkg 404809 -rw- 4894720 Feb 10 2025 06:17:06 +00:00 c8000be-firmware_nim_bri_st_fw.17.09.05e.SPA.pkg 404808 -rw- 13139968 Feb 10 2025 06:17:06 +00:00 c8000be-firmware_nim_async.17.09.05e.SPA.pkg 404807 -rw- 11497472 Feb 10 2025 06:17:05 +00:00 c8000be-firmware_ngwic_t1e1.17.09.05e.SPA.pkg 404806 -rw- 18649088 Feb 10 2025 06:17:05 +00:00 c8000be-firmware_dsp_tilegx.17.09.05e.SPA.pkg 404805 -rw- 2007040 Feb 10 2025 06:17:04 +00:00 c8000be-firmware_dsp_sp2700.17.09.05e.SPA.pkg 404804 -rw- 6799360 Feb 10 2025 06:17:04 +00:00 c8000be-firmware_dsp_analogbri.17.09.05e.SPA.pkg 404803 -rw- 65536 Feb 10 2025 06:17:04 +00:00 c8000be-firmware_dreamliner.17.09.05e.SPA.pkg 13 -rw- 859360566 Feb 10 2025 06:06:59 +00:00 c8000be-universalk9.17.09.05e.SPA.bin 267169 drwx 4096 Feb 10 2025 05:19:36 +00:00 pnp-tech 11 -rw- 248 Feb 10 2025 05:19:29 +00:00 .iox_dir_list 12 drwx 4096 Feb 10 2025 04:29:43 +00:00 lost+found 275265 drwx 4096 Aug 26 2024 16:42:04 +00:00 .dbpersist 437185 drwx 4096 Aug 26 2024 16:33:30 +00:00 sysboot 291478 -rw- 43301928 Aug 26 2024 16:28:08 +00:00 c8000be-rpboot.17.06.06a.SPA.pkg 291477 -rw- 623141956 Aug 26 2024 16:27:18 +00:00 c8000be-mono-universalk9.17.06.06a.SPA.pkg 291476 -rw- 156728 Aug 26 2024 16:27:07 +00:00 c8000be-firmware_sm_nim_adpt.17.06.06a.SPA.pkg 291475 -rw- 2094136 Aug 26 2024 16:27:07 +00:00 c8000be-firmware_sm_dsp_sp2700.17.06.06a.SPA.pkg 291474 -rw- 14259252 Aug 26 2024 16:27:07 +00:00 c8000be-firmware_sm_async.17.06.06a.SPA.pkg 291473 -rw- 11093044 Aug 26 2024 16:27:07 +00:00 c8000be-firmware_sm_1t3e3.17.06.06a.SPA.pkg 291472 -rw- 2475056 Aug 26 2024 16:27:07 +00:00 c8000be-firmware_sm_10g.17.06.06a.SPA.pkg 291471 -rw- 10253360 Aug 26 2024 16:27:07 +00:00 c8000be-firmware_prince.17.06.06a.SPA.pkg 291470 -rw- 5571636 Aug 26 2024 16:27:07 +00:00 c8000be-firmware_nim_xdsl.17.06.06a.SPA.pkg 291469 -rw- 5334068 Aug 26 2024 16:27:06 +00:00 c8000be-firmware_nim_ssd.17.06.06a.SPA.pkg 291468 -rw- 11523124 Aug 26 2024 16:27:06 +00:00 c8000be-firmware_nim_shdsl.17.06.06a.SPA.pkg 291467 -rw- 2966576 Aug 26 2024 16:27:06 +00:00 c8000be-firmware_nim_ge.17.06.06a.SPA.pkg 291466 -rw- 17646644 Aug 26 2024 16:27:06 +00:00 c8000be-firmware_nim_cwan.17.06.06a.SPA.pkg 291465 -rw- 4793400 Aug 26 2024 16:27:06 +00:00 c8000be-firmware_nim_bri_st_fw.17.06.06a.SPA.pkg 291464 -rw- 12870708 Aug 26 2024 16:27:06 +00:00 c8000be-firmware_nim_async.17.06.06a.SPA.pkg 291463 -rw- 11310132 Aug 26 2024 16:27:05 +00:00 c8000be-firmware_ngwic_t1e1.17.06.06a.SPA.pkg 291462 -rw- 18342964 Aug 26 2024 16:27:05 +00:00 c8000be-firmware_dsp_tilegx.17.06.06a.SPA.pkg 291461 -rw- 1963060 Aug 26 2024 16:27:05 +00:00 c8000be-firmware_dsp_sp2700.17.06.06a.SPA.pkg 291460 -rw- 6681656 Aug 26 2024 16:27:05 +00:00 c8000be-firmware_dsp_analogbri.17.06.06a.SPA.pkg 291459 -rw- 54324 Aug 26 2024 16:27:05 +00:00 c8000be-firmware_dreamliner.17.06.06a.SPA.pkg 186209 drwx 4096 Aug 26 2024 16:20:23 +00:00 iox_host_data_share 364321 drwx 4096 Aug 26 2024 16:20:17 +00:00 core 210497 drwx 4096 Aug 26 2024 16:20:02 +00:00 guest-share 170017 drwx 4096 Aug 26 2024 16:19:55 +00:00 onep 129537 drwx 4096 Aug 26 2024 16:19:54 +00:00 pnp-info 121441 drwx 4096 Aug 26 2024 16:19:23 +00:00 virtual-instance 24294 -rw- 1923 Aug 26 2024 16:19:18 +00:00 trustidrootx3_ca_092024.ca 24293 -rw- 20109 Aug 26 2024 16:19:18 +00:00 ios_core.p7b 24291 -rw- 5242880 Aug 26 2024 16:19:03 +00:00 ssd 307649 drwx 4096 Aug 26 2024 16:18:49 +00:00 .ssh
Router#install remove inactive install_remove: START Mon Feb 10 06:34:40 UTC 2025 install_remove: Removing IMG Cleaning up unnecessary package files No path specified, will use booted path /bootflash/packages.conf
Cleaning /bootflash Scanning boot directory for packages ... done. Preparing packages list to delete ... [R0]: /bootflash/packages.conf File is in use, will not delete. [R0]: /bootflash/c8000be-firmware_dreamliner.17.09.05e.SPA.pkg File is in use, will not delete. [R0]: /bootflash/c8000be-firmware_dsp_analogbri.17.09.05e.SPA.pkg File is in use, will not delete. [R0]: /bootflash/c8000be-firmware_dsp_sp2700.17.09.05e.SPA.pkg File is in use, will not delete. [R0]: /bootflash/c8000be-firmware_dsp_tilegx.17.09.05e.SPA.pkg File is in use, will not delete. [R0]: /bootflash/c8000be-firmware_ngwic_t1e1.17.09.05e.SPA.pkg File is in use, will not delete. [R0]: /bootflash/c8000be-firmware_nim_async.17.09.05e.SPA.pkg File is in use, will not delete. [R0]: /bootflash/c8000be-firmware_nim_bri_st_fw.17.09.05e.SPA.pkg File is in use, will not delete. [R0]: /bootflash/c8000be-firmware_nim_cwan.17.09.05e.SPA.pkg File is in use, will not delete. [R0]: /bootflash/c8000be-firmware_nim_ge.17.09.05e.SPA.pkg File is in use, will not delete. [R0]: /bootflash/c8000be-firmware_nim_shdsl.17.09.05e.SPA.pkg File is in use, will not delete. [R0]: /bootflash/c8000be-firmware_nim_ssd.17.09.05e.SPA.pkg File is in use, will not delete. [R0]: /bootflash/c8000be-firmware_nim_xdsl.17.09.05e.SPA.pkg File is in use, will not delete. [R0]: /bootflash/c8000be-firmware_prince.17.09.05e.SPA.pkg File is in use, will not delete. [R0]: /bootflash/c8000be-firmware_sm_10g.17.09.05e.SPA.pkg File is in use, will not delete. [R0]: /bootflash/c8000be-firmware_sm_1t3e3.17.09.05e.SPA.pkg File is in use, will not delete. [R0]: /bootflash/c8000be-firmware_sm_async.17.09.05e.SPA.pkg File is in use, will not delete. [R0]: /bootflash/c8000be-firmware_sm_dsp_sp2700.17.09.05e.SPA.pkg File is in use, will not delete. [R0]: /bootflash/c8000be-firmware_sm_nim_adpt.17.09.05e.SPA.pkg File is in use, will not delete. [R0]: /bootflash/c8000be-mono-universalk9.17.09.05e.SPA.pkg File is in use, will not delete. [R0]: /bootflash/c8000be-rpboot.17.09.05e.SPA.pkg File is in use, will not delete. [R0]: /bootflash/c8000be-universalk9.17.09.05e.SPA.conf File is in use, will not delete.
--- Starting Post_Remove_Cleanup --- Performing REMOVE_POSTCHECK on all members Finished Post_Remove_Cleanup SUCCESS: install_remove Mon Feb 10 06:35:12 UTC 2025
89057 drwx 4096 Feb 10 2025 06:35:13 +00:00 .installer 412897 drwx 4096 Feb 10 2025 06:28:09 +00:00 license_evlog 24295 -rw- 30 Feb 10 2025 06:28:09 +00:00 throughput_monitor_params 24292 -rw- 137940 Feb 10 2025 06:28:05 +00:00 memleak.tcl 226689 drwx 4096 Feb 10 2025 06:27:59 +00:00 .prst_sync 24289 -rw- 1939 Feb 10 2025 06:27:50 +00:00 trustidrootx3_ca_062035.ca 24290 -rwx 1274 Feb 10 2025 06:27:45 +00:00 mode_event_log 429089 drwx 57344 Feb 10 2025 06:27:42 +00:00 tracelogs 64769 drwx 4096 Feb 10 2025 06:27:04 +00:00 SHARED-IOX 420993 drwx 4096 Feb 10 2025 06:25:25 +00:00 .rollback_timer 16 -rw- 9330 Feb 10 2025 06:24:28 +00:00 packages.conf 404802 -rw- 9330 Feb 10 2025 06:18:05 +00:00 c8000be-universalk9.17.09.05e.SPA.conf 226691 -rw- 38283450 Feb 10 2025 06:18:05 +00:00 c8000be-rpboot.17.09.05e.SPA.pkg 404821 -rw- 679469056 Feb 10 2025 06:17:20 +00:00 c8000be-mono-universalk9.17.09.05e.SPA.pkg 404820 -rw- 167936 Feb 10 2025 06:17:08 +00:00 c8000be-firmware_sm_nim_adpt.17.09.05e.SPA.pkg 404819 -rw- 2138112 Feb 10 2025 06:17:08 +00:00 c8000be-firmware_sm_dsp_sp2700.17.09.05e.SPA.pkg 404818 -rw- 14557184 Feb 10 2025 06:17:08 +00:00 c8000be-firmware_sm_async.17.09.05e.SPA.pkg 404817 -rw- 11366400 Feb 10 2025 06:17:07 +00:00 c8000be-firmware_sm_1t3e3.17.09.05e.SPA.pkg 404816 -rw- 2535424 Feb 10 2025 06:17:07 +00:00 c8000be-firmware_sm_10g.17.09.05e.SPA.pkg 404815 -rw- 10432512 Feb 10 2025 06:17:07 +00:00 c8000be-firmware_prince.17.09.05e.SPA.pkg 404814 -rw- 5677056 Feb 10 2025 06:17:07 +00:00 c8000be-firmware_nim_xdsl.17.09.05e.SPA.pkg 404813 -rw- 5431296 Feb 10 2025 06:17:07 +00:00 c8000be-firmware_nim_ssd.17.09.05e.SPA.pkg 404812 -rw- 11714560 Feb 10 2025 06:17:07 +00:00 c8000be-firmware_nim_shdsl.17.09.05e.SPA.pkg 404811 -rw- 2994176 Feb 10 2025 06:17:06 +00:00 c8000be-firmware_nim_ge.17.09.05e.SPA.pkg 404810 -rw- 17960960 Feb 10 2025 06:17:06 +00:00 c8000be-firmware_nim_cwan.17.09.05e.SPA.pkg 404809 -rw- 4894720 Feb 10 2025 06:17:06 +00:00 c8000be-firmware_nim_bri_st_fw.17.09.05e.SPA.pkg 404808 -rw- 13139968 Feb 10 2025 06:17:06 +00:00 c8000be-firmware_nim_async.17.09.05e.SPA.pkg 404807 -rw- 11497472 Feb 10 2025 06:17:05 +00:00 c8000be-firmware_ngwic_t1e1.17.09.05e.SPA.pkg 404806 -rw- 18649088 Feb 10 2025 06:17:05 +00:00 c8000be-firmware_dsp_tilegx.17.09.05e.SPA.pkg 404805 -rw- 2007040 Feb 10 2025 06:17:04 +00:00 c8000be-firmware_dsp_sp2700.17.09.05e.SPA.pkg 404804 -rw- 6799360 Feb 10 2025 06:17:04 +00:00 c8000be-firmware_dsp_analogbri.17.09.05e.SPA.pkg 404803 -rw- 65536 Feb 10 2025 06:17:04 +00:00 c8000be-firmware_dreamliner.17.09.05e.SPA.pkg 267169 drwx 4096 Feb 10 2025 05:19:36 +00:00 pnp-tech 11 -rw- 248 Feb 10 2025 05:19:29 +00:00 .iox_dir_list 12 drwx 4096 Feb 10 2025 04:29:43 +00:00 lost+found 275265 drwx 4096 Aug 26 2024 16:42:04 +00:00 .dbpersist 437185 drwx 4096 Aug 26 2024 16:33:30 +00:00 sysboot 186209 drwx 4096 Aug 26 2024 16:20:23 +00:00 iox_host_data_share 364321 drwx 4096 Aug 26 2024 16:20:17 +00:00 core 210497 drwx 4096 Aug 26 2024 16:20:02 +00:00 guest-share 170017 drwx 4096 Aug 26 2024 16:19:55 +00:00 onep 129537 drwx 4096 Aug 26 2024 16:19:54 +00:00 pnp-info 121441 drwx 4096 Aug 26 2024 16:19:23 +00:00 virtual-instance 24294 -rw- 1923 Aug 26 2024 16:19:18 +00:00 trustidrootx3_ca_092024.ca 24293 -rw- 20109 Aug 26 2024 16:19:18 +00:00 ios_core.p7b 24291 -rw- 5242880 Aug 26 2024 16:19:03 +00:00 ssd 307649 drwx 4096 Aug 26 2024 16:18:49 +00:00 .ssh
7361155072 bytes total (6116417536 bytes free) Router#
show version
Router# show version Cisco IOS XE Software, Version 17.09.05e Cisco IOS Software [Cupertino], c8000be Software (X86_64_LINUX_IOSD-UNIVERSALK9-M), Version 17.9.5e, RELEASE SOFTWARE (fc1) Technical Support: http://www.cisco.com/techsupport Copyright (c) 1986-2024 by Cisco Systems, Inc. Compiled Thu 12-Dec-24 19:05 by mcpre
Cisco IOS-XE software, Copyright (c) 2005-2024 by cisco Systems, Inc. All rights reserved. Certain components of Cisco IOS-XE software are licensed under the GNU General Public License ("GPL") Version 2.0. The software code licensed under GPL Version 2.0 is free software that comes with ABSOLUTELY NO WARRANTY. You can redistribute and/or modify such GPL code under the terms of GPL Version 2.0. For more details, see the documentation or "License Notice" file accompanying the IOS-XE software, or the applicable URL provided on the flyer accompanying the IOS-XE software.
ROM: 17.6(8.1r)
Router uptime is 9 minutes Uptime for this control processor is 9 minutes System returned to ROM by Reload Command System image file is "bootflash:packages.conf" Last reload reason: Reload Command
This product contains cryptographic features and is subject to United States and local country laws governing import, export, transfer and use. Delivery of Cisco cryptographic products does not imply third-party authority to import, export, distribute or use encryption. Importers, exporters, distributors and users are responsible for compliance with U.S. and local country laws. By using this product you agree to comply with applicable laws and regulations. If you are unable to comply with U.S. and local laws, return this product immediately.
The support for Smart Licensing started with Cisco IOS XE 16.10.1. In the Cisco IOS XE 17.3.2 and 17.4.1, support to a simplified method for Smart Licensing with the use of Policies mode only License was started.
IOS XE Release
Platform Requirements
CUBE Licensing
16.6.1 to 16.9.x
Smart Licensing mode is optional
RTU licensing only
16.10.x
Smart Licensing mode only
RTU licensing only
16.11.1a to 17.1.x
Smart Licensing mode only
Continued registration is required to enable CUBE features
Smart Licensing only*
Trunk license requests are set by manual configuration
No license policing if out of compliance
SIP processing disabled in the 'Eval-Expired' state
17.2.1r to 17.3.1a
Smart Licensing mode only
Continued registration is required in order to enable CUBE features
Smart Licensing only*
Trunk license requests are set dynamically by usage
No license policing if out of compliance
SIP processing disabled in the 'Eval-Expired' state
17.3.2 onwards
Smart Licensing with the use of Policy mode only
License use must be reported within the account policy to enable CUBE features
Smart Licensing only*
Trunk license use is measured periodically and reported as per the Smart Account policy
In accordance with policy, license policing reports are not acknowledged (SIP processing is disabled otherwise)
FTD - Firepower Threat Defense - Next-genration Firewall 이미지를 사용 합니다.
만약에 FTD에 Cisco ASA code로 변환해서 사용을 하면 Next-Generation Firewall에서 제공하는 기능들을 사용 못합니다.
그리고 Cisco ASA code는 현재는 제공하지만 점차 제공하지 않을 예정이기 때문에 Cisco 에서도 FTD를 이미지를 권장합니다.
Cisco ASA Code는 아래처럼 두가지 모드가 있습니다.
1. Platform 모드
2. Appliance 모드
Platform 모드는 시스템을 하나의 통합 플랫폼으로 보고, 하드웨어와 관리 기능을 분리하여 구성합니다.
주요 특징:
**제어 플레인(Control Plane)**과 **데이터 플레인(Data Plane)**이 분리되어 있습니다. ASA 소프트웨어는 Firepower 플랫폼 내의 하나의 구성요소로 실행됩니다.
**FXOS(Firepower eXtensible Operating System)**가 기본 운영체제로 동작하며, 하드웨어 관리에 사용됩니다.
논리적 장치(Logical Device) 구성: Firepower Chassis Manager(FCM)나 FXOS CLI를 통해 ASA, FTD 등의 장치를 생성합니다.
다중 인스턴스(multi-instance) 지원: 하나의 장비에서 여러 논리적 방화벽을 운영할 수 있어 멀티 테넌시가 가능합니다.
주로 Firepower 4100 시리즈 또는 9300 시리즈에서 사용됩니다.
관리 방법:
FXOS와 ASA CLI 또는 ASDM을 함께 사용하여 관리합니다.
FXOS에서 인터페이스, 모듈, 하드웨어 수준의 설정을 담당합니다.
Appliance 모드
Appliance 모드는 Firepower 장비를 전통적인 ASA 장비처럼 독립형 방화벽 어플라이언스로 사용합니다.
주요 특징:
단일 이미지 부팅: ASA 소프트웨어가 직접 장비에서 실행되며, FXOS는 사용되지 않습니다.
구성이 간단하며, 기존 ASA 사용자에게 친숙한 방식입니다.
논리적 장치 개념 없이 단일 ASA 인스턴스만 실행됩니다.
주로 Firepower 2100 시리즈 또는 하위 모델에서 사용됩니다.
관리 방법:
ASA CLI, ASDM, 또는 Cisco Security Manager 등을 사용하여 직접 관리합니다.
FMC(Firepower Management Center)와는 주로 FTD 모드에서 통합됩니다.
항목 Platform 모드 Appliance 모드
기본 운영체제
FXOS
ASA 이미지 직접 실행
배포 방식
논리적 장치로 구성
단일 ASA 인스턴스
사용 가능한 하드웨어
Firepower 4100/9300 시리즈
Firepower 2100 시리즈 등
관리 도구
FXOS + ASA CLI/ASDM
ASA CLI, ASDM
다중 인스턴스 지원
예 (논리적 또는 다중 컨텍스트로 가능)
아니오 (ASA 자체 기능만 사용 가능)
복잡도
높음 (더 많은 제어 및 유연성 제공)
낮음 (간단한 설정 및 운영)
이번에 고객사 장비가 FPR3105인데 Cisco ASA Code를 사용해서 기존에 사용중인 ASA 5545-X 교체하고자 합니다.
FPR3105는 Appliance Mode를 지원하나요?
Cisco Firepower 3105(FPR3105)는 Appliance Mode를 지원합니다. 이 모드는 장치를 독립 실행형 ASA 어플라이언스로 작동하게 하며, Firepower eXtensible Operating System(FXOS) 계층 없이 전통적인 방화벽 기능을 제공합니다.
Appliance Mode에서는, FPR3105가 ASA 이미지를 직접 실행하므로, ASA 기능만 필요한 환경에서 배포 및 관리가 간소화됩니다.
이 모드는 특히 익숙한 ASA 인터페이스를 선호하고, Firepower Threat Defense(FTD)가 제공하는 고급 기능이 필요하지 않은 사용자에게 적합합니다.
단, Appliance Mode로 운영할 경우, 고급 위협 방어 및 침입 방지(IPS)와 같은 Firepower 서비스는 사용할 수 없습니다. 따라서 네트워크 보안 전략에 이러한 고급 기능이 포함되어 있다면, FPR3105를 FTD 이미지로 배포하는 것을 고려해야 합니다.
요약하자면, FPR3105는 유연한 장비로, ASA 또는 FTD 소프트웨어 중 원하는 모드로 구성할 수 있으며, 보안 요구사항과 운영 환경에 맞게 선택할 수 있습니다.
그럼 이번에는 ASA 버전 몇부터 Platform모드를 지원하고 Appliance모드를 지원하는지 알아보겠습니다.
ASA 9.13 이상으로 업그레이드하면 Appliance 모드가 기본 모드로 설정되며, show fxos mode 명령어를 통해 현재 모드를 확인할 수 있습니다.이 모드에서는 ASA CLI나 ASDM을 통해 모든 설정을 구성할 수 있으며, FXOS CLI는 고급 트러블슈팅 명령어에만 사용됩니다.ManualsLib+3Manuals++3pseudoco.cisco.com+3
따라서, Firepower 2100을 Appliance 모드로 운영하려면 ASA 9.13 이상으로 업그레이드해야 하며, 이전 버전에서는 FXOS를 통해 Platform 모드로만 구성할 수 있습니다.
Username : kevin Index : 62470 Assigned IP : 192.168.200.100 Public IP : 192.168.10.102 Protocol : AnyConnect-Parent SSL-Tunnel DTLS-Tunnel License : AnyConnect Premium Encryption : AnyConnect-Parent: (1)none SSL-Tunnel: (1)AES-GCM-256 DTLS-Tunnel: (1)AES256 Hashing : AnyConnect-Parent: (1)none SSL-Tunnel: (1)SHA384 DTLS-Tunnel: (1)SHA1 Bytes Tx : 58544 Bytes Rx : 54607 Group Policy : ANYCONNECT_POLICY Tunnel Group : MY_TUNNEL Login Time : 12:24:54 UTC Sun Feb 2 2025 Duration : 0h:12m:24s Inactivity : 0h:00m:00s VLAN Mapping : N/A VLAN : none Audt Sess ID : 0a0101fe0f406000679f6416 Security Grp : none ASAv#
아래 명령어를 통해서 라이센스 남은 갯수도 확인 가능 합니다.
ASAv# show vpn-sessiondb license-summary --------------------------------------------------------------------------- VPN Licenses and Configured Limits Summary --------------------------------------------------------------------------- Status : Capacity : Installed : Limit ----------------------------------------- AnyConnect Premium : ENABLED : 250 : 2 : NONE AnyConnect Essentials : DISABLED : 250 : 0 : NONE Other VPN (Available by Default) : ENABLED : 250 : 250 : NONE Shared License Server : DISABLED Shared License Participant : DISABLED AnyConnect for Mobile : DISABLED(Requires Premium or Essentials) Advanced Endpoint Assessment : DISABLED(Requires Premium) AnyConnect for Cisco VPN Phone : DISABLED VPN-3DES-AES : ENABLED VPN-DES : ENABLED ---------------------------------------------------------------------------
--------------------------------------------------------------------------- VPN Licenses Usage Summary --------------------------------------------------------------------------- Local : Shared : All : Peak : Eff. : In Use : In Use : In Use : In Use : Limit : Usage ---------------------------------------------------- AnyConnect Premium : 1 : 0 : 1 : 2 : 2 : 50% AnyConnect Client : : 1 : 1 : 50% AnyConnect Mobile : : 0 : 0 : 0% Clientless VPN : : 0 : 1 : 0% Generic IKEv2 Client : : 0 : 0 : 0% Other VPN : : 0 : 0 : 250 : 0% Cisco VPN Client : : 0 : 0 : 0% L2TP Clients Site-to-Site VPN : : 0 : 0 : 0% ---------------------------------------------------------------------------
ASAv#
anyconnect Permium 라이센스가 2개 이고, 현재 PC에서 접속 해서 한개를 사용하고 있고, Usage에 50% 표시 되었습니다.
ASAv# show version
Cisco Adaptive Security Appliance Software Version 9.8(1) Firepower Extensible Operating System Version 2.2(1.47) Device Manager Version 7.22(1)
Compiled on Wed 10-May-17 15:38 PDT by builders System image file is "boot:/asa981-smp-k8.bin" Config file at boot was "startup-config"
ASAv up 6 hours 21 mins
Hardware: ASAv, 2048 MB RAM, CPU Xeon E5 series 2394 MHz, Model Id: ASAv10 Internal ATA Compact Flash, 8192MB Slot 1: ATA Compact Flash, 8192MB BIOS Flash Firmware Hub @ 0x0, 0KB
0: Ext: Management0/0 : address is 50fd.e000.3500, irq 11 1: Ext: GigabitEthernet0/0 : address is 50fd.e000.3501, irq 11 2: Ext: GigabitEthernet0/1 : address is 50fd.e000.3502, irq 10 3: Ext: GigabitEthernet0/2 : address is 50fd.e000.3503, irq 10 4: Ext: GigabitEthernet0/3 : address is 50fd.e000.3504, irq 11 5: Ext: GigabitEthernet0/4 : address is 50fd.e000.3505, irq 11 6: Ext: GigabitEthernet0/5 : address is 50fd.e000.3506, irq 10 7: Ext: GigabitEthernet0/6 : address is 50fd.e000.3507, irq 10
License mode: Smart Licensing ASAv Platform License State: Unlicensed No active entitlement: no feature tier and no throughput level configured *Memory resource allocation is more than the permitted limit.
Licensed features for this platform: Maximum VLANs : 50 Inside Hosts : Unlimited Failover : Active/Standby Encryption-DES : Enabled Encryption-3DES-AES : Enabled Security Contexts : 0 Carrier : Disabled AnyConnect Premium Peers : 2 AnyConnect Essentials : Disabled Other VPN Peers : 250 Total VPN Peers : 250
지금까지 [ASA #06] - Remote Access VPN current user check 글을 읽어주셔서 감사합니다.