안녕하세요.
이번에는 Juniper SRX S2S VPN 설정하겠습니다.
실습을 위해서 기본 설정은 아래 글을 참고 부탁드립니다.
https://itblog-kr.tistory.com/196
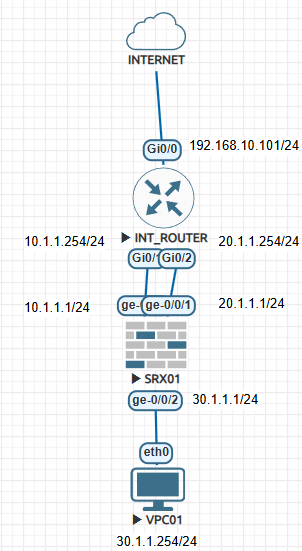
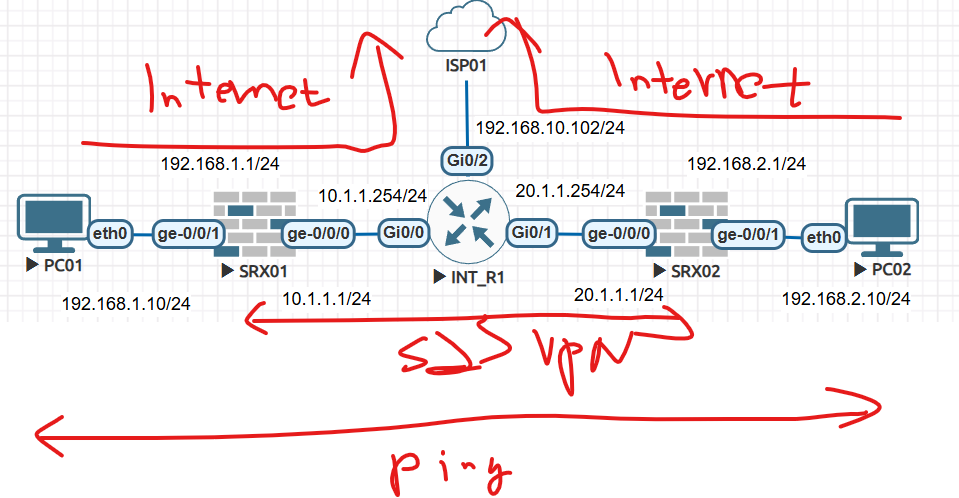
1. 토폴로지는 아래와 같습니다.
SRX01 Ge-0/0/0 10.1.1.1 trust
SRX01 Ge-0/0/1 192.168.1.1 untrust
SRX02 Ge-0/0/0 20.1.1.1 trust
SRX02 Ge-0/0/1 192.168.2.1 untrust
S2S VPN 연결후 PC 192.168.1.10 <-> PC 192.168.2.10으로 통신이 가능 합니다.
2. SRX01 설정
2-1 Tunnel Interface 설정
| set interfaces st0 unit 0 family inet |
2-2 Tunnel Interface통해서 상대방 SRX02 내부 192.168.2.0/24로 Static Route 설정
| set routing-options static route 192.168.2.0/24 next-hop st0.0 |
2-3 IKE 설정
IKE POLICY Name: IKE-POLICY-S2SVPN-01
IKE GATEWAY Name: IKE-GW-S2SVPN-01
Pre-share-Keys: juniper
| set security ike proposal standard authentication-method pre-shared-keys set security ike policy IKE-POLICY-S2SVPN-01 mode aggressive set security ike policy IKE-POLICY-S2SVPN-01 proposals standard set security ike policy IKE-POLICY-S2SVPN-01 pre-shared-key ascii-text juniper set security ike gateway IKE-GW-S2SVPN-01 ike-policy IKE-POLICY-S2SVPN-01 set security ike gateway IKE-GW-S2SVPN-01 address 20.1.1.1 set security ike gateway IKE-GW-S2SVPN-01 external-interface ge-0/0/0 |
2-4 IPSEC 설정
| set security ipsec proposal standard set security ipsec policy IPSEC-POLICY-S2SVPN-01 proposals standard set security ipsec vpn SRX01-TO-SRX02 bind-interface st0.0 set security ipsec vpn SRX01-TO-SRX02 ike gateway IKE-GW-S2SVPN-01 set security ipsec vpn SRX01-TO-SRX02 ike ipsec-policy IPSEC-POLICY-S2SVPN-01 set security ipsec vpn SRX01-TO-SRX02 establish-tunnels immediately |
2-5 S2S VPN을 위한 방화벽 정책 설정
| set security zones security-zone vpn host-inbound-traffic system-services all set security zones security-zone vpn interfaces st0.0 set security policies from-zone trust to-zone vpn policy trust-to-vpn match source-address any set security policies from-zone trust to-zone vpn policy trust-to-vpn match destination-address any set security policies from-zone trust to-zone vpn policy trust-to-vpn match application any set security policies from-zone trust to-zone vpn policy trust-to-vpn then permit set security policies from-zone vpn to-zone trust policy vpn-to-trust match source-address any set security policies from-zone vpn to-zone trust policy vpn-to-trust match destination-address any set security policies from-zone vpn to-zone trust policy vpn-to-trust match application any set security policies from-zone vpn to-zone trust policy vpn-to-trust then permit |
3 SRX02 설정
3-1 Tunnel Interface 설정
| set interfaces st0 unit 0 family inet |
3-2 Tunnel Interface통해서 상대방 SRX02 내부 192.168.1.0/24로 Static Route 설정
| set routing-options static route 192.168.1.0/24 next-hop st0.0 |
3-3 IKE 설정
IKE POLICY Name: IKE-POLICY-S2SVPN-01
IKE GATEWAY Name: IKE-GW-S2SVPN-01
Pre-share-Keys: juniper
| set security ike proposal standard authentication-method pre-shared-keys set security ike policy IKE-POLICY-S2SVPN-01 mode aggressive set security ike policy IKE-POLICY-S2SVPN-01 proposals standard set security ike policy IKE-POLICY-S2SVPN-01 pre-shared-key ascii-text juniper set security ike gateway IKE-GW-S2SVPN-01 ike-policy IKE-POLICY-S2SVPN-01 set security ike gateway IKE-GW-S2SVPN-01 address 10.1.1.1 set security ike gateway IKE-GW-S2SVPN-01 external-interface ge-0/0/0 |
3-4 IPSEC 설정
| set security ipsec proposal standard set security ipsec policy IPSEC-POLICY-S2SVPN-01 proposals standard set security ipsec vpn SRX02-TO-SRX01 bind-interface st0.0 set security ipsec vpn SRX02-TO-SRX01 ike gateway IKE-GW-S2SVPN-01 set security ipsec vpn SRX02-TO-SRX01 ike ipsec-policy IPSEC-POLICY-S2SVPN-01 set security ipsec vpn SRX02-TO-SRX01 establish-tunnels immediately |
3-5 S2S VPN을 위한 방화벽 정책 설정
| set security zones security-zone vpn host-inbound-traffic system-services all set security zones security-zone vpn interfaces st0.0 set security policies from-zone trust to-zone vpn policy trust-to-vpn match source-address any set security policies from-zone trust to-zone vpn policy trust-to-vpn match destination-address any set security policies from-zone trust to-zone vpn policy trust-to-vpn match application any set security policies from-zone trust to-zone vpn policy trust-to-vpn then permit set security policies from-zone vpn to-zone trust policy vpn-to-trust match source-address any set security policies from-zone vpn to-zone trust policy vpn-to-trust match destination-address any set security policies from-zone vpn to-zone trust policy vpn-to-trust match application any set security policies from-zone vpn to-zone trust policy vpn-to-trust then permit |
4. Test
PC01에서 PC02로 PING 192.168.2.10
PC02에서 PC01로 PING 192.168.1.10
| PC01 84 bytes from 192.168.2.10 icmp_seq=105 ttl=62 time=12.610 ms 84 bytes from 192.168.2.10 icmp_seq=106 ttl=62 time=33.502 ms 84 bytes from 192.168.2.10 icmp_seq=107 ttl=62 time=3.875 ms 84 bytes from 192.168.2.10 icmp_seq=108 ttl=62 time=5.376 ms 84 bytes from 192.168.2.10 icmp_seq=109 ttl=62 time=3.175 ms 84 bytes from 192.168.2.10 icmp_seq=110 ttl=62 time=2.963 ms 84 bytes from 192.168.2.10 icmp_seq=111 ttl=62 time=3.547 ms 84 bytes from 192.168.2.10 icmp_seq=112 ttl=62 time=3.976 ms 84 bytes from 192.168.2.10 icmp_seq=113 ttl=62 time=3.358 ms 84 bytes from 192.168.2.10 icmp_seq=114 ttl=62 time=9.753 ms 84 bytes from 192.168.2.10 icmp_seq=115 ttl=62 time=3.128 ms 84 bytes from 192.168.2.10 icmp_seq=116 ttl=62 time=4.142 ms 84 bytes from 192.168.2.10 icmp_seq=117 ttl=62 time=3.175 ms 84 bytes from 192.168.2.10 icmp_seq=118 ttl=62 time=4.214 ms 84 bytes from 192.168.2.10 icmp_seq=119 ttl=62 time=3.807 ms 84 bytes from 192.168.2.10 icmp_seq=120 ttl=62 time=4.220 ms 84 bytes from 192.168.2.10 icmp_seq=121 ttl=62 time=7.300 ms 84 bytes from 192.168.2.10 icmp_seq=122 ttl=62 time=3.735 ms 84 bytes from 192.168.2.10 icmp_seq=123 ttl=62 time=5.798 ms 84 bytes from 192.168.2.10 icmp_seq=124 ttl=62 time=3.588 ms 84 bytes from 192.168.2.10 icmp_seq=125 ttl=62 time=3.750 ms 84 bytes from 192.168.2.10 icmp_seq=126 ttl=62 time=3.633 ms 84 bytes from 192.168.2.10 icmp_seq=127 ttl=62 time=2.710 ms 84 bytes from 192.168.2.10 icmp_seq=128 ttl=62 time=4.018 ms 84 bytes from 192.168.2.10 icmp_seq=129 ttl=62 time=3.169 ms 84 bytes from 192.168.2.10 icmp_seq=130 ttl=62 time=3.093 ms 84 bytes from 192.168.2.10 icmp_seq=131 ttl=62 time=3.001 ms 84 bytes from 192.168.2.10 icmp_seq=132 ttl=62 time=4.013 ms 84 bytes from 192.168.2.10 icmp_seq=133 ttl=62 time=3.296 ms 84 bytes from 192.168.2.10 icmp_seq=134 ttl=62 time=2.731 ms 84 bytes from 192.168.2.10 icmp_seq=135 ttl=62 time=3.164 ms 84 bytes from 192.168.2.10 icmp_seq=136 ttl=62 time=3.521 ms 84 bytes from 192.168.2.10 icmp_seq=137 ttl=62 time=3.264 ms 84 bytes from 192.168.2.10 icmp_seq=138 ttl=62 time=3.372 ms PC02 84 bytes from 192.168.1.10 icmp_seq=96 ttl=62 time=11.549 ms 84 bytes from 192.168.1.10 icmp_seq=97 ttl=62 time=3.299 ms 84 bytes from 192.168.1.10 icmp_seq=98 ttl=62 time=4.139 ms 84 bytes from 192.168.1.10 icmp_seq=99 ttl=62 time=6.704 ms 84 bytes from 192.168.1.10 icmp_seq=100 ttl=62 time=7.948 ms 84 bytes from 192.168.1.10 icmp_seq=101 ttl=62 time=7.042 ms 84 bytes from 192.168.1.10 icmp_seq=102 ttl=62 time=8.883 ms 84 bytes from 192.168.1.10 icmp_seq=103 ttl=62 time=5.830 ms 84 bytes from 192.168.1.10 icmp_seq=104 ttl=62 time=3.864 ms 84 bytes from 192.168.1.10 icmp_seq=105 ttl=62 time=7.203 ms 84 bytes from 192.168.1.10 icmp_seq=106 ttl=62 time=5.233 ms 84 bytes from 192.168.1.10 icmp_seq=107 ttl=62 time=3.276 ms 84 bytes from 192.168.1.10 icmp_seq=108 ttl=62 time=3.849 ms 84 bytes from 192.168.1.10 icmp_seq=109 ttl=62 time=4.194 ms 84 bytes from 192.168.1.10 icmp_seq=110 ttl=62 time=3.221 ms 84 bytes from 192.168.1.10 icmp_seq=111 ttl=62 time=3.447 ms 84 bytes from 192.168.1.10 icmp_seq=112 ttl=62 time=4.475 ms 84 bytes from 192.168.1.10 icmp_seq=113 ttl=62 time=4.493 ms 84 bytes from 192.168.1.10 icmp_seq=114 ttl=62 time=3.987 ms 84 bytes from 192.168.1.10 icmp_seq=115 ttl=62 time=3.965 ms 84 bytes from 192.168.1.10 icmp_seq=116 ttl=62 time=3.814 ms 84 bytes from 192.168.1.10 icmp_seq=117 ttl=62 time=3.276 ms 84 bytes from 192.168.1.10 icmp_seq=118 ttl=62 time=3.454 ms 84 bytes from 192.168.1.10 icmp_seq=119 ttl=62 time=4.694 ms 84 bytes from 192.168.1.10 icmp_seq=120 ttl=62 time=4.093 ms 84 bytes from 192.168.1.10 icmp_seq=121 ttl=62 time=3.481 ms 84 bytes from 192.168.1.10 icmp_seq=122 ttl=62 time=5.376 ms 84 bytes from 192.168.1.10 icmp_seq=123 ttl=62 time=3.494 ms 84 bytes from 192.168.1.10 icmp_seq=124 ttl=62 time=4.032 ms 84 bytes from 192.168.1.10 icmp_seq=125 ttl=62 time=3.6 |
4. S2S VPN 상태 확인
SRX01
IKE Phase 1 UP이 표시 되면 IPSEC를 확인 합니다.
| root@SRX01> show security ike security-associations Index State Initiator cookie Responder cookie Mode Remote Address 5482273 UP 65c909f14f4d8824 7d74504d227553ca Aggressive 20.1.1.1 |
IPSEC Phase2 아래처럼 터널이 생성 되었는지 확인
| root@SRX01> show security ipsec security-associations Total active tunnels: 1 Total Ipsec sas: 1 ID Algorithm SPI Life:sec/kb Mon lsys Port Gateway <131073 ESP:3des/sha1 fc12e938 3062/ unlim - root 500 20.1.1.1 >131073 ESP:3des/sha1 49d44ef0 3062/ unlim - root 500 20.1.1.1 |
PC01에서 PC02로 무한으로 PING를 시도하고 Packet Count가 실제 올라가는지 확인 합니다
그리고 SRX01에서 아래 명령어로 확인
| root@SRX01> show security ipsec statistics ESP Statistics: Encrypted bytes: 70040 Decrypted bytes: 41832 Encrypted packets: 515 Decrypted packets: 498 AH Statistics: Input bytes: 0 Output bytes: 0 Input packets: 0 Output packets: 0 Errors: AH authentication failures: 0, Replay errors: 0 ESP authentication failures: 0, ESP decryption failures: 0 Bad headers: 0, Bad trailers: 0 root@SRX01> |
10초뒤에 다시 똑같은 명령어를 입력하면 Packet Count가 증가하였습니다.
| root@SRX01> show security ipsec statistics ESP Statistics: Encrypted bytes: 77656 Decrypted bytes: 46536 Encrypted packets: 571 Decrypted packets: 554 AH Statistics: Input bytes: 0 Output bytes: 0 Input packets: 0 Output packets: 0 Errors: AH authentication failures: 0, Replay errors: 0 ESP authentication failures: 0, ESP decryption failures: 0 Bad headers: 0, Bad trailers: 0 root@SRX01> |
PC02 -> PC01로 무한으로 PING를 시도합니다
SRX02에서 확인해보겠습니다.
IKE Phase 1 UP이 표시 되면 IPSEC를 확인 합니다.
| root@SRX02> show security ike security-associations Index State Initiator cookie Responder cookie Mode Remote Address 6514201 UP 65c909f14f4d8824 7d74504d227553ca Aggressive 10.1.1.1 root@SRX02> |
IPSEC Phase2 Tunnel이 생성되었습니다.
| root@SRX02> show security ipsec security-associations Total active tunnels: 1 Total Ipsec sas: 1 ID Algorithm SPI Life:sec/kb Mon lsys Port Gateway <131073 ESP:3des/sha1 49d44ef0 2678/ unlim - root 500 10.1.1.1 >131073 ESP:3des/sha1 fc12e938 2678/ unlim - root 500 10.1.1.1 root@SRX02> |
Packet Count를 확인 합니다
| root@SRX02> show security ipsec statistics ESP Statistics: Encrypted bytes: 87992 Decrypted bytes: 55776 Encrypted packets: 647 Decrypted packets: 664 AH Statistics: Input bytes: 0 Output bytes: 0 Input packets: 0 Output packets: 0 Errors: AH authentication failures: 0, Replay errors: 0 ESP authentication failures: 0, ESP decryption failures: 0 Bad headers: 0, Bad trailers: 0 root@SRX02> |
10초뒤에 다시 한번 확인합니다
| root@SRX02> show security ipsec statistics ESP Statistics: Encrypted bytes: 90032 Decrypted bytes: 57036 Encrypted packets: 662 Decrypted packets: 679 AH Statistics: Input bytes: 0 Output bytes: 0 Input packets: 0 Output packets: 0 Errors: AH authentication failures: 0, Replay errors: 0 ESP authentication failures: 0, ESP decryption failures: 0 Bad headers: 0, Bad trailers: 0 root@SRX02> |
전체 설정
SRX01
| root@SRX01> show configuration | display set | no-more set version 21.3R1.9 set system host-name SRX01 set security ike proposal standard authentication-method pre-shared-keys set security ike policy IKE-POLICY-S2SVPN-01 mode aggressive set security ike policy IKE-POLICY-S2SVPN-01 proposals standard set security ike policy IKE-POLICY-S2SVPN-01 pre-shared-key ascii-text "$9$a-GjqTz6uORmfORhSMWJGD" set security ike gateway IKE-GW-S2SVPN-01 ike-policy IKE-POLICY-S2SVPN-01 set security ike gateway IKE-GW-S2SVPN-01 address 20.1.1.1 set security ike gateway IKE-GW-S2SVPN-01 external-interface ge-0/0/0 set security ipsec proposal standard set security ipsec policy IPSEC-POLICY-S2SVPN-01 proposals standard set security ipsec vpn SRX01-TO-SRX02 bind-interface st0.0 set security ipsec vpn SRX01-TO-SRX02 ike gateway IKE-GW-S2SVPN-01 set security ipsec vpn SRX01-TO-SRX02 ike ipsec-policy IPSEC-POLICY-S2SVPN-01 set security ipsec vpn SRX01-TO-SRX02 establish-tunnels immediately set security nat source rule-set SOURCE-NAT from zone trust set security nat source rule-set SOURCE-NAT to zone untrust set security nat source rule-set SOURCE-NAT rule PAT-INTERFACE match source-address 192.168.1.0/24 set security nat source rule-set SOURCE-NAT rule PAT-INTERFACE match destination-address 0.0.0.0/0 set security nat source rule-set SOURCE-NAT rule PAT-INTERFACE then source-nat interface set security policies from-zone trust to-zone untrust policy trust_to_untrust match source-address any set security policies from-zone trust to-zone untrust policy trust_to_untrust match destination-address any set security policies from-zone trust to-zone untrust policy trust_to_untrust match application any set security policies from-zone trust to-zone untrust policy trust_to_untrust then permit set security policies from-zone trust to-zone vpn policy trust-to-vpn match source-address any set security policies from-zone trust to-zone vpn policy trust-to-vpn match destination-address any set security policies from-zone trust to-zone vpn policy trust-to-vpn match application any set security policies from-zone trust to-zone vpn policy trust-to-vpn then permit set security policies from-zone vpn to-zone trust policy vpn-to-trust match source-address any set security policies from-zone vpn to-zone trust policy vpn-to-trust match destination-address any set security policies from-zone vpn to-zone trust policy vpn-to-trust match application any set security policies from-zone vpn to-zone trust policy vpn-to-trust then permit set security zones security-zone trust host-inbound-traffic system-services all set security zones security-zone trust host-inbound-traffic protocols all set security zones security-zone trust interfaces ge-0/0/1.0 set security zones security-zone untrust host-inbound-traffic system-services all set security zones security-zone untrust host-inbound-traffic protocols all set security zones security-zone untrust interfaces ge-0/0/0.0 set security zones security-zone vpn host-inbound-traffic system-services all set security zones security-zone vpn interfaces st0.0 set interfaces ge-0/0/0 unit 0 family inet address 10.1.1.1/24 set interfaces ge-0/0/1 unit 0 family inet address 192.168.1.1/24 set interfaces st0 unit 0 family inet set routing-options static route 0.0.0.0/0 next-hop 10.1.1.254 set routing-options static route 192.168.2.0/24 next-hop st0.0 root@SRX01> |
SRX02
| root@SRX02> show configuration | display set | no-more set version 21.3R1.9 set system host-name SRX02 set security ike proposal standard authentication-method pre-shared-keys set security ike policy IKE-POLICY-S2SVPN-01 mode aggressive set security ike policy IKE-POLICY-S2SVPN-01 proposals standard set security ike policy IKE-POLICY-S2SVPN-01 pre-shared-key ascii-text "$9$SY2lvLdb2GDkxNDk.P3nylK" set security ike gateway IKE-GW-S2SVPN-01 ike-policy IKE-POLICY-S2SVPN-01 set security ike gateway IKE-GW-S2SVPN-01 address 10.1.1.1 set security ike gateway IKE-GW-S2SVPN-01 external-interface ge-0/0/0 set security ipsec proposal standard set security ipsec policy IPSEC-POLICY-S2SVPN-01 proposals standard set security ipsec vpn SRX02-TO-SRX01 bind-interface st0.0 set security ipsec vpn SRX02-TO-SRX01 ike gateway IKE-GW-S2SVPN-01 set security ipsec vpn SRX02-TO-SRX01 ike ipsec-policy IPSEC-POLICY-S2SVPN-01 set security ipsec vpn SRX02-TO-SRX01 establish-tunnels immediately set security nat source rule-set SOURCE-NAT from zone trust set security nat source rule-set SOURCE-NAT to zone untrust set security nat source rule-set SOURCE-NAT rule PAT-INTERFACE match source-address 192.168.2.0/24 set security nat source rule-set SOURCE-NAT rule PAT-INTERFACE match destination-address 0.0.0.0/0 set security nat source rule-set SOURCE-NAT rule PAT-INTERFACE then source-nat interface set security policies from-zone trust to-zone untrust policy trust_to_untrust match source-address any set security policies from-zone trust to-zone untrust policy trust_to_untrust match destination-address any set security policies from-zone trust to-zone untrust policy trust_to_untrust match application any set security policies from-zone trust to-zone untrust policy trust_to_untrust then permit set security policies from-zone trust to-zone vpn policy trust-to-vpn match source-address any set security policies from-zone trust to-zone vpn policy trust-to-vpn match destination-address any set security policies from-zone trust to-zone vpn policy trust-to-vpn match application any set security policies from-zone trust to-zone vpn policy trust-to-vpn then permit set security policies from-zone vpn to-zone trust policy vpn-to-trust match source-address any set security policies from-zone vpn to-zone trust policy vpn-to-trust match destination-address any set security policies from-zone vpn to-zone trust policy vpn-to-trust match application any set security policies from-zone vpn to-zone trust policy vpn-to-trust then permit set security zones security-zone trust host-inbound-traffic system-services all set security zones security-zone trust host-inbound-traffic protocols all set security zones security-zone trust interfaces ge-0/0/1.0 set security zones security-zone untrust host-inbound-traffic system-services all set security zones security-zone untrust host-inbound-traffic protocols all set security zones security-zone untrust interfaces ge-0/0/0.0 set security zones security-zone vpn host-inbound-traffic system-services all set security zones security-zone vpn interfaces st0.0 set interfaces ge-0/0/0 unit 0 family inet address 20.1.1.1/24 set interfaces ge-0/0/1 unit 0 family inet address 192.168.2.1/24 set interfaces st0 unit 0 family inet set routing-options static route 0.0.0.0/0 next-hop 20.1.1.254 set routing-options static route 192.168.1.0/24 next-hop st0.0 root@SRX02> |
Router
| hostname INT_R1 ! boot-start-marker boot-end-marker ! ! ! no aaa new-model ! ! ! mmi polling-interval 60 no mmi auto-configure no mmi pvc mmi snmp-timeout 180 ! ! ! ! ! ! ! ! ! ! ! ip cef no ipv6 cef ! multilink bundle-name authenticated ! ! ! ! ! redundancy ! ! ! ! ! ! ! ! ! ! ! ! ! ! ! interface GigabitEthernet0/0 ip address 10.1.1.254 255.255.255.0 ip nat inside ip virtual-reassembly in duplex auto speed auto media-type rj45 ! interface GigabitEthernet0/1 ip address 20.1.1.254 255.255.255.0 ip nat inside ip virtual-reassembly in duplex auto speed auto media-type rj45 ! interface GigabitEthernet0/2 ip address 192.168.10.99 255.255.255.0 ip nat outside ip virtual-reassembly in duplex auto speed auto media-type rj45 ! interface GigabitEthernet0/3 no ip address shutdown duplex auto speed auto media-type rj45 ! ip forward-protocol nd ! ! no ip http server no ip http secure-server ip nat inside source list 1 interface GigabitEthernet0/2 overload ip route 0.0.0.0 0.0.0.0 192.168.10.253 ! ipv6 ioam timestamp ! ! access-list 1 permit any ! |
지금까지 [2025][Juniper SRX #23] site to site vpn - S2S VPN 글을 읽어주셔서 감사합니다.
'JUNIPER > SRX 방화벽' 카테고리의 다른 글
| [2025][Juniper SRX #26] Source Nat - SNAT - IP Pool (0) | 2025.02.14 |
|---|---|
| [2025][Juniper SRX #24] site to site vpn - S2S VPN - OSPF (0) | 2025.02.07 |
| [2025][Juniper SRX #22] site to site vpn - S2S VPN - 기본 설정 (0) | 2025.02.07 |
| [2025][Juniper SRX #21] ip monitor - ip sla (0) | 2025.02.06 |
| [2024][Juniper SRX #20] License Install - J-Web (0) | 2025.02.05 |