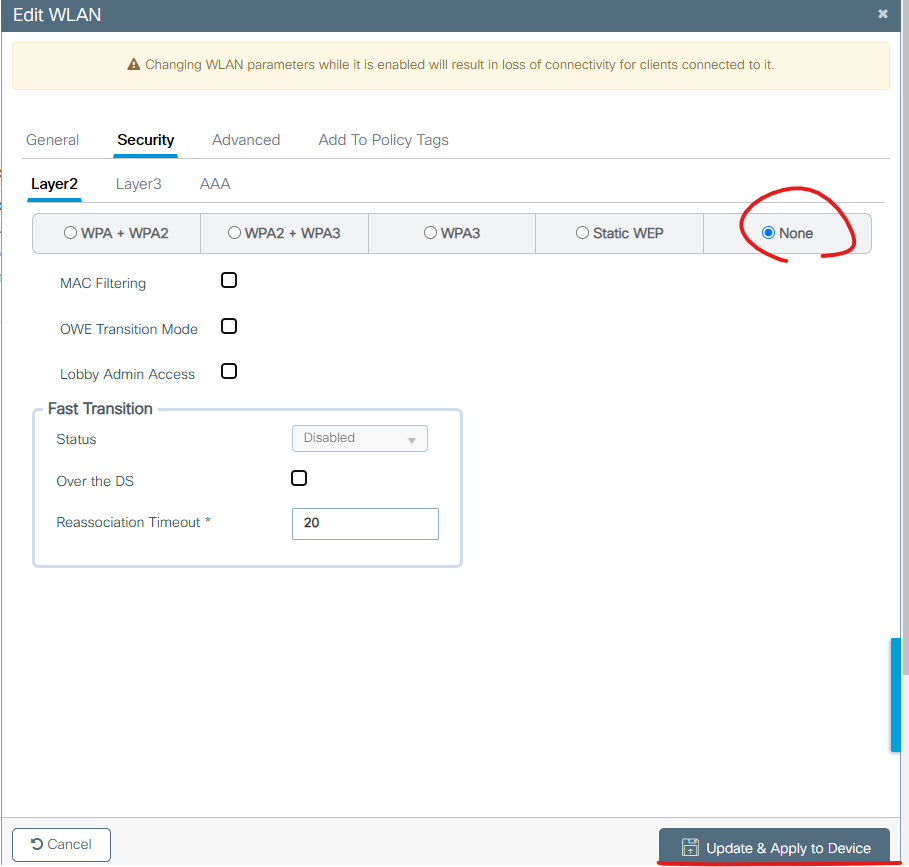
Security -> Layter2 -> None를 설정해서 SSID 패스워드 없이 접속 가능 하게 합니다.
테스트 용도이기 때문에 이렇게 설정합니다.
그리고 Save버튼을 클릭 합니다.
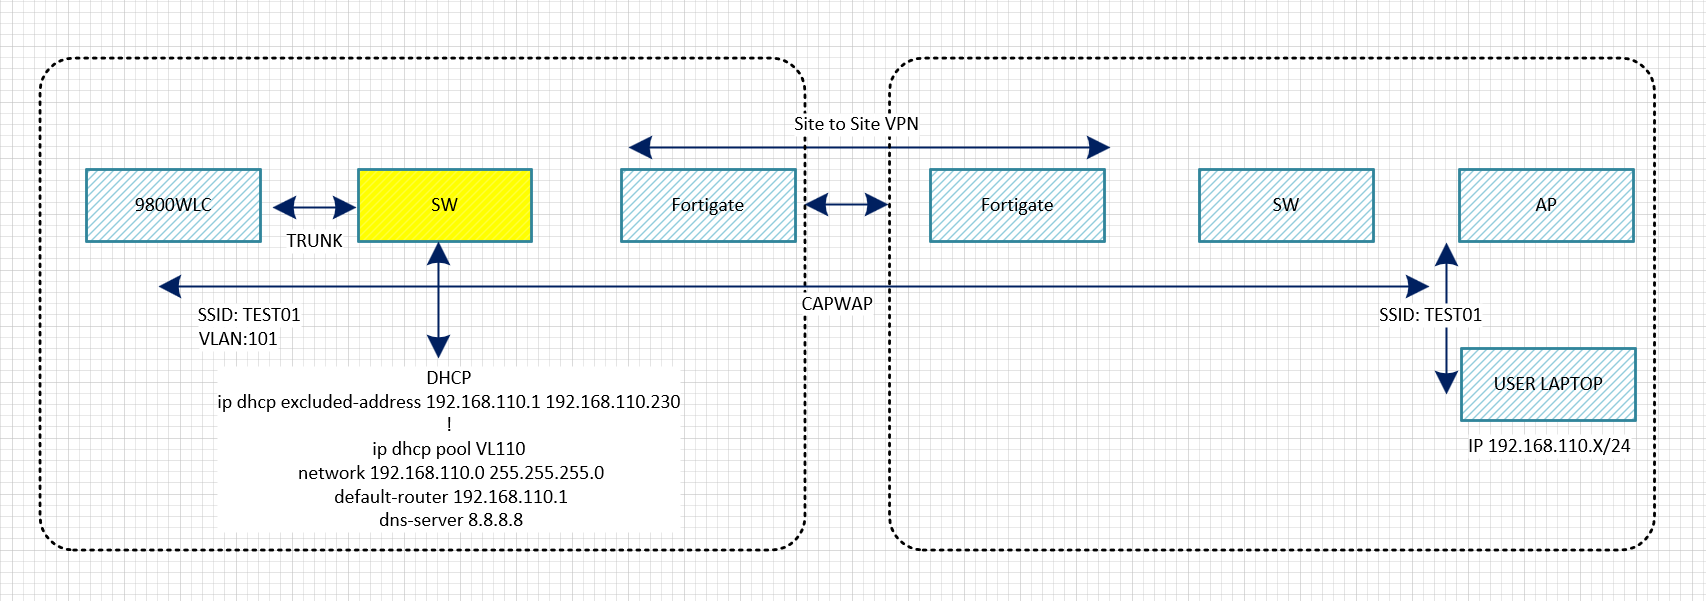
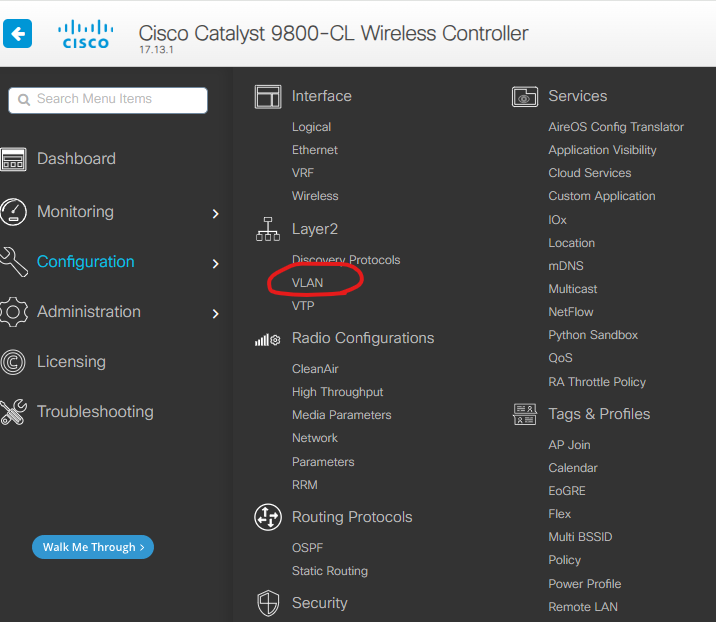
4. VLAN 설정
Configuration -> Layer2 -> VLAN
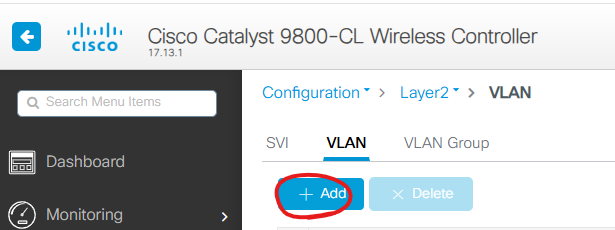
Add버튼을 클릭 합니다.
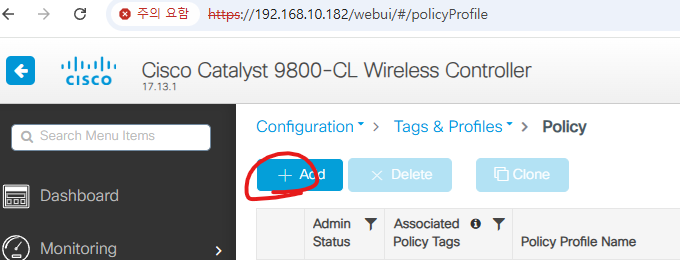
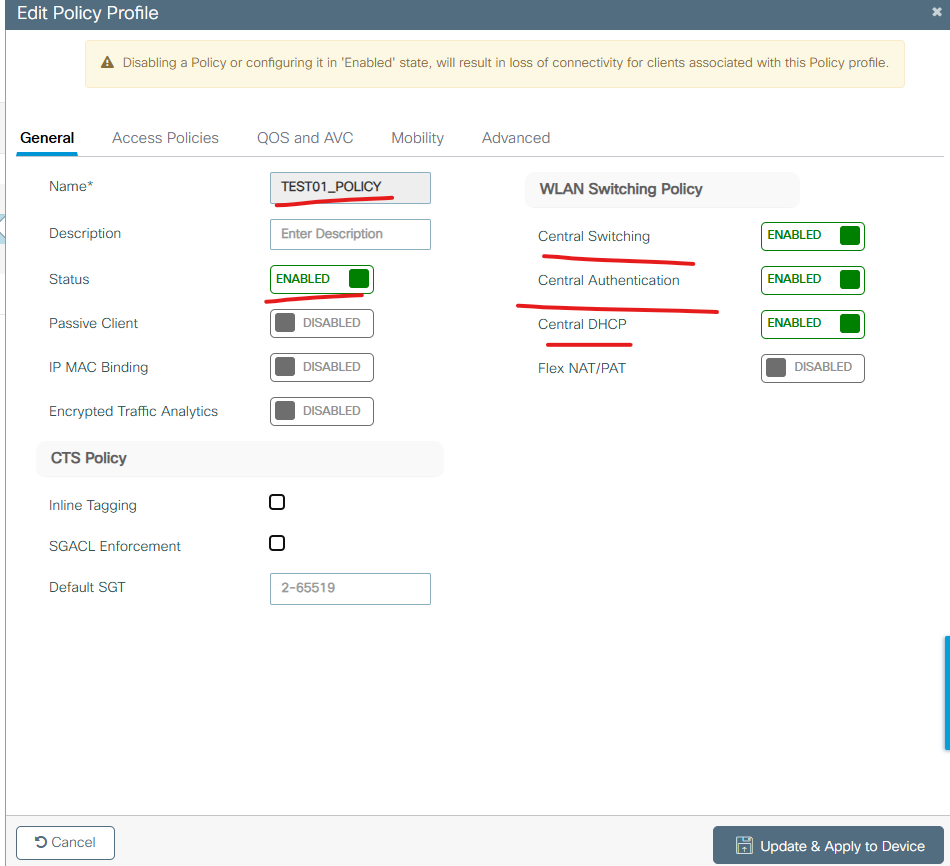
4. Policy 설정
아래처럼 설정합니다.
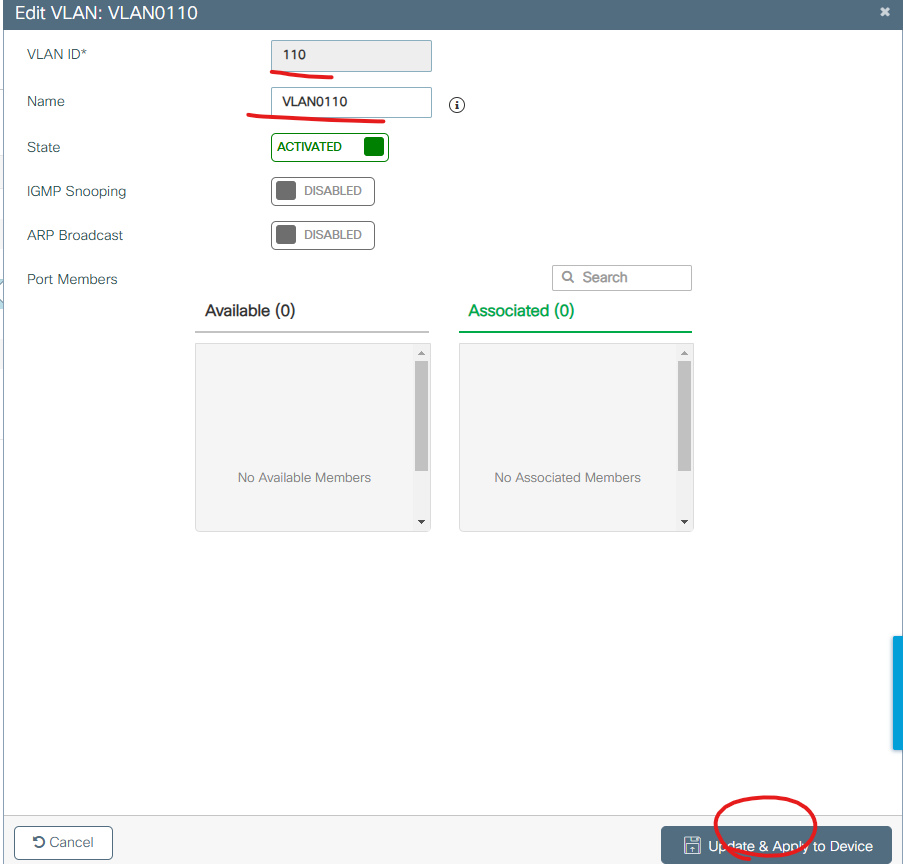
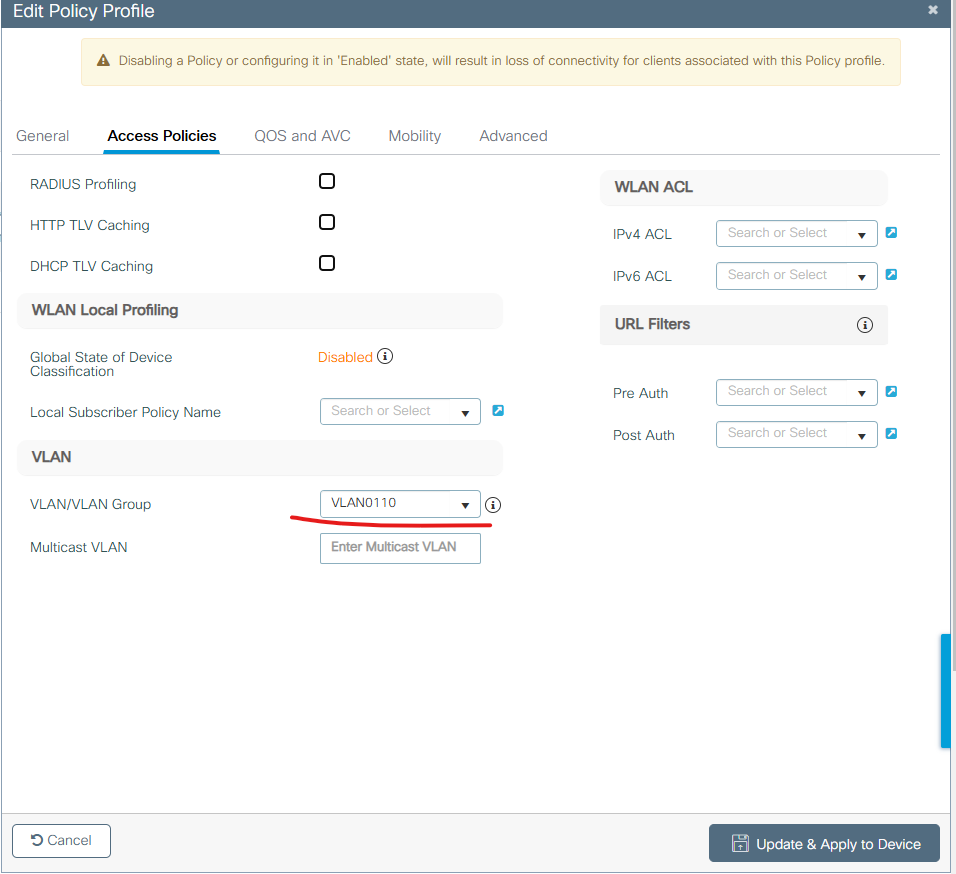
아래처럼 VLAN를 설정하고 나머지를 디폴트 값으로 두고 SAVE버튼을 클릭 합니다.
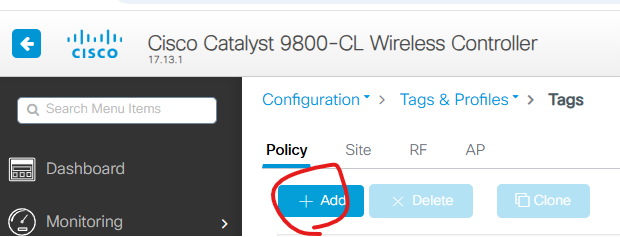
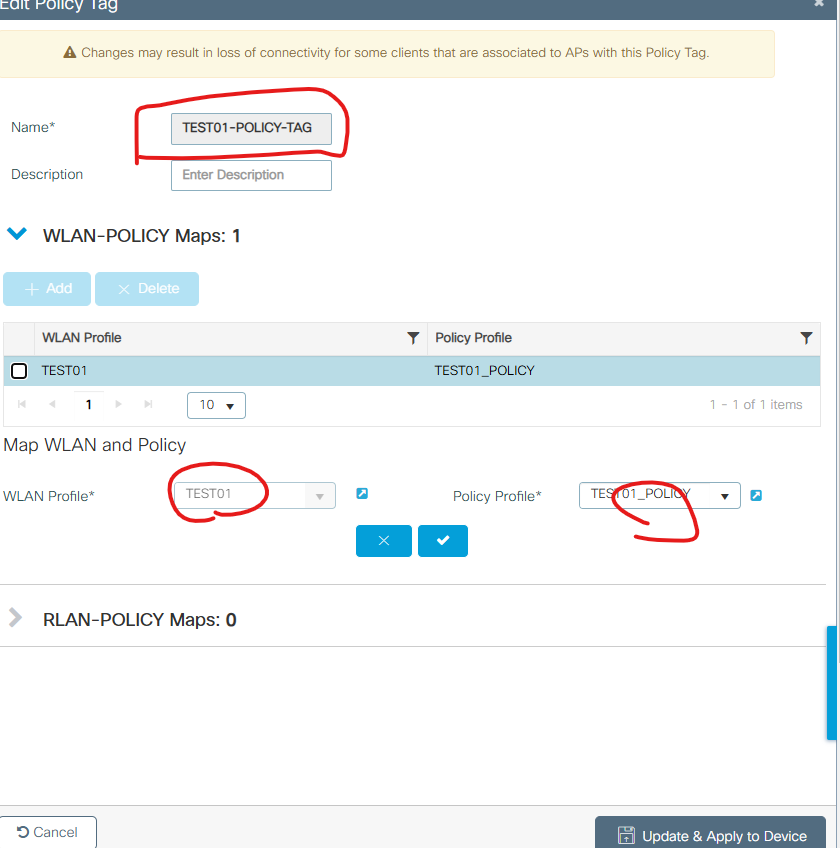
5. TAG설정 - POLICY
Name: TEST01-POLICY-TAG
WLAN: TEST01
PLOICY: TEST01_POLICY
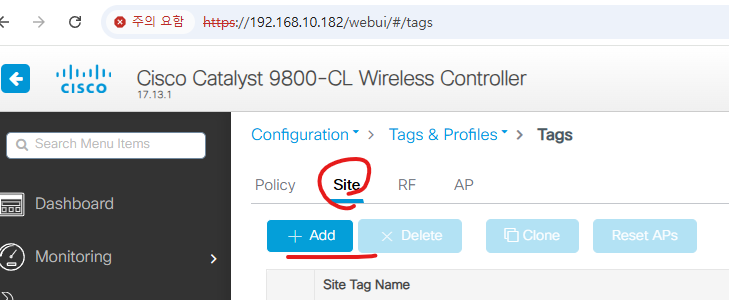
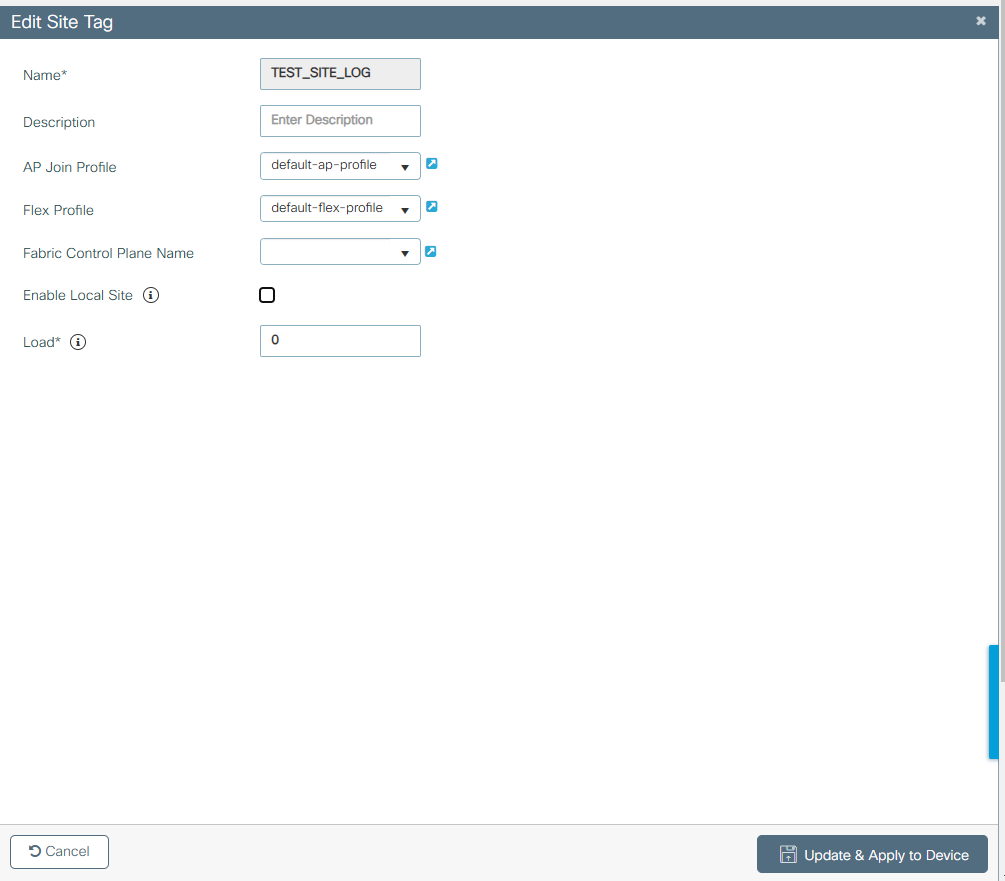
6. TAG 설정 - SITE
Name: TEST_SITE_TAG
아래처럼 설정 합니다.
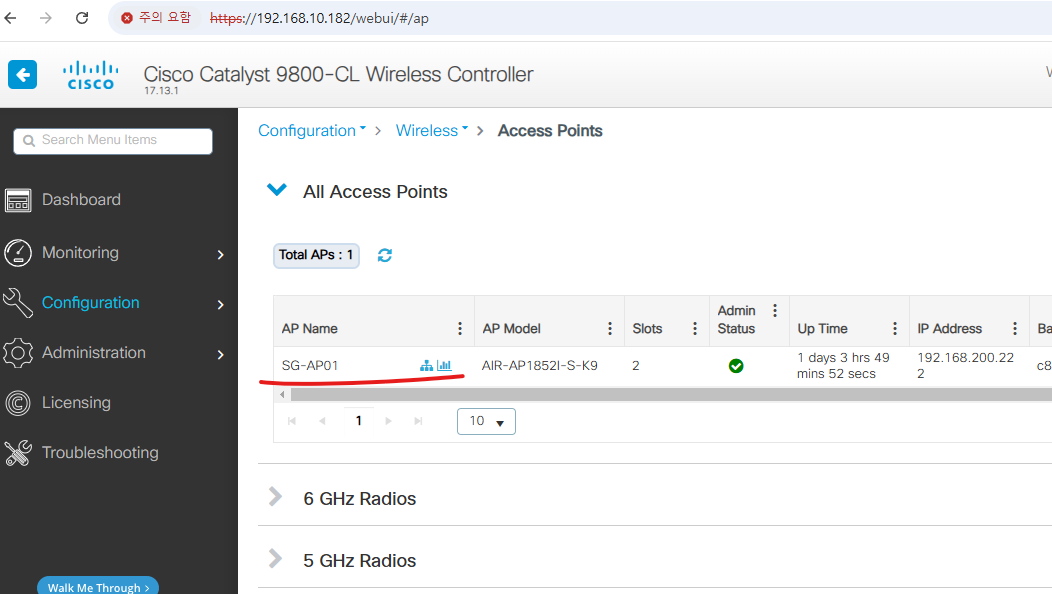
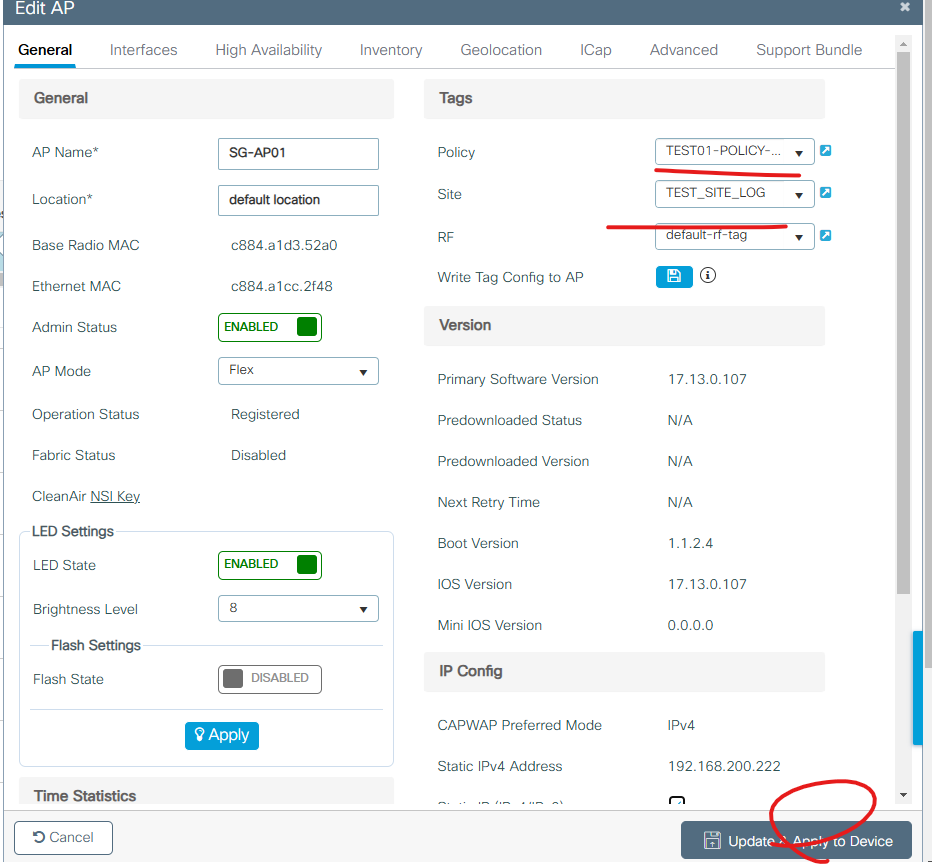
6. AP에 TAG 설정
7. 설정값을 적용하면 AP가 재부팅이 됩니다.
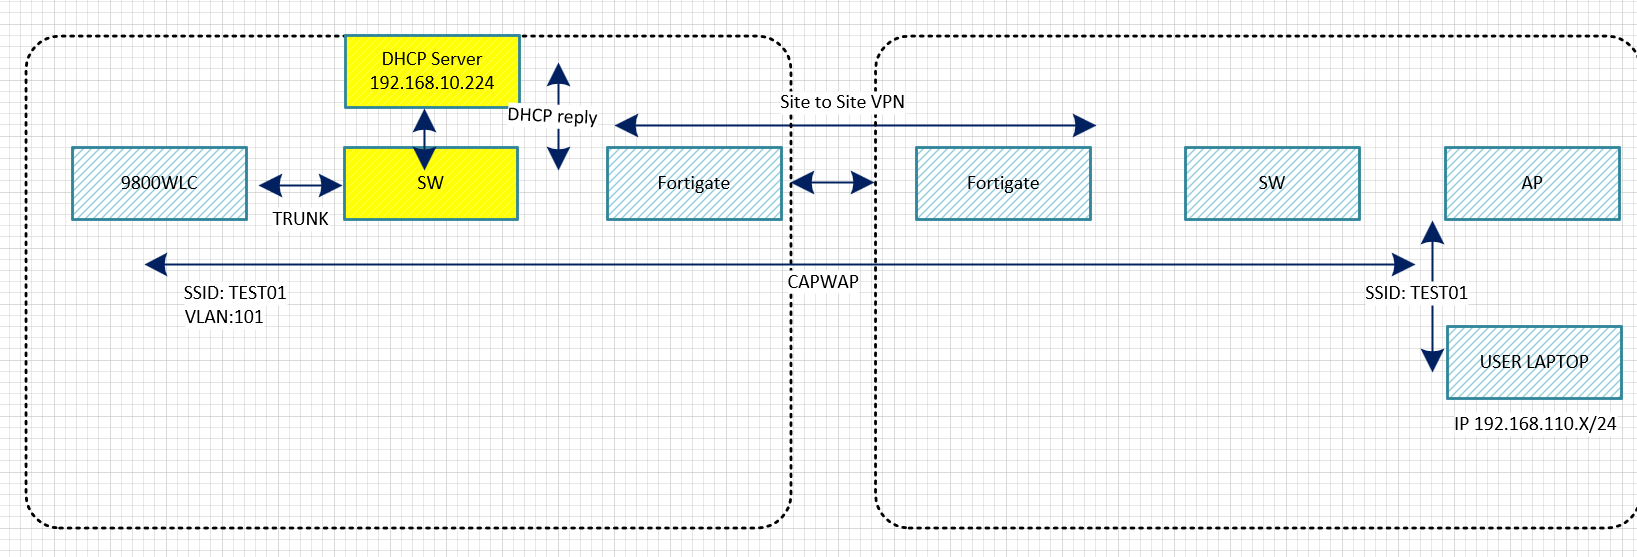
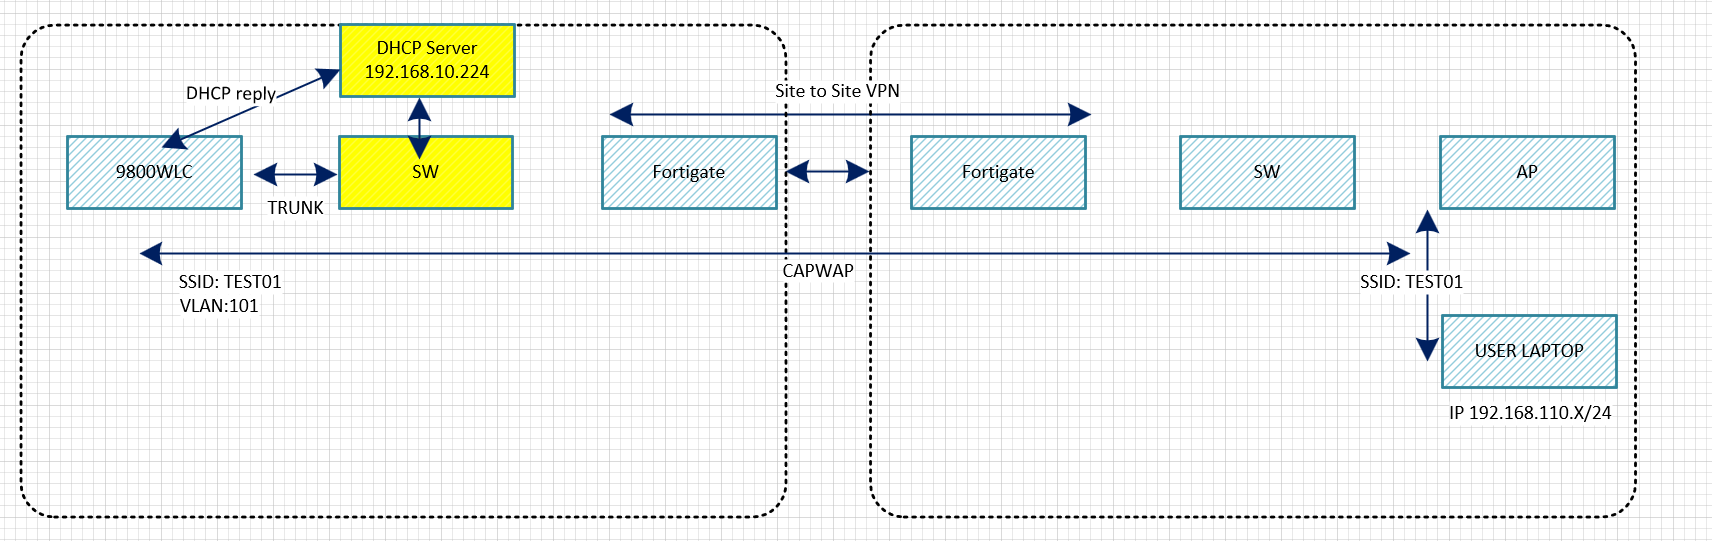
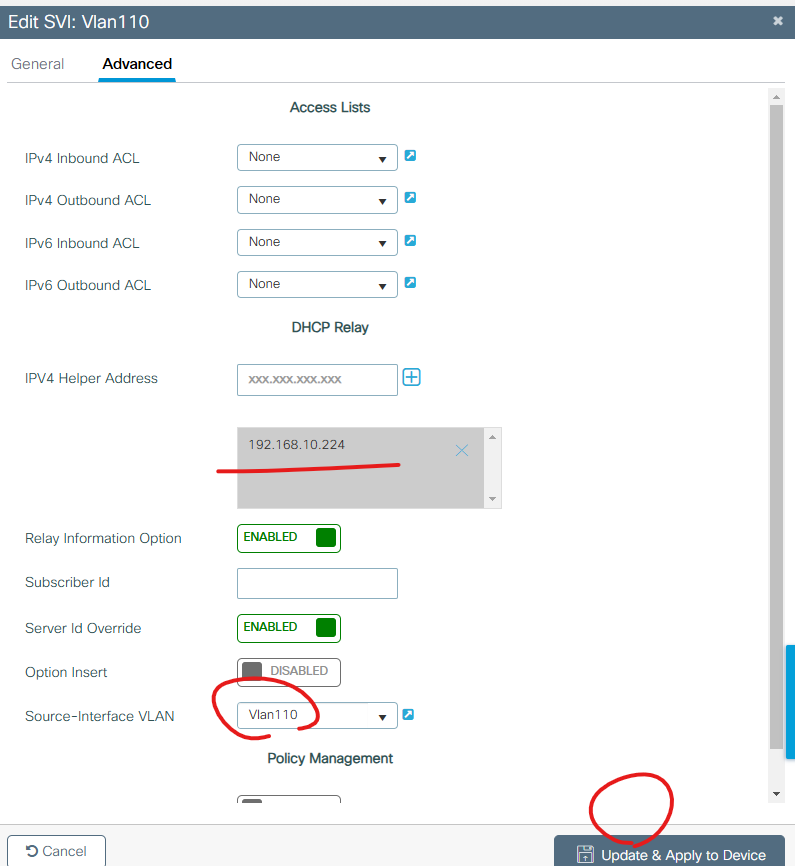
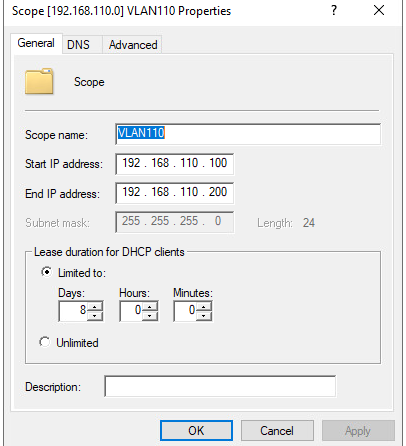
8. DC SWITCH에서 DHCP 설정
DHCP ip dhcp excluded-address 192.168.110.1 192.168.110.230 ! ip dhcp pool VL110 network 192.168.110.0 255.255.255.0 default-router 192.168.110.1 dns-server 8.8.8.8 ! VLAN 110 ! Int vlan 110 ip add 192.168.110.1 255.255.255.0 no shutdown
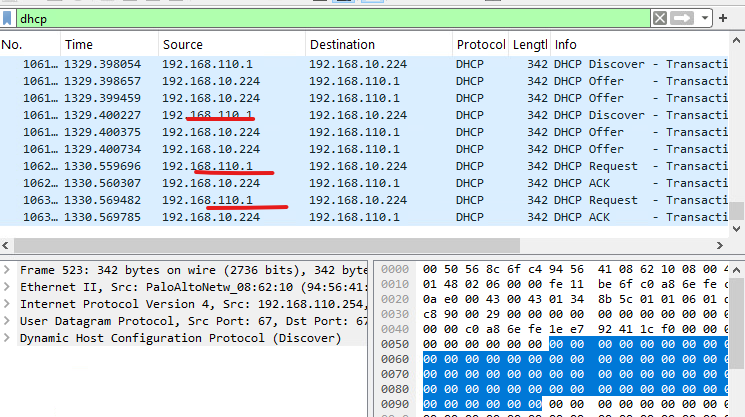
9. DHCP Binding 확인
SW01#show ip dhcp binding Bindings from all pools not associated with VRF: IP address Client-ID/ Lease expiration Type State Interface Hardware address/ User name SW01#
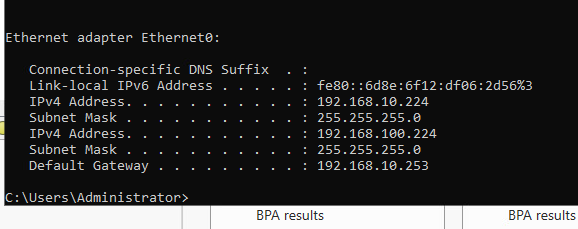
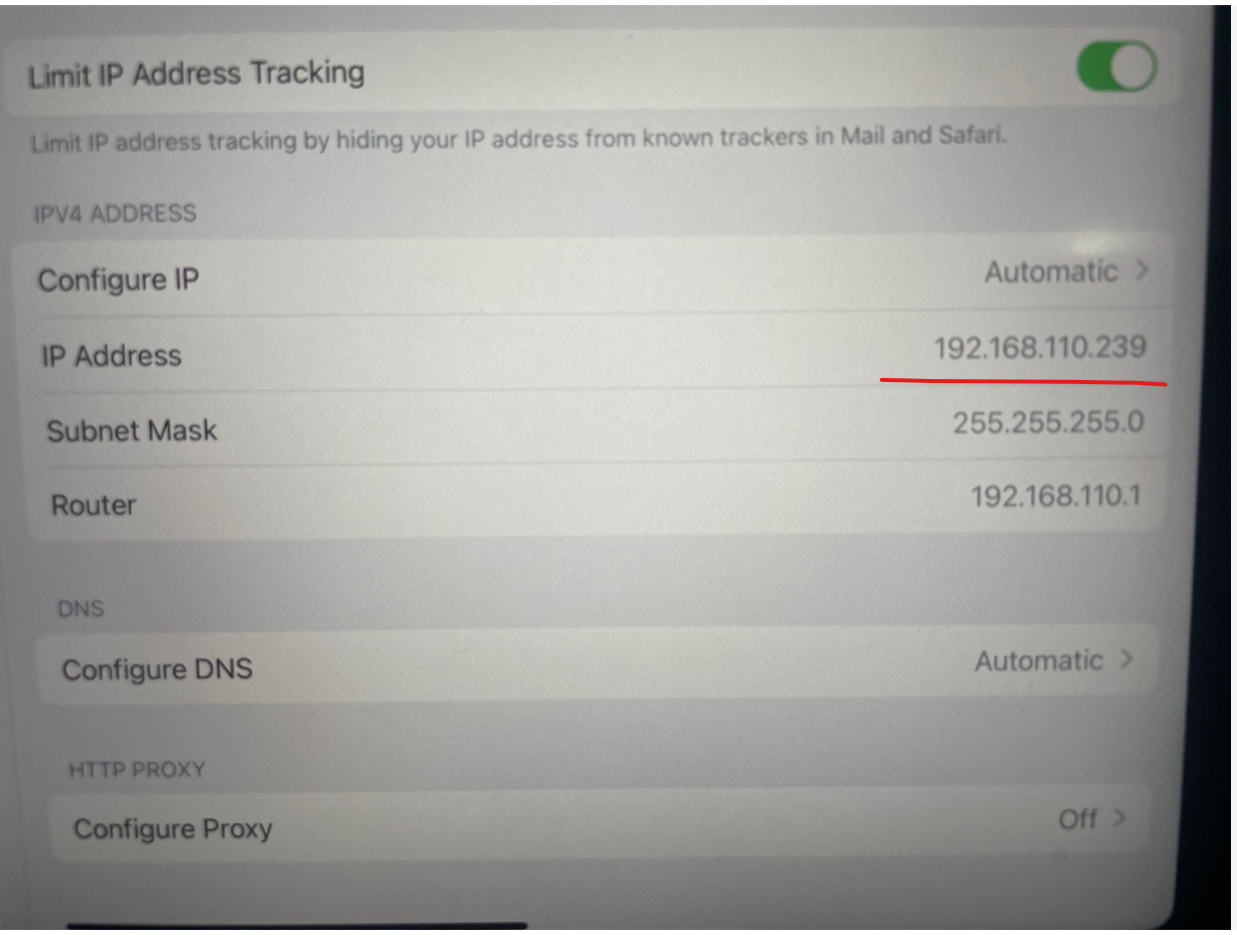
10. Client 에서 TEST01를 접속하고 IP주소를 확 합니다.
11. DC BackBone Swtich에서 DHCP Binding 확인
SW01#show ip dhcp binding Bindings from all pools not associated with VRF: IP address Client-ID/ Lease expiration Type State Interface Hardware address/ User name 192.168.110.239 011e.e792.411c.f0 Mar 02 2025 06:56 AM Automatic Active Vlan110 SW01#
SW01#ping 192.168.110.239 Type escape sequence to abort. Sending 5, 100-byte ICMP Echos to 192.168.110.239, timeout is 2 seconds: !!!!! Success rate is 100 percent (5/5), round-trip min/avg/max = 12/19/48 ms SW01#
지금까지 [C9800CL][#10]- DHCP Bridging - Option1 - BackBone SW DHCP 글을 읽어주셔서 감사합니다.
오늘은 Juniper IPS Signature Update하는 방법에 대해서 알아보겠습니다.
1. Juniper SRX License Check
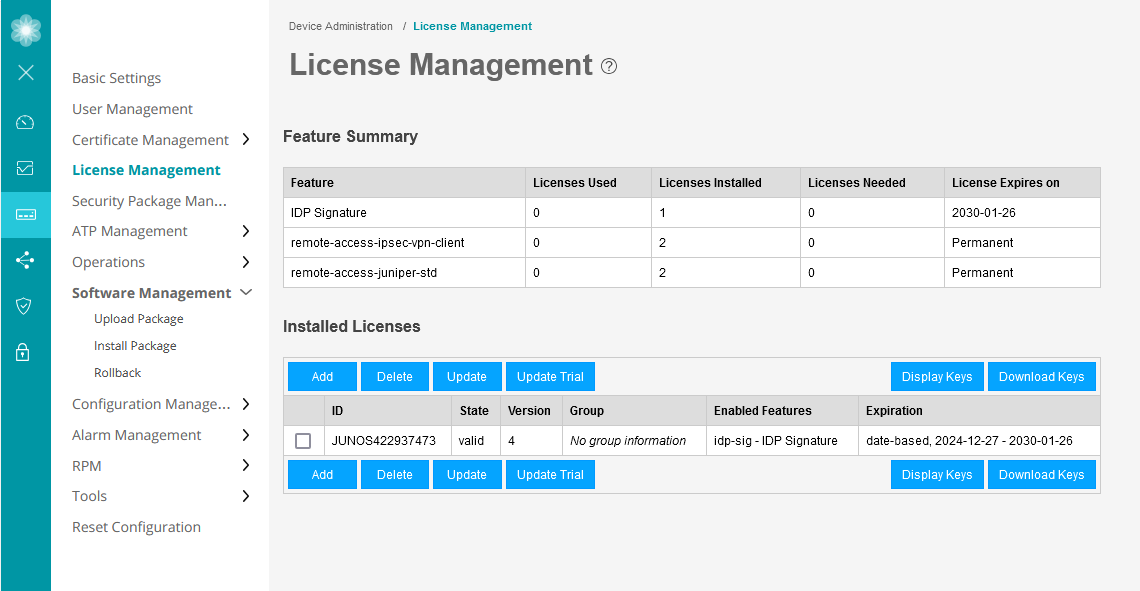
root> show system license License usage: Licensed Licensed Licensed Feature Feature Feature Feature name used installed needed Expiry idp-sig 0 1 0 2030-01-26 00:00:00 UTC remote-access-ipsec-vpn-client 0 2 0 permanent remote-access-juniper-std 0 2 0 permanent
Licenses installed:
License identifier: JUNOS422937473 License version: 4 Valid for device: CW4024AX0159 Customer ID: KDDI ASIA PACIFIC PTE. LTD. Features: idp-sig - IDP Signature date-based, 2024-12-27 00:00:00 UTC - 2030-01-26 00:00:00 UTC
root>
2. Juniper IDP Signature check.
root> show security idp security-package-version Attack database version:N/A(N/A) Detector version :N/A Policy template version :N/A Rollback Attack database version :N/A(N/A) Rollback Detector version : N/A
3. Juniper SRX IDP package Download- 외부에 통신 확인.
root> ping 8.8.8.8 PING 8.8.8.8 (8.8.8.8): 56 data bytes 64 bytes from 8.8.8.8: icmp_seq=0 ttl=118 time=46.391 ms 64 bytes from 8.8.8.8: icmp_seq=1 ttl=118 time=33.274 ms 64 bytes from 8.8.8.8: icmp_seq=2 ttl=118 time=20.448 ms 64 bytes from 8.8.8.8: icmp_seq=3 ttl=118 time=19.188 ms 64 bytes from 8.8.8.8: icmp_seq=4 ttl=118 time=18.793 ms ^C --- 8.8.8.8 ping statistics --- 5 packets transmitted, 5 packets received, 0% packet loss round-trip min/avg/max/stddev = 18.793/27.619/46.391/10.815 ms
root> request security idp security-package download Will be processed in async mode. Check the status using the status checking CLI
root>
root> request security idp security-package download status Done;Successfully downloaded from(https://signatures.juniper.net/cgi-bin/index.cgi). Version info:3786(Thu Feb 27 14:04:10 2025 UTC, Detector=23.6.160240709)
root>
4. Juniper SRX IDP Package Install
root> request security idp security-package install Will be processed in async mode. Check the status using the status checking CLI
root> request security idp security-package install status In progress:Installing AI ...
root>
약 5분 뒤에 request security idp security-package install status 확인 합니다.
root> request security idp security-package install status Done;Attack DB update : successful - [UpdateNumber=3786,ExportDate=Thu Feb 27 14:04:10 2025 UTC,Detector=23.6.160240709] Updating control-plane with new detector : successful Updating data-plane with new attack or detector : not performed due to no active policy configured.
5. check version
root> show security idp security-package-version Attack database version:3786(Thu Feb 27 14:04:10 2025 UTC) Detector version :23.6.160240709 Policy template version :N/A Rollback Attack database version :() Rollback Detector version : N/A
root>
지금까지 [2025][Juniper SRX #30] IDP Signature Update 글을 읽어주셔서 감사합니다.
root> show configuration | display set | no-more set version 21.4R3-S3.4 set system root-authentication encrypted-password "$6$Kt3WFIik$0vN75BKuEZDkbTiLXUiAaTbrdkZ2EQCMo0u/G2D.nI3yQFDnN2sRwSwMra/BrVBfXg2lnWtzltwnPZkIWY2Zi." set system services ssh set system services netconf ssh set system services dhcp-local-server group jdhcp-group interface irb.0 set system services web-management https system-generated-certificate set system name-server 8.8.8.8 set system name-server 8.8.4.4 set system syslog archive size 100k set system syslog archive files 3 set system syslog user * any emergency set system syslog file interactive-commands interactive-commands any set system syslog file messages any notice set system syslog file messages authorization info set system max-configurations-on-flash 5 set system max-configuration-rollbacks 5 set system license autoupdate url https://ae1.juniper.net/junos/key_retrieval set system phone-home server https://redirect.juniper.net set system phone-home rfc-compliant set security screen ids-option untrust-screen icmp ping-death set security screen ids-option untrust-screen ip source-route-option set security screen ids-option untrust-screen ip tear-drop set security screen ids-option untrust-screen tcp syn-flood alarm-threshold 1024 set security screen ids-option untrust-screen tcp syn-flood attack-threshold 200 set security screen ids-option untrust-screen tcp syn-flood source-threshold 1024 set security screen ids-option untrust-screen tcp syn-flood destination-threshold 2048 set security screen ids-option untrust-screen tcp syn-flood timeout 20 set security screen ids-option untrust-screen tcp land set security nat source rule-set trust-to-untrust from zone trust set security nat source rule-set trust-to-untrust to zone untrust set security nat source rule-set trust-to-untrust rule source-nat-rule match source-address 0.0.0.0/0 set security nat source rule-set trust-to-untrust rule source-nat-rule then source-nat interface set security policies from-zone trust to-zone trust policy trust-to-trust match source-address any set security policies from-zone trust to-zone trust policy trust-to-trust match destination-address any set security policies from-zone trust to-zone trust policy trust-to-trust match application any set security policies from-zone trust to-zone trust policy trust-to-trust then permit set security policies from-zone trust to-zone untrust policy trust-to-untrust match source-address any set security policies from-zone trust to-zone untrust policy trust-to-untrust match destination-address any set security policies from-zone trust to-zone untrust policy trust-to-untrust match application any set security policies from-zone trust to-zone untrust policy trust-to-untrust then permit set security policies pre-id-default-policy then log session-close set security zones security-zone trust host-inbound-traffic system-services all set security zones security-zone trust host-inbound-traffic protocols all set security zones security-zone trust interfaces irb.0 set security zones security-zone untrust screen untrust-screen set security zones security-zone untrust interfaces ge-0/0/0.0 host-inbound-traffic system-services dhcp set security zones security-zone untrust interfaces ge-0/0/0.0 host-inbound-traffic system-services tftp set security zones security-zone untrust interfaces ge-0/0/0.0 host-inbound-traffic system-services https set security zones security-zone untrust interfaces ge-0/0/7.0 host-inbound-traffic system-services dhcp set security zones security-zone untrust interfaces ge-0/0/7.0 host-inbound-traffic system-services tftp set security zones security-zone untrust interfaces dl0.0 host-inbound-traffic system-services tftp set interfaces ge-0/0/0 unit 0 family inet dhcp vendor-id Juniper-srx320 set interfaces ge-0/0/1 unit 0 family ethernet-switching vlan members vlan-trust set interfaces ge-0/0/2 unit 0 family ethernet-switching vlan members vlan-trust set interfaces ge-0/0/3 unit 0 family ethernet-switching vlan members vlan-trust set interfaces ge-0/0/4 unit 0 family ethernet-switching vlan members vlan-trust set interfaces ge-0/0/5 unit 0 family ethernet-switching vlan members vlan-trust set interfaces ge-0/0/6 unit 0 family ethernet-switching vlan members vlan-trust set interfaces ge-0/0/7 unit 0 family inet dhcp vendor-id Juniper-srx320 set interfaces cl-1/0/0 dialer-options pool 1 priority 100 set interfaces dl0 unit 0 family inet negotiate-address set interfaces dl0 unit 0 family inet6 negotiate-address set interfaces dl0 unit 0 dialer-options pool 1 set interfaces dl0 unit 0 dialer-options dial-string 1234 set interfaces dl0 unit 0 dialer-options always-on set interfaces irb unit 0 family inet address 192.168.1.1/24 set access address-assignment pool junosDHCPPool family inet network 192.168.1.0/24 set access address-assignment pool junosDHCPPool family inet range junosRange low 192.168.1.2 set access address-assignment pool junosDHCPPool family inet range junosRange high 192.168.1.254 set access address-assignment pool junosDHCPPool family inet dhcp-attributes router 192.168.1.1 set access address-assignment pool junosDHCPPool family inet dhcp-attributes propagate-settings ge-0/0/0.0 set vlans vlan-trust vlan-id 3 set vlans vlan-trust l3-interface irb.0 set protocols l2-learning global-mode switching set protocols rstp interface all
root>
root> show system license License usage: Licenses Licenses Licenses Expiry Feature name used installed needed idp-sig 0 1 0 2030-01-26 00:00:00 UTC remote-access-ipsec-vpn-client 0 2 0 permanent remote-access-juniper-std 0 2 0 permanent
Licenses installed: License identifier: JUNOS422937473 License version: 4 Valid for device: CW4024AX0159 Customer ID: KDDI ASIA PACIFIC PTE. LTD. Features: idp-sig - IDP Signature date-based, 2024-12-27 00:00:00 UTC - 2030-01-26 00:00:00 UTC
root>
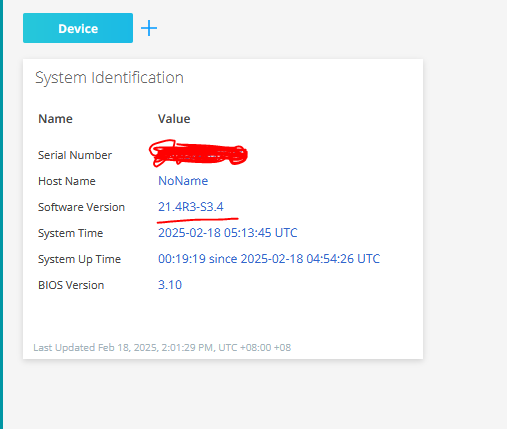
root> show version Model: srx320 Junos: 21.4R3-S3.4 JUNOS Software Release [21.4R3-S3.4]
2. UTP 케이블을 노트북과 Juniper SRX Ge-0/0/3에 연결합니다.
그리고 노트북에 192.168.1.2 255.255.255.0 설정하고
Ping 192.168.1.1
C:\Users\admin>ping 192.168.1.1
Pinging 192.168.1.1 with 32 bytes of data: Reply from 192.168.1.1: bytes=32 time=1ms TTL=64 Reply from 192.168.1.1: bytes=32 time=1ms TTL=64 Reply from 192.168.1.1: bytes=32 time=2ms TTL=64 Reply from 192.168.1.1: bytes=32 time=1ms TTL=64
Ping statistics for 192.168.1.1: Packets: Sent = 4, Received = 4, Lost = 0 (0% loss), Approximate round trip times in milli-seconds: Minimum = 1ms, Maximum = 2ms, Average = 1ms
C:\Users\admin>
C:\Users\admin>
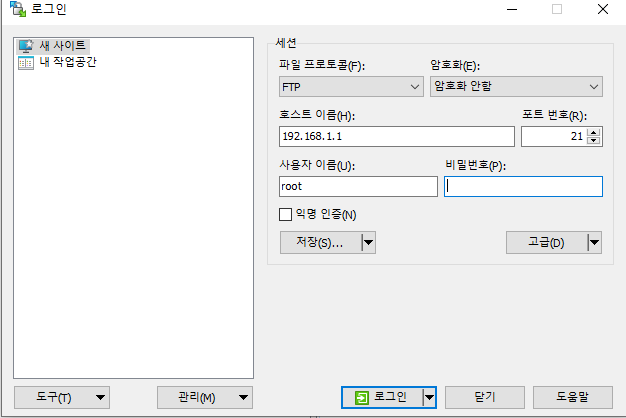
3. ftp enable 합니다.
root# set system services ftp
[edit] root# show system services ftp; ssh; netconf { ssh; } dhcp-local-server { group jdhcp-group { interface irb.0; } } web-management { https { system-generated-certificate; } }
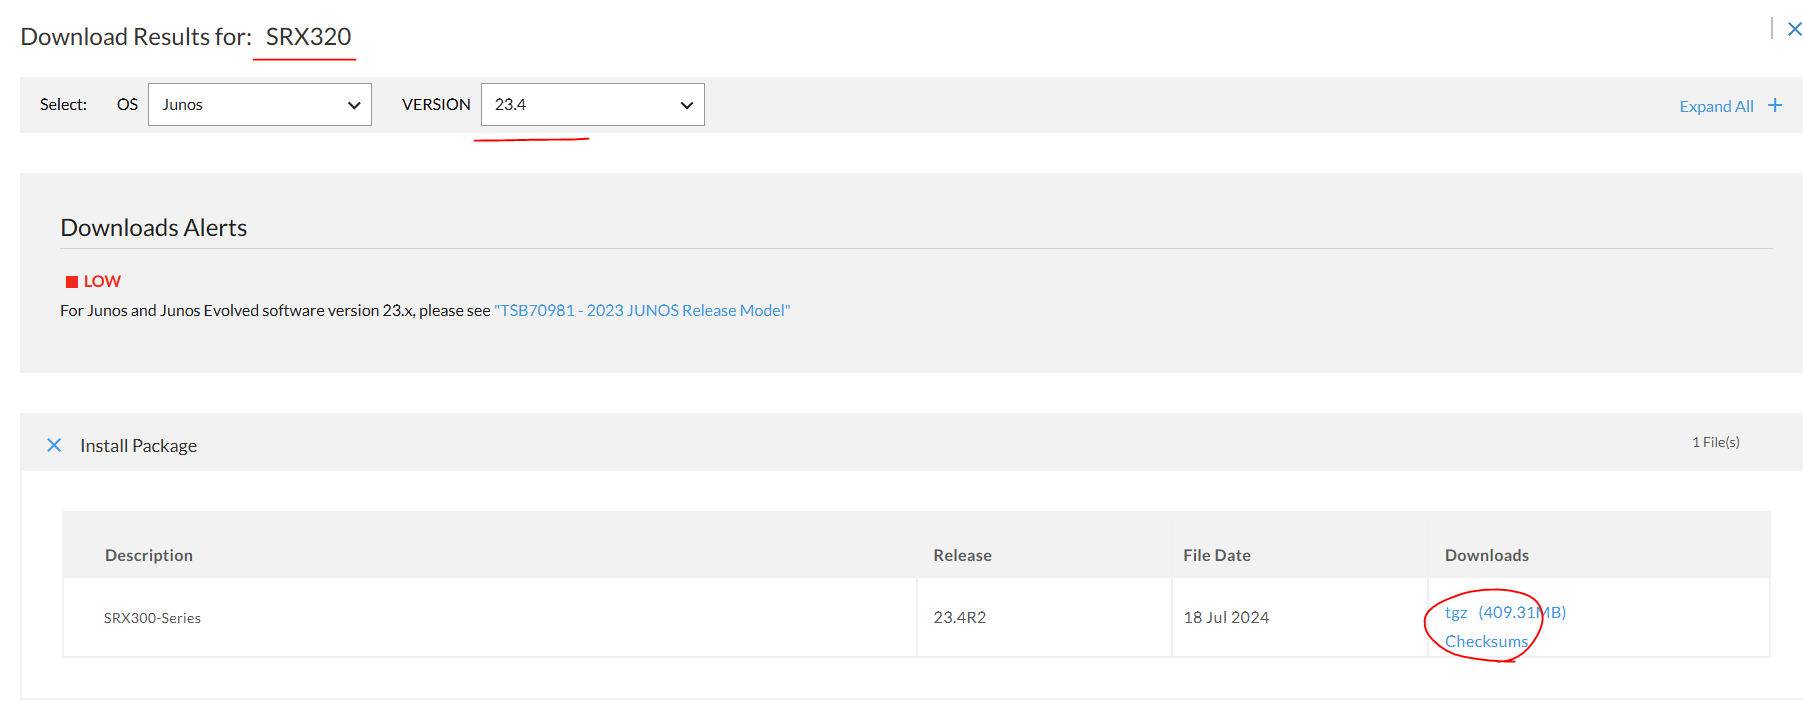
To make it easy to lookup for each Junos release for SRX from which earlier releases it is supported to directly upgrade to it, please see the below table.
Before performing the upgrade, please make sure to check the Notes section below for possible caveats and limitations which may apply.
Target Junos releaseDirect upgrade supported from
24.4(*2)
24.2, 23.4, 23.2
24.2
23.4, 23.2, 22.4
23.4
23.2, 22.4, 22.3
23.2
22.4, 22.3, 22.2
22.4
22.3, 22.2, 22.1, 21.4
22.3
22.2, 22.1, 21.4
22.2
22.1, 21.4, 21.3, 21.2
22.1
21.4, 21.3, 21.2
21.4
21.3, 21.2, 21.1, 20.4
21.3
21.2, 21.1, 20.4
21.2
21.1, 20.4, 20.3, 20.2
21.1
20.4, 20.3, 20.2
20.4
20.3, 20.2, 20.1, 19.4
20.3
20.2, 20.1, 19.4
20.2
20.1, 19.4, 19.3, 19.2
20.1
19.4, 19.3, 19.2
19.4
19.3, 19.2, 19.1, 18.4, 15.1X49
19.3
19.2, 19.1, 18.4
19.2
19.1, 18.4, 18.3, 18.2
19.1
18.4, 18.3, 18.2
18.4
18.3, 18.2, 18.1, 17.4, 15.1X49
18.3
18.2, 18.1, 17.4
18.2
18.1, 17.4, 17.3
18.1
17.4, 17.3
17.4
17.3, 15.1X49
17.3
15.1X49
15.1X49
12.3X48
위에 정보를 확인한 결과
To upgrade your SRX device from Junos 21.4R3 to 23.4R2-S3 Path: 21.4R3 -->22.4R3 -->23.4R2-S3
root> request system software add /cf/var/tmp/junos-srxsme-22.4R3.25.tgz no-validate reboot Formatting alternate root (/dev/da0s2a)... /dev/da0s2a: 596.0MB (1220680 sectors) block size 16384, fragment size 2048 using 4 cylinder groups of 149.02MB, 9537 blks, 19200 inodes. super-block backups (for fsck -b #) at: 32, 305216, 610400, 915584 saving package file in /var/sw/pkg ... Installing package '/altroot/cf/packages/install-tmp/junos-22.4R3.25' ... Verified junos-boot-srxsme-22.4R3.25.tgz signed by PackageProductionECP256_2024 method ECDSA256+SHA256 Verified junos-srxsme-22.4R3.25-domestic signed by PackageProductionECP256_2024 method ECDSA256+SHA256 Verified manifest signed by PackageProductionECP256_2024 method ECDSA256+SHA256 JUNOS 22.4R3.25 will become active at next reboot Saving state for rollback ... Rebooting ... shutdown: [pid 6825] Shutdown NOW!
*** FINAL System shutdown message from root@ ***
System going down IMMEDIATELY
부팅 과정 생략
Amnesiac (ttyu0)
login:
부팅이 완료 되면 로그인 합니다.
root> show version Model: srx320 Junos: 22.4R3.25 JUNOS Software Release [22.4R3.25]
root> show system license License usage: Licenses Licenses Licenses Feature Feature Feature Feature name used installed needed Expiry idp-sig 0 1 0 2030-01 -26 00:00:00 UTC remote-access-ipsec-vpn-client 0 2 0 permane nt remote-access-juniper-std 0 2 0 permane nt
Licenses installed: License identifier: License version: 4 Valid for device: Customer ID: Features: idp-sig - IDP Signature date-based, 2024-12-27 00:00:00 UTC - 2030-01-26 00:00:00 UTC
[edit] root# delete This will delete the entire configuration Delete everything under this level? [yes,no] (no) yes
[edit] root# set system root-authentication plain-text-password New password: Retype new password:
[edit] root# commit
1-2 Interface 설정
set interfaces ge-0/0/0 unit 0 family inet address 192.168.10.83/24 set interfaces ge-0/0/1 unit 0 family inet address 10.1.1.254/24 set interfaces ge-0/0/2 unit 0 family inet address 20.1.1.254/24 set protocols lldp interface all set routing-options static route 0.0.0.0/0 next-hop 192.168.10.253
1-3 Interface를 Zone에 할당하기. 그리고 system-services all로 설정
set security zones security-zone trust host-inbound-traffic system-services all set security zones security-zone trust host-inbound-traffic protocols all set security zones security-zone trust interfaces ge-0/0/1.0 set security zones security-zone untrust host-inbound-traffic system-services all set security zones security-zone untrust host-inbound-traffic protocols all set security zones security-zone untrust interfaces ge-0/0/0.0 set security zones security-zone dmz host-inbound-traffic system-services all set security zones security-zone dmz host-inbound-traffic protocols all set security zones security-zone dmz interfaces ge-0/0/2.0
1-4 SRX에서 방화벽 정책 설정
set security policies from-zone trust to-zone untrust policy trust_to_untrust match source-address any set security policies from-zone trust to-zone untrust policy trust_to_untrust match destination-address any set security policies from-zone trust to-zone untrust policy trust_to_untrust match application any set security policies from-zone trust to-zone untrust policy trust_to_untrust then permit
set security policies from-zone trust to-zone dmz policy trust_to_untrust match source-address any set security policies from-zone trust to-zone dmz policy trust_to_untrust match destination-address any set security policies from-zone trust to-zone dmz policy trust_to_untrust match application any set security policies from-zone trust to-zone dmz policy trust_to_untrust then permit
set security policies from-zone dmz to-zone untrust policy trust_to_untrust match source-address any set security policies from-zone dmz to-zone untrust policy trust_to_untrust match destination-address any set security policies from-zone dmz to-zone untrust policy trust_to_untrust match application any set security policies from-zone dmz to-zone untrust policy trust_to_untrust then permit
2. HTTP SERVER 설정 - 저는 cisco router를 http enable 해서 http server로 사용하겠습니다
conf t int g0/0 ip add 20.1.1.1 255.255.255.0 no sh ip route 0.0.0.0 0.0.0.0 20.1.1.254 ip http server
R1#show *Feb 14 05:15:18.099: %SYS-5-CONFIG_I: Configured from console by consoleip int brie Interface IP-Address OK? Method Status Protocol GigabitEthernet0/0 20.1.1.1 YES manual up up GigabitEthernet0/1 unassigned YES unset administratively down down GigabitEthernet0/2 unassigned YES unset administratively down down GigabitEthernet0/3 unassigned YES unset administratively down down R1# R1#show ip route Codes: L - local, C - connected, S - static, R - RIP, M - mobile, B - BGP D - EIGRP, EX - EIGRP external, O - OSPF, IA - OSPF inter area N1 - OSPF NSSA external type 1, N2 - OSPF NSSA external type 2 E1 - OSPF external type 1, E2 - OSPF external type 2 i - IS-IS, su - IS-IS summary, L1 - IS-IS level-1, L2 - IS-IS level-2 ia - IS-IS inter area, * - candidate default, U - per-user static route o - ODR, P - periodic downloaded static route, H - NHRP, l - LISP a - application route + - replicated route, % - next hop override, p - overrides from PfR
Gateway of last resort is 20.1.1.254 to network 0.0.0.0
S* 0.0.0.0/0 [1/0] via 20.1.1.254 20.0.0.0/8 is variably subnetted, 2 subnets, 2 masks C 20.1.1.0/24 is directly connected, GigabitEthernet0/0 L 20.1.1.1/32 is directly connected, GigabitEthernet0/0
R1#ping 20.1.1.254 Type escape sequence to abort. Sending 5, 100-byte ICMP Echos to 20.1.1.254, timeout is 2 seconds: !!!!! Success rate is 100 percent (5/5), round-trip min/avg/max = 1/2/4 ms R1#
3. User01/ USer02 설정
USER01> ip 10.1.1.1/24 10.1.1.254 Checking for duplicate address... VPCS : 10.1.1.1 255.255.255.0 gateway 10.1.1.254
USER01> save Saving startup configuration to startup.vpc . done
USER01> USER01> ping 10.1.1.254
84 bytes from 10.1.1.254 icmp_seq=1 ttl=64 time=0.418 ms 84 bytes from 10.1.1.254 icmp_seq=2 ttl=64 time=0.573 ms 84 bytes from 10.1.1.254 icmp_seq=3 ttl=64 time=0.539 ms 84 bytes from 10.1.1.254 icmp_seq=4 ttl=64 time=0.567 ms ^C USER01>
USER02> ip 10.1.1.2/24 10.1.1.254 Checking for duplicate address... VPCS : 10.1.1.2 255.255.255.0 gateway 10.1.1.254
USER02> save Saving startup configuration to startup.vpc . done
USER02> USER02> ping 10.1.1.254
84 bytes from 10.1.1.254 icmp_seq=1 ttl=64 time=0.418 ms 84 bytes from 10.1.1.254 icmp_seq=2 ttl=64 time=0.573 ms 84 bytes from 10.1.1.254 icmp_seq=3 ttl=64 time=0.539 ms 84 bytes from 10.1.1.254 icmp_seq=4 ttl=64 time=0.567 ms ^C USER02>
set security nat source pool source_nat address 192.168.10.84/32 set security nat source rule-set SOURCE-NAT from zone trust set security nat source rule-set SOURCE-NAT to zone untrust set security nat source rule-set SOURCE-NAT rule PAT-INTERFACE match source-address 10.1.1.0/24 set security nat source rule-set SOURCE-NAT rule PAT-INTERFACE match destination-address 0.0.0.0/0 set security nat source rule-set SOURCE-NAT rule PAT-INTERFACE then source-nat pool source_nat
PC에서 다시 확인
USER01> ping 8.8.8.8
84 bytes from 8.8.8.8 icmp_seq=1 ttl=56 time=10.328 ms 84 bytes from 8.8.8.8 icmp_seq=2 ttl=56 time=5.192 ms 84 bytes from 8.8.8.8 icmp_seq=3 ttl=56 time=5.557 ms 84 bytes from 8.8.8.8 icmp_seq=4 ttl=56 time=5.158 ms 84 bytes from 8.8.8.8 icmp_seq=5 ttl=56 time=4.425 ms
USER02> ping 8.8.8.8
84 bytes from 8.8.8.8 icmp_seq=1 ttl=56 time=10.328 ms 84 bytes from 8.8.8.8 icmp_seq=2 ttl=56 time=5.192 ms 84 bytes from 8.8.8.8 icmp_seq=3 ttl=56 time=5.557 ms 84 bytes from 8.8.8.8 icmp_seq=4 ttl=56 time=5.158 ms 84 bytes from 8.8.8.8 icmp_seq=5 ttl=56 time=4.425 ms
Probing 192.168.10.85:80/tcp - No response - time=2001.746ms Probing 192.168.10.85:80/tcp - No response - time=2003.928ms Probing 192.168.10.85:80/tcp - No response - time=2013.536ms Probing 192.168.10.85:80/tcp - No response - time=2006.107ms Probing 192.168.10.85:80/tcp - No response - time=2006.452ms Probing 192.168.10.85:80/tcp - No response - time=2005.353ms Probing 192.168.10.85:80/tcp - No response - time=2012.393ms Probing 192.168.10.85:80/tcp - No response - time=2012.957ms Probing 192.168.10.85:80/tcp - No response - time=2008.528ms Probing 192.168.10.85:80/tcp - No response - time=2011.220ms Probing 192.168.10.85:80/tcp - No response - time=2008.000ms Probing 192.168.10.85:80/tcp - No response - time=2008.216ms Probing 192.168.10.85:80/tcp - No response - time=2004.983ms Probing 192.168.10.85:80/tcp - No response - time=2000.407ms Probing 192.168.10.85:80/tcp - No response - time=2005.790ms
우선 외부 untrust에서 dmz로 통신하기 위해서 방화벽 정책을 설정 합니다.
set security zones security-zone dmz address-book address dmz_server_01 20.1.1.1/32
set security policies from-zone untrust to-zone dmz policy untrust_to_dmz_web_server match source-address any set security policies from-zone untrust to-zone dmz policy untrust_to_dmz_web_server match destination-address dmz_server_01 set security policies from-zone untrust to-zone dmz policy untrust_to_dmz_web_server match application any set security policies from-zone untrust to-zone dmz policy untrust_to_dmz_web_server then permit
SRX에서 Proxy로 IP POOL에 사용하는 IP 주소를 설정 해야지 Ge-0/0/0가 ARP에 대해서 응답합니다.
set security nat proxy-arp interface ge-0/0/0.0 address 192.168.10.86
DESTINATION NAT 설정
set security nat destination pool web_server address 20.1.1.1/32
set security nat destination rule-set to_web_server from zone untrust set security nat destination rule-set to_web_server rule web_server_incoming match destination-address 192.168.10.86/32 set security nat destination rule-set to_web_server rule web_server_incoming then destination-nat pool web_server
PC에서 통신을 확인 합니다.
정상적으로 통신 가능 합니다.
Probing 192.168.10.86:80/tcp - Port is open - time=23.372ms Probing 192.168.10.86:80/tcp - Port is open - time=18.897ms Probing 192.168.10.86:80/tcp - Port is open - time=14.309ms Probing 192.168.10.86:80/tcp - Port is open - time=18.139ms Probing 192.168.10.86:80/tcp - Port is open - time=23.166ms Probing 192.168.10.86:80/tcp - Port is open - time=19.464ms Probing 192.168.10.86:80/tcp - Port is open - time=18.645ms Probing 192.168.10.86:80/tcp - Port is open - time=27.360ms Probing 192.168.10.86:80/tcp - Port is open - time=19.947ms Probing 192.168.10.86:80/tcp - Port is open - time=20.782ms
위와 같이 192.168.10.85 포트 80 또는 8000으로 20.1.1.1 80으로 통신 가능 합니다.
Interface 확인
root> show interfaces terse Interface Admin Link Proto Local Remote ge-0/0/0 up up ge-0/0/0.0 up up inet 192.168.10.83/24 gr-0/0/0 up up ip-0/0/0 up up lsq-0/0/0 up up lt-0/0/0 up up mt-0/0/0 up up sp-0/0/0 up up sp-0/0/0.0 up up inet inet6 sp-0/0/0.16383 up up inet ge-0/0/1 up up ge-0/0/1.0 up up inet 10.1.1.254/24 ge-0/0/2 up up ge-0/0/2.0 up up inet 20.1.1.254/24 dsc up up fti0 up up fxp0 up up gre up up ipip up up irb up up lo0 up up lo0.16384 up up inet 127.0.0.1 --> 0/0 lo0.16385 up up inet 10.0.0.1 --> 0/0 10.0.0.16 --> 0/0 128.0.0.1 --> 0/0 128.0.0.4 --> 0/0 128.0.1.16 --> 0/0 lo0.32768 up up lsi up up mtun up up pimd up up pime up up pp0 up up ppd0 up up ppe0 up up st0 up up tap up up vlan up down
Routing 확인
root> show route
inet.0: 7 destinations, 7 routes (7 active, 0 holddown, 0 hidden) + = Active Route, - = Last Active, * = Both
0.0.0.0/0 *[Static/5] 00:13:56 > to 192.168.10.253 via ge-0/0/0.0 10.1.1.0/24 *[Direct/0] 00:13:56 > via ge-0/0/1.0 10.1.1.254/32 *[Local/0] 00:13:56 Local via ge-0/0/1.0 20.1.1.0/24 *[Direct/0] 00:13:56 > via ge-0/0/2.0 20.1.1.254/32 *[Local/0] 00:13:56 Local via ge-0/0/2.0 192.168.10.0/24 *[Direct/0] 00:13:56 > via ge-0/0/0.0 192.168.10.83/32 *[Local/0] 00:13:56 Local via ge-0/0/0.0
inet6.0: 1 destinations, 1 routes (1 active, 0 holddown, 0 hidden) + = Active Route, - = Last Active, * = Both
ff02::2/128 *[INET6/0] 00:30:41 MultiRecv
root>
Security Zone 확인
root> show security zones terse Zone Type dmz Security trust Security untrust Security junos-host Security
root> show security zones
Security zone: dmz Zone ID: 10 Send reset for non-SYN session TCP packets: Off Policy configurable: Yes Interfaces bound: 1 Interfaces: ge-0/0/2.0 Advanced-connection-tracking timeout: 1800 Unidirectional-session-refreshing: No
Security zone: trust Zone ID: 7 Send reset for non-SYN session TCP packets: Off Policy configurable: Yes Interfaces bound: 1 Interfaces: ge-0/0/1.0 Advanced-connection-tracking timeout: 1800 Unidirectional-session-refreshing: No
Security zone: untrust Zone ID: 8 Send reset for non-SYN session TCP packets: Off Policy configurable: Yes Interfaces bound: 1 Interfaces: ge-0/0/0.0 Advanced-connection-tracking timeout: 1800 Unidirectional-session-refreshing: No
Security zone: junos-host Zone ID: 2 Send reset for non-SYN session TCP packets: Off Policy configurable: Yes Interfaces bound: 0 Interfaces: Advanced-connection-tracking timeout: 1800 Unidirectional-session-refreshing: No
방화벽 정책 확인
root> show security policies Default policy: deny-all Default policy log Profile ID: 0 Pre ID default policy: permit-all From zone: trust, To zone: untrust Policy: trust_to_untrust, State: enabled, Index: 4, Scope Policy: 0, Sequence number: 1, Log Profile ID: 0 Source vrf group: any Destination vrf group: any Source addresses: any Destination addresses: any Applications: any Source identity feeds: any Destination identity feeds: any Action: permit From zone: trust, To zone: dmz Policy: trust_to_untrust, State: enabled, Index: 5, Scope Policy: 0, Sequence number: 1, Log Profile ID: 0 Source vrf group: any Destination vrf group: any Source addresses: any Destination addresses: any Applications: any Source identity feeds: any Destination identity feeds: any Action: permit From zone: dmz, To zone: untrust Policy: trust_to_untrust, State: enabled, Index: 6, Scope Policy: 0, Sequence number: 1, Log Profile ID: 0 Source vrf group: any Destination vrf group: any Source addresses: any Destination addresses: any Applications: any Source identity feeds: any Destination identity feeds: any Action: permit From zone: untrust, To zone: dmz Policy: untrust_to_dmz_web_server, State: enabled, Index: 7, Scope Policy: 0, Sequence number: 1, Log Profile ID: 0 Source vrf group: any Destination vrf group: any Source addresses: any Destination addresses: dmz_server_01 Applications: any Source identity feeds: any Destination identity feeds: any Action: permit
root>
방화벽 Hit Count 확인
root> show security policies hit-count Logical system: root-logical-system Index From zone To zone Name Policy count Action 1 trust untrust trust_to_untrust 1942 Permit 2 trust dmz trust_to_untrust 0 Permit 3 untrust dmz untrust_to_dmz_web_server 844 Permit 4 dmz untrust trust_to_untrust 2010 Permit
Number of policy: 4
root>
방화벽 설정값
root> show configuration | display set | no-more set version 21.3R1.9 set security nat source pool source_nat address 192.168.10.84/32 set security nat source rule-set SOURCE-NAT from zone trust set security nat source rule-set SOURCE-NAT to zone untrust set security nat source rule-set SOURCE-NAT rule PAT-INTERFACE match source-address 10.1.1.0/24 set security nat source rule-set SOURCE-NAT rule PAT-INTERFACE match destination-address 0.0.0.0/0 set security nat source rule-set SOURCE-NAT rule PAT-INTERFACE then source-nat interface set security nat destination pool port_foward_server address 20.1.1.1/32 set security nat destination pool port_foward_server address port 80 set security nat destination pool web_server address 20.1.1.1/32 set security nat destination rule-set to_web_server from zone untrust set security nat destination rule-set to_web_server rule port_forwarding match destination-address 192.168.10.85/32 set security nat destination rule-set to_web_server rule port_forwarding match destination-port 80 set security nat destination rule-set to_web_server rule port_forwarding match destination-port 8000 set security nat destination rule-set to_web_server rule port_forwarding then destination-nat pool port_foward_server set security nat destination rule-set to_web_server rule web_server_incoming match destination-address 192.168.10.86/32 set security nat destination rule-set to_web_server rule web_server_incoming then destination-nat pool web_server set security nat static rule-set static_nat_01 from zone untrust set security nat static rule-set static_nat_01 rule auth_server match destination-address 192.168.10.84/32 set security nat static rule-set static_nat_01 rule auth_server then static-nat prefix 20.1.1.1/32 set security nat proxy-arp interface ge-0/0/0.0 address 192.168.10.84/32 set security nat proxy-arp interface ge-0/0/0.0 address 192.168.10.85/32 set security nat proxy-arp interface ge-0/0/0.0 address 192.168.10.86/32 set security policies from-zone trust to-zone untrust policy trust_to_untrust match source-address any set security policies from-zone trust to-zone untrust policy trust_to_untrust match destination-address any set security policies from-zone trust to-zone untrust policy trust_to_untrust match application any set security policies from-zone trust to-zone untrust policy trust_to_untrust then permit set security policies from-zone trust to-zone dmz policy trust_to_untrust match source-address any set security policies from-zone trust to-zone dmz policy trust_to_untrust match destination-address any set security policies from-zone trust to-zone dmz policy trust_to_untrust match application any set security policies from-zone trust to-zone dmz policy trust_to_untrust then permit set security policies from-zone dmz to-zone untrust policy trust_to_untrust match source-address any set security policies from-zone dmz to-zone untrust policy trust_to_untrust match destination-address any set security policies from-zone dmz to-zone untrust policy trust_to_untrust match application any set security policies from-zone dmz to-zone untrust policy trust_to_untrust then permit set security policies from-zone untrust to-zone dmz policy untrust_to_dmz_web_server match source-address any set security policies from-zone untrust to-zone dmz policy untrust_to_dmz_web_server match destination-address dmz_server_01 set security policies from-zone untrust to-zone dmz policy untrust_to_dmz_web_server match application any set security policies from-zone untrust to-zone dmz policy untrust_to_dmz_web_server then permit set security zones security-zone trust host-inbound-traffic system-services all set security zones security-zone trust host-inbound-traffic protocols all set security zones security-zone trust interfaces ge-0/0/1.0 set security zones security-zone untrust host-inbound-traffic system-services all set security zones security-zone untrust host-inbound-traffic protocols all set security zones security-zone untrust interfaces ge-0/0/0.0 set security zones security-zone dmz address-book address dmz_server_01 20.1.1.1/32 set security zones security-zone dmz host-inbound-traffic system-services all set security zones security-zone dmz host-inbound-traffic protocols all set security zones security-zone dmz interfaces ge-0/0/2.0 set interfaces ge-0/0/0 unit 0 family inet address 192.168.10.83/24 set interfaces ge-0/0/1 unit 0 family inet address 10.1.1.254/24 set interfaces ge-0/0/2 unit 0 family inet address 20.1.1.254/24 set protocols lldp interface all set routing-options static route 0.0.0.0/0 next-hop 192.168.10.253
root>
지금까지 [2025][Juniper SRX #27] Destination Nat - DNAT 글을 읽어주셔서 감사합니다.
[edit] root# delete This will delete the entire configuration Delete everything under this level? [yes,no] (no) yes
[edit] root# set system root-authentication plain-text-password New password: Retype new password:
[edit] root# commit
1-2 Interface 설정
set interfaces ge-0/0/0 unit 0 family inet address 192.168.10.83/24 set interfaces ge-0/0/1 unit 0 family inet address 10.1.1.254/24 set interfaces ge-0/0/2 unit 0 family inet address 20.1.1.254/24 set protocols lldp interface all set routing-options static route 0.0.0.0/0 next-hop 192.168.10.253
1-3 Interface를 Zone에 할당하기. 그리고 system-services all로 설정
set security zones security-zone trust host-inbound-traffic system-services all set security zones security-zone trust host-inbound-traffic protocols all set security zones security-zone trust interfaces ge-0/0/1.0 set security zones security-zone untrust host-inbound-traffic system-services all set security zones security-zone untrust host-inbound-traffic protocols all set security zones security-zone untrust interfaces ge-0/0/0.0 set security zones security-zone dmz host-inbound-traffic system-services all set security zones security-zone dmz host-inbound-traffic protocols all set security zones security-zone dmz interfaces ge-0/0/2.0
1-4 SRX에서 방화벽 정책 설정
set security policies from-zone trust to-zone untrust policy trust_to_untrust match source-address any set security policies from-zone trust to-zone untrust policy trust_to_untrust match destination-address any set security policies from-zone trust to-zone untrust policy trust_to_untrust match application any set security policies from-zone trust to-zone untrust policy trust_to_untrust then permit
set security policies from-zone trust to-zone dmz policy trust_to_untrust match source-address any set security policies from-zone trust to-zone dmz policy trust_to_untrust match destination-address any set security policies from-zone trust to-zone dmz policy trust_to_untrust match application any set security policies from-zone trust to-zone dmz policy trust_to_untrust then permit
set security policies from-zone dmz to-zone untrust policy trust_to_untrust match source-address any set security policies from-zone dmz to-zone untrust policy trust_to_untrust match destination-address any set security policies from-zone dmz to-zone untrust policy trust_to_untrust match application any set security policies from-zone dmz to-zone untrust policy trust_to_untrust then permit
2. HTTP SERVER 설정 - 저는 cisco router를 http enable 해서 http server로 사용하겠습니다
conf t int g0/0 ip add 20.1.1.1 255.255.255.0 no sh ip route 0.0.0.0 0.0.0.0 20.1.1.254 ip http server
R1#show *Feb 14 05:15:18.099: %SYS-5-CONFIG_I: Configured from console by consoleip int brie Interface IP-Address OK? Method Status Protocol GigabitEthernet0/0 20.1.1.1 YES manual up up GigabitEthernet0/1 unassigned YES unset administratively down down GigabitEthernet0/2 unassigned YES unset administratively down down GigabitEthernet0/3 unassigned YES unset administratively down down R1# R1#show ip route Codes: L - local, C - connected, S - static, R - RIP, M - mobile, B - BGP D - EIGRP, EX - EIGRP external, O - OSPF, IA - OSPF inter area N1 - OSPF NSSA external type 1, N2 - OSPF NSSA external type 2 E1 - OSPF external type 1, E2 - OSPF external type 2 i - IS-IS, su - IS-IS summary, L1 - IS-IS level-1, L2 - IS-IS level-2 ia - IS-IS inter area, * - candidate default, U - per-user static route o - ODR, P - periodic downloaded static route, H - NHRP, l - LISP a - application route + - replicated route, % - next hop override, p - overrides from PfR
Gateway of last resort is 20.1.1.254 to network 0.0.0.0
S* 0.0.0.0/0 [1/0] via 20.1.1.254 20.0.0.0/8 is variably subnetted, 2 subnets, 2 masks C 20.1.1.0/24 is directly connected, GigabitEthernet0/0 L 20.1.1.1/32 is directly connected, GigabitEthernet0/0
R1#ping 20.1.1.254 Type escape sequence to abort. Sending 5, 100-byte ICMP Echos to 20.1.1.254, timeout is 2 seconds: !!!!! Success rate is 100 percent (5/5), round-trip min/avg/max = 1/2/4 ms R1#
3. User01/ USer02 설정
USER01> ip 10.1.1.1/24 10.1.1.254 Checking for duplicate address... VPCS : 10.1.1.1 255.255.255.0 gateway 10.1.1.254
USER01> save Saving startup configuration to startup.vpc . done
USER01> USER01> ping 10.1.1.254
84 bytes from 10.1.1.254 icmp_seq=1 ttl=64 time=0.418 ms 84 bytes from 10.1.1.254 icmp_seq=2 ttl=64 time=0.573 ms 84 bytes from 10.1.1.254 icmp_seq=3 ttl=64 time=0.539 ms 84 bytes from 10.1.1.254 icmp_seq=4 ttl=64 time=0.567 ms ^C USER01>
USER02> ip 10.1.1.2/24 10.1.1.254 Checking for duplicate address... VPCS : 10.1.1.2 255.255.255.0 gateway 10.1.1.254
USER02> save Saving startup configuration to startup.vpc . done
USER02> USER02> ping 10.1.1.254
84 bytes from 10.1.1.254 icmp_seq=1 ttl=64 time=0.418 ms 84 bytes from 10.1.1.254 icmp_seq=2 ttl=64 time=0.573 ms 84 bytes from 10.1.1.254 icmp_seq=3 ttl=64 time=0.539 ms 84 bytes from 10.1.1.254 icmp_seq=4 ttl=64 time=0.567 ms ^C USER02>
set security nat source pool source_nat address 192.168.10.84/32 set security nat source rule-set SOURCE-NAT from zone trust set security nat source rule-set SOURCE-NAT to zone untrust set security nat source rule-set SOURCE-NAT rule PAT-INTERFACE match source-address 10.1.1.0/24 set security nat source rule-set SOURCE-NAT rule PAT-INTERFACE match destination-address 0.0.0.0/0 set security nat source rule-set SOURCE-NAT rule PAT-INTERFACE then source-nat pool source_nat
PC에서 다시 확인
USER01> ping 8.8.8.8
84 bytes from 8.8.8.8 icmp_seq=1 ttl=56 time=10.328 ms 84 bytes from 8.8.8.8 icmp_seq=2 ttl=56 time=5.192 ms 84 bytes from 8.8.8.8 icmp_seq=3 ttl=56 time=5.557 ms 84 bytes from 8.8.8.8 icmp_seq=4 ttl=56 time=5.158 ms 84 bytes from 8.8.8.8 icmp_seq=5 ttl=56 time=4.425 ms
USER02> ping 8.8.8.8
84 bytes from 8.8.8.8 icmp_seq=1 ttl=56 time=10.328 ms 84 bytes from 8.8.8.8 icmp_seq=2 ttl=56 time=5.192 ms 84 bytes from 8.8.8.8 icmp_seq=3 ttl=56 time=5.557 ms 84 bytes from 8.8.8.8 icmp_seq=4 ttl=56 time=5.158 ms 84 bytes from 8.8.8.8 icmp_seq=5 ttl=56 time=4.425 ms
Probing 192.168.10.85:80/tcp - No response - time=2001.746ms Probing 192.168.10.85:80/tcp - No response - time=2003.928ms Probing 192.168.10.85:80/tcp - No response - time=2013.536ms Probing 192.168.10.85:80/tcp - No response - time=2006.107ms Probing 192.168.10.85:80/tcp - No response - time=2006.452ms Probing 192.168.10.85:80/tcp - No response - time=2005.353ms Probing 192.168.10.85:80/tcp - No response - time=2012.393ms Probing 192.168.10.85:80/tcp - No response - time=2012.957ms Probing 192.168.10.85:80/tcp - No response - time=2008.528ms Probing 192.168.10.85:80/tcp - No response - time=2011.220ms Probing 192.168.10.85:80/tcp - No response - time=2008.000ms Probing 192.168.10.85:80/tcp - No response - time=2008.216ms Probing 192.168.10.85:80/tcp - No response - time=2004.983ms Probing 192.168.10.85:80/tcp - No response - time=2000.407ms Probing 192.168.10.85:80/tcp - No response - time=2005.790ms
우선 외부 untrust에서 dmz로 통신하기 위해서 방화벽 정책을 설정 합니다.
set security zones security-zone dmz address-book address dmz_server_01 20.1.1.1/32
set security policies from-zone untrust to-zone dmz policy untrust_to_dmz_web_server match source-address any set security policies from-zone untrust to-zone dmz policy untrust_to_dmz_web_server match destination-address dmz_server_01 set security policies from-zone untrust to-zone dmz policy untrust_to_dmz_web_server match application any set security policies from-zone untrust to-zone dmz policy untrust_to_dmz_web_server then permit
SRX에서 Proxy로 IP POOL에 사용하는 IP 주소를 설정 해야지 Ge-0/0/0가 ARP에 대해서 응답합니다.
set security nat proxy-arp interface ge-0/0/0.0 address 192.168.10.85
DESTINATION NAT 설정
set security nat destination pool port_foward_server address 20.1.1.1/32 set security nat destination pool port_foward_server address port 80
set security nat destination rule-set to_web_server from zone untrust set security nat destination rule-set to_web_server rule port_forwarding match destination-address 192.168.10.85/32 set security nat destination rule-set to_web_server rule port_forwarding match destination-port 80 set security nat destination rule-set to_web_server rule port_forwarding then destination-nat pool port_foward_server
PC에서 통신을 확인 합니다.
정상적으로 통신 가능 합니다.
C:\Users\USER>tcping -t 192.168.10.85 80
** Pinging continuously. Press control-c to stop **
Probing 192.168.10.85:80/tcp - Port is open - time=65.904ms Probing 192.168.10.85:80/tcp - Port is open - time=15.969ms Control-C
만약에 192.168.10.85:8000 -> 20.1.1.1:80으로 통신 하고 싶다면 아래와 같이 설정 합니다.
set security nat destination rule-set to_web_server01 rule port_forwarding match destination-port 8000
내 PC에서 통신 시도
C:\Users\USER>tcping -t 192.168.10.85 8000
** Pinging continuously. Press control-c to stop **
Probing 192.168.10.85:8000/tcp - Port is open - time=14.496ms Probing 192.168.10.85:8000/tcp - Port is open - time=17.589ms Probing 192.168.10.85:8000/tcp - Port is open - time=13.039ms Probing 192.168.10.85:8000/tcp - Port is open - time=15.563ms Probing 192.168.10.85:8000/tcp - Port is open - time=15.389ms Probing 192.168.10.85:8000/tcp - Port is open - time=13.528ms Probing 192.168.10.85:8000/tcp - Port is open - time=11.238ms Probing 192.168.10.85:8000/tcp - Port is open - time=14.091ms
C:\Users\USER>tcping -t 192.168.10.85 80
** Pinging continuously. Press control-c to stop **
Probing 192.168.10.85:80/tcp - Port is open - time=55.989ms Probing 192.168.10.85:80/tcp - Port is open - time=54.255ms Probing 192.168.10.85:80/tcp - Port is open - time=19.360ms
위와 같이 192.168.10.85 포트 80 또는 8000으로 20.1.1.1 80으로 통신 가능 합니다.
root> show security nat destination summary Total pools: 1 Pool name Address Routing Port Total Range Instance Address port_foward_server 20.1.1.1 - 20.1.1.1 80 1
Total rules: 1 Rule name Rule set From Action port_forwarding to_web_server untrust port_foward_server
root>
root> show security nat destination rule all Total destination-nat rules: 1 Total referenced IPv4/IPv6 ip-prefixes: 1/0 Destination NAT rule: port_forwarding Rule-set: to_web_server Rule-Id : 1 Rule position : 1 From zone : untrust Destination addresses : 192.168.10.85 - 192.168.10.85 Destination port : 80 - 80 8000 - 8000 Action : port_foward_server Translation hits : 106 Successful sessions : 106 Number of sessions : 0
root>
Interface 확인
root> show interfaces terse Interface Admin Link Proto Local Remote ge-0/0/0 up up ge-0/0/0.0 up up inet 192.168.10.83/24 gr-0/0/0 up up ip-0/0/0 up up lsq-0/0/0 up up lt-0/0/0 up up mt-0/0/0 up up sp-0/0/0 up up sp-0/0/0.0 up up inet inet6 sp-0/0/0.16383 up up inet ge-0/0/1 up up ge-0/0/1.0 up up inet 10.1.1.254/24 ge-0/0/2 up up ge-0/0/2.0 up up inet 20.1.1.254/24 dsc up up fti0 up up fxp0 up up gre up up ipip up up irb up up lo0 up up lo0.16384 up up inet 127.0.0.1 --> 0/0 lo0.16385 up up inet 10.0.0.1 --> 0/0 10.0.0.16 --> 0/0 128.0.0.1 --> 0/0 128.0.0.4 --> 0/0 128.0.1.16 --> 0/0 lo0.32768 up up lsi up up mtun up up pimd up up pime up up pp0 up up ppd0 up up ppe0 up up st0 up up tap up up vlan up down
Routing 확인
root> show route
inet.0: 7 destinations, 7 routes (7 active, 0 holddown, 0 hidden) + = Active Route, - = Last Active, * = Both
0.0.0.0/0 *[Static/5] 00:13:56 > to 192.168.10.253 via ge-0/0/0.0 10.1.1.0/24 *[Direct/0] 00:13:56 > via ge-0/0/1.0 10.1.1.254/32 *[Local/0] 00:13:56 Local via ge-0/0/1.0 20.1.1.0/24 *[Direct/0] 00:13:56 > via ge-0/0/2.0 20.1.1.254/32 *[Local/0] 00:13:56 Local via ge-0/0/2.0 192.168.10.0/24 *[Direct/0] 00:13:56 > via ge-0/0/0.0 192.168.10.83/32 *[Local/0] 00:13:56 Local via ge-0/0/0.0
inet6.0: 1 destinations, 1 routes (1 active, 0 holddown, 0 hidden) + = Active Route, - = Last Active, * = Both
ff02::2/128 *[INET6/0] 00:30:41 MultiRecv
root>
Security Zone 확인
root> show security zones terse Zone Type dmz Security trust Security untrust Security junos-host Security
root> show security zones
Security zone: dmz Zone ID: 10 Send reset for non-SYN session TCP packets: Off Policy configurable: Yes Interfaces bound: 1 Interfaces: ge-0/0/2.0 Advanced-connection-tracking timeout: 1800 Unidirectional-session-refreshing: No
Security zone: trust Zone ID: 7 Send reset for non-SYN session TCP packets: Off Policy configurable: Yes Interfaces bound: 1 Interfaces: ge-0/0/1.0 Advanced-connection-tracking timeout: 1800 Unidirectional-session-refreshing: No
Security zone: untrust Zone ID: 8 Send reset for non-SYN session TCP packets: Off Policy configurable: Yes Interfaces bound: 1 Interfaces: ge-0/0/0.0 Advanced-connection-tracking timeout: 1800 Unidirectional-session-refreshing: No
Security zone: junos-host Zone ID: 2 Send reset for non-SYN session TCP packets: Off Policy configurable: Yes Interfaces bound: 0 Interfaces: Advanced-connection-tracking timeout: 1800 Unidirectional-session-refreshing: No
방화벽 정책 확인
root> show security policies Default policy: deny-all Default policy log Profile ID: 0 Pre ID default policy: permit-all From zone: trust, To zone: untrust Policy: trust_to_untrust, State: enabled, Index: 4, Scope Policy: 0, Sequence number: 1, Log Profile ID: 0 Source vrf group: any Destination vrf group: any Source addresses: any Destination addresses: any Applications: any Source identity feeds: any Destination identity feeds: any Action: permit From zone: trust, To zone: dmz Policy: trust_to_untrust, State: enabled, Index: 5, Scope Policy: 0, Sequence number: 1, Log Profile ID: 0 Source vrf group: any Destination vrf group: any Source addresses: any Destination addresses: any Applications: any Source identity feeds: any Destination identity feeds: any Action: permit From zone: dmz, To zone: untrust Policy: trust_to_untrust, State: enabled, Index: 6, Scope Policy: 0, Sequence number: 1, Log Profile ID: 0 Source vrf group: any Destination vrf group: any Source addresses: any Destination addresses: any Applications: any Source identity feeds: any Destination identity feeds: any Action: permit From zone: untrust, To zone: dmz Policy: untrust_to_dmz_web_server, State: enabled, Index: 7, Scope Policy: 0, Sequence number: 1, Log Profile ID: 0 Source vrf group: any Destination vrf group: any Source addresses: any Destination addresses: dmz_server_01 Applications: any Source identity feeds: any Destination identity feeds: any Action: permit
root>
방화벽 Hit Count 확인
root> show security policies hit-count Logical system: root-logical-system Index From zone To zone Name Policy count Action 1 trust untrust trust_to_untrust 1942 Permit 2 trust dmz trust_to_untrust 0 Permit 3 untrust dmz untrust_to_dmz_web_server 844 Permit 4 dmz untrust trust_to_untrust 2010 Permit
Number of policy: 4
root>
방화벽 설정값
root> show configuration | display set | no-more set version 21.3R1.9 set security nat source pool source_nat address 192.168.10.84/32 set security nat source rule-set SOURCE-NAT from zone trust set security nat source rule-set SOURCE-NAT to zone untrust set security nat source rule-set SOURCE-NAT rule PAT-INTERFACE match source-address 10.1.1.0/24 set security nat source rule-set SOURCE-NAT rule PAT-INTERFACE match destination-address 0.0.0.0/0 set security nat source rule-set SOURCE-NAT rule PAT-INTERFACE then source-nat interface set security nat destination pool port_foward_server address 20.1.1.1/32 set security nat destination pool port_foward_server address port 80 set security nat destination rule-set to_web_server from zone untrust set security nat destination rule-set to_web_server rule port_forwarding match destination-address 192.168.10.85/32 set security nat destination rule-set to_web_server rule port_forwarding match destination-port 80 set security nat destination rule-set to_web_server rule port_forwarding match destination-port 8000 set security nat destination rule-set to_web_server rule port_forwarding then destination-nat pool port_foward_server set security nat static rule-set static_nat_01 from zone untrust set security nat static rule-set static_nat_01 rule auth_server match destination-address 192.168.10.84/32 set security nat static rule-set static_nat_01 rule auth_server then static-nat prefix 20.1.1.1/32 set security nat proxy-arp interface ge-0/0/0.0 address 192.168.10.84/32 set security nat proxy-arp interface ge-0/0/0.0 address 192.168.10.85/32 set security policies from-zone trust to-zone untrust policy trust_to_untrust match source-address any set security policies from-zone trust to-zone untrust policy trust_to_untrust match destination-address any set security policies from-zone trust to-zone untrust policy trust_to_untrust match application any set security policies from-zone trust to-zone untrust policy trust_to_untrust then permit set security policies from-zone trust to-zone dmz policy trust_to_untrust match source-address any set security policies from-zone trust to-zone dmz policy trust_to_untrust match destination-address any set security policies from-zone trust to-zone dmz policy trust_to_untrust match application any set security policies from-zone trust to-zone dmz policy trust_to_untrust then permit set security policies from-zone dmz to-zone untrust policy trust_to_untrust match source-address any set security policies from-zone dmz to-zone untrust policy trust_to_untrust match destination-address any set security policies from-zone dmz to-zone untrust policy trust_to_untrust match application any set security policies from-zone dmz to-zone untrust policy trust_to_untrust then permit set security policies from-zone untrust to-zone dmz policy untrust_to_dmz_web_server match source-address any set security policies from-zone untrust to-zone dmz policy untrust_to_dmz_web_server match destination-address dmz_server_01 set security policies from-zone untrust to-zone dmz policy untrust_to_dmz_web_server match application any set security policies from-zone untrust to-zone dmz policy untrust_to_dmz_web_server then permit set security zones security-zone trust host-inbound-traffic system-services all set security zones security-zone trust host-inbound-traffic protocols all set security zones security-zone trust interfaces ge-0/0/1.0 set security zones security-zone untrust host-inbound-traffic system-services all set security zones security-zone untrust host-inbound-traffic protocols all set security zones security-zone untrust interfaces ge-0/0/0.0 set security zones security-zone dmz address-book address dmz_server_01 20.1.1.1/32 set security zones security-zone dmz host-inbound-traffic system-services all set security zones security-zone dmz host-inbound-traffic protocols all set security zones security-zone dmz interfaces ge-0/0/2.0 set interfaces ge-0/0/0 unit 0 family inet address 192.168.10.83/24 set interfaces ge-0/0/1 unit 0 family inet address 10.1.1.254/24 set interfaces ge-0/0/2 unit 0 family inet address 20.1.1.254/24 set protocols lldp interface all set routing-options static route 0.0.0.0/0 next-hop 192.168.10.253
root>
지금까지 [2025][Juniper SRX #27] Destination Nat - Port Forwarding 글을 읽어주셔서 감사합니다.
Smart Licensing Status: Registration Not Applicable/Not Applicable
cisco C8000V (VXE) processor (revision VXE) with 2032007K/3075K bytes of memory. Processor board ID 9DJL2EOPCI1 Router operating mode: Autonomous 4 Gigabit Ethernet interfaces 32768K bytes of non-volatile configuration memory. 3965344K bytes of physical memory. 5234688K bytes of virtual hard disk at bootflash:.