안녕하세요.
오늘은 [2025][Juniper SRX #27] Static NAT - One to One NAT 설정해보겠습니다.
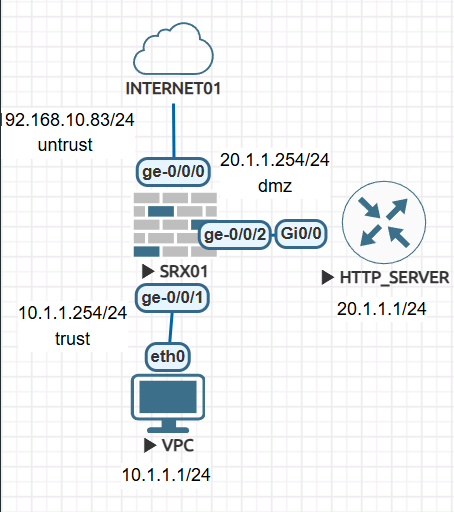
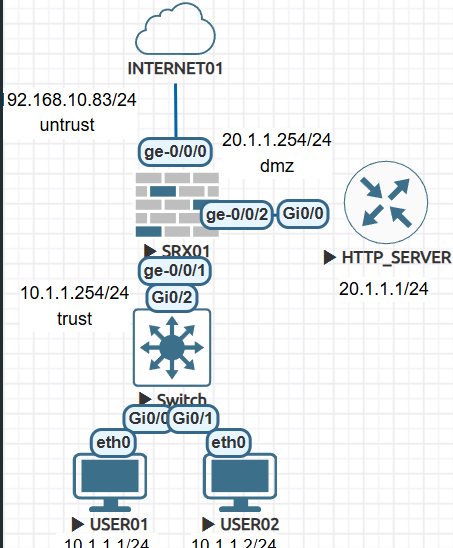
User01 - 10.1.1.1 Ge-0/0/0 192.168.10.83를 통해서 SNAT하고
User02 - 10.1.1.2 Ge-0/0/0 192.168.10.83를 통해서 SNAT하고
HTTP SERVER - 20.1.1.1에 static nat를 설정 하겠습니다.
외부에서 DMZ Server에 통신할때 192.168.10.84 -> 20.1.1.1 변경됩니다.
HTTP Server 20.1.1.1 외부로 통신할때 192.168.10.84로 변경 됩니다.
1.SRX01 기본설정 입니다.
1-1 SRX 디폴트로 설정되어진 설정값을 삭제 합니다.
FreeBSD/amd64 (Amnesiac) (ttyu0) login: root --- JUNOS 21.3R1.9 Kernel 64-bit XEN JNPR-12.1-20210828.6e5b1bf_buil root@:~ # cli root> root> root> root> configure Entering configuration mode [edit] root# delete This will delete the entire configuration Delete everything under this level? [yes,no] (no) yes [edit] root# set system root-authentication plain-text-password New password: Retype new password: [edit] root# commit |
1-2 Interface 설정
set interfaces ge-0/0/0 unit 0 family inet address 192.168.10.83/24 set interfaces ge-0/0/1 unit 0 family inet address 10.1.1.254/24 set interfaces ge-0/0/2 unit 0 family inet address 20.1.1.254/24 set protocols lldp interface all set routing-options static route 0.0.0.0/0 next-hop 192.168.10.253 |
1-3 Interface를 Zone에 할당하기. 그리고 system-services all로 설정
| set security zones security-zone trust host-inbound-traffic system-services all set security zones security-zone trust host-inbound-traffic protocols all set security zones security-zone trust interfaces ge-0/0/1.0 set security zones security-zone untrust host-inbound-traffic system-services all set security zones security-zone untrust host-inbound-traffic protocols all set security zones security-zone untrust interfaces ge-0/0/0.0 set security zones security-zone dmz host-inbound-traffic system-services all set security zones security-zone dmz host-inbound-traffic protocols all set security zones security-zone dmz interfaces ge-0/0/2.0 |
1-4 SRX에서 방화벽 정책 설정
| set security policies from-zone trust to-zone untrust policy trust_to_untrust match source-address any set security policies from-zone trust to-zone untrust policy trust_to_untrust match destination-address any set security policies from-zone trust to-zone untrust policy trust_to_untrust match application any set security policies from-zone trust to-zone untrust policy trust_to_untrust then permit set security policies from-zone trust to-zone dmz policy trust_to_untrust match source-address any set security policies from-zone trust to-zone dmz policy trust_to_untrust match destination-address any set security policies from-zone trust to-zone dmz policy trust_to_untrust match application any set security policies from-zone trust to-zone dmz policy trust_to_untrust then permit set security policies from-zone dmz to-zone untrust policy trust_to_untrust match source-address any set security policies from-zone dmz to-zone untrust policy trust_to_untrust match destination-address any set security policies from-zone dmz to-zone untrust policy trust_to_untrust match application any set security policies from-zone dmz to-zone untrust policy trust_to_untrust then permit |
2. HTTP SERVER 설정 - 저는 cisco router를 http enable 해서 http server로 사용하겠습니다
| conf t int g0/0 ip add 20.1.1.1 255.255.255.0 no sh ip route 0.0.0.0 0.0.0.0 20.1.1.254 ip http server |
| R1#show *Feb 14 05:15:18.099: %SYS-5-CONFIG_I: Configured from console by consoleip int brie Interface IP-Address OK? Method Status Protocol GigabitEthernet0/0 20.1.1.1 YES manual up up GigabitEthernet0/1 unassigned YES unset administratively down down GigabitEthernet0/2 unassigned YES unset administratively down down GigabitEthernet0/3 unassigned YES unset administratively down down R1# R1#show ip route Codes: L - local, C - connected, S - static, R - RIP, M - mobile, B - BGP D - EIGRP, EX - EIGRP external, O - OSPF, IA - OSPF inter area N1 - OSPF NSSA external type 1, N2 - OSPF NSSA external type 2 E1 - OSPF external type 1, E2 - OSPF external type 2 i - IS-IS, su - IS-IS summary, L1 - IS-IS level-1, L2 - IS-IS level-2 ia - IS-IS inter area, * - candidate default, U - per-user static route o - ODR, P - periodic downloaded static route, H - NHRP, l - LISP a - application route + - replicated route, % - next hop override, p - overrides from PfR Gateway of last resort is 20.1.1.254 to network 0.0.0.0 S* 0.0.0.0/0 [1/0] via 20.1.1.254 20.0.0.0/8 is variably subnetted, 2 subnets, 2 masks C 20.1.1.0/24 is directly connected, GigabitEthernet0/0 L 20.1.1.1/32 is directly connected, GigabitEthernet0/0 R1#ping 20.1.1.254 Type escape sequence to abort. Sending 5, 100-byte ICMP Echos to 20.1.1.254, timeout is 2 seconds: !!!!! Success rate is 100 percent (5/5), round-trip min/avg/max = 1/2/4 ms R1# |
3. User01/ USer02 설정
USER01> ip 10.1.1.1/24 10.1.1.254 Checking for duplicate address... VPCS : 10.1.1.1 255.255.255.0 gateway 10.1.1.254 USER01 > save Saving startup configuration to startup.vpc . done USER01 > USER01 > ping 10.1.1.254 84 bytes from 10.1.1.254 icmp_seq=1 ttl=64 time=0.418 ms 84 bytes from 10.1.1.254 icmp_seq=2 ttl=64 time=0.573 ms 84 bytes from 10.1.1.254 icmp_seq=3 ttl=64 time=0.539 ms 84 bytes from 10.1.1.254 icmp_seq=4 ttl=64 time=0.567 ms ^C USER01 > USER02> ip 10.1.1.2/24 10.1.1.254 Checking for duplicate address... VPCS : 10.1.1.2 255.255.255.0 gateway 10.1.1.254 USER02 > save Saving startup configuration to startup.vpc . done USER02 > USER02 > ping 10.1.1.254 84 bytes from 10.1.1.254 icmp_seq=1 ttl=64 time=0.418 ms 84 bytes from 10.1.1.254 icmp_seq=2 ttl=64 time=0.573 ms 84 bytes from 10.1.1.254 icmp_seq=3 ttl=64 time=0.539 ms 84 bytes from 10.1.1.254 icmp_seq=4 ttl=64 time=0.567 ms ^C USER02 > |
PC에서 ping 8.8.8.8 시도
| USER01> ping 8.8.8.8 8.8.8.8 icmp_seq=1 timeout 8.8.8.8 icmp_seq=2 timeout 8.8.8.8 icmp_seq=3 timeout 8.8.8.8 icmp_seq=4 timeout USER02> ping 8.8.8.8 8.8.8.8 icmp_seq=1 timeout 8.8.8.8 icmp_seq=2 timeout 8.8.8.8 icmp_seq=3 timeout 8.8.8.8 icmp_seq=4 timeout |
SRX에서 Source NAT (SNAT)가 설정 안되어져 있어서 통신이 불가능 합니다.
SRX에서 SNAT 설정
| set security nat source pool source_nat address 192.168.10.84/32 set security nat source rule-set SOURCE-NAT from zone trust set security nat source rule-set SOURCE-NAT to zone untrust set security nat source rule-set SOURCE-NAT rule PAT-INTERFACE match source-address 10.1.1.0/24 set security nat source rule-set SOURCE-NAT rule PAT-INTERFACE match destination-address 0.0.0.0/0 set security nat source rule-set SOURCE-NAT rule PAT-INTERFACE then source-nat pool source_nat |
PC에서 다시 확인
| USER01> ping 8.8.8.8 84 bytes from 8.8.8.8 icmp_seq=1 ttl=56 time=10.328 ms 84 bytes from 8.8.8.8 icmp_seq=2 ttl=56 time=5.192 ms 84 bytes from 8.8.8.8 icmp_seq=3 ttl=56 time=5.557 ms 84 bytes from 8.8.8.8 icmp_seq=4 ttl=56 time=5.158 ms 84 bytes from 8.8.8.8 icmp_seq=5 ttl=56 time=4.425 ms USER02> ping 8.8.8.8 84 bytes from 8.8.8.8 icmp_seq=1 ttl=56 time=10.328 ms 84 bytes from 8.8.8.8 icmp_seq=2 ttl=56 time=5.192 ms 84 bytes from 8.8.8.8 icmp_seq=3 ttl=56 time=5.557 ms 84 bytes from 8.8.8.8 icmp_seq=4 ttl=56 time=5.158 ms 84 bytes from 8.8.8.8 icmp_seq=5 ttl=56 time=4.425 ms |
방화벽에서 Session 확인하기
| root> show security flow session Session ID: 54102, Policy name: trust_to_untrust/4, State: Stand-alone, Timeout: 2, Valid In: 10.1.1.1/54387 --> 8.8.8.8/12;icmp, Conn Tag: 0x0, If: ge-0/0/1.0, Pkts: 1, Bytes: 84, Out: 8.8.8.8/12 --> 192.168.10.83/31714;icmp, Conn Tag: 0x0, If: ge-0/0/0.0, Pkts: 1, Bytes: 84, Session ID: 54103, Policy name: trust_to_untrust/4, State: Stand-alone, Timeout: 2, Valid In: 10.1.1.2/54643 --> 8.8.8.8/8;icmp, Conn Tag: 0x0, If: ge-0/0/1.0, Pkts: 1, Bytes: 84, Out: 8.8.8.8/8 --> 192.168.10.83/11101;icmp, Conn Tag: 0x0, If: ge-0/0/0.0, Pkts: 1, Bytes: 84, Session ID: 54104, Policy name: trust_to_untrust/4, State: Stand-alone, Timeout: 2, Valid In: 10.1.1.1/54643 --> 8.8.8.8/13;icmp, Conn Tag: 0x0, If: ge-0/0/1.0, Pkts: 1, Bytes: 84, Out: 8.8.8.8/13 --> 192.168.10.83/8139;icmp, Conn Tag: 0x0, If: ge-0/0/0.0, Pkts: 1, Bytes: 84, Session ID: 54105, Policy name: trust_to_untrust/4, State: Stand-alone, Timeout: 2, Valid In: 10.1.1.2/54899 --> 8.8.8.8/9;icmp, Conn Tag: 0x0, If: ge-0/0/1.0, Pkts: 1, Bytes: 84, Out: 8.8.8.8/9 --> 192.168.10.83/3136;icmp, Conn Tag: 0x0, If: ge-0/0/0.0, Pkts: 1, Bytes: 84, Session ID: 54106, Policy name: trust_to_untrust/4, State: Stand-alone, Timeout: 4, Valid In: 10.1.1.1/54899 --> 8.8.8.8/14;icmp, Conn Tag: 0x0, If: ge-0/0/1.0, Pkts: 1, Bytes: 84, Out: 8.8.8.8/14 --> 192.168.10.83/13674;icmp, Conn Tag: 0x0, If: ge-0/0/0.0, Pkts: 1, Bytes: 84, Total sessions: 5 |
DMZ에 20.1.1.1 서버에서 외부로 PING를 시도 합니다.
| R1#ping 20.1.1.254 Type escape sequence to abort. Sending 5, 100-byte ICMP Echos to 20.1.1.254, timeout is 2 seconds: !!!!! Success rate is 100 percent (5/5), round-trip min/avg/max = 1/2/7 ms R1#ping 8.8.8.8 Type escape sequence to abort. Sending 5, 100-byte ICMP Echos to 8.8.8.8, timeout is 2 seconds: ..... Success rate is 0 percent (0/5) R1# |
제 PC에서도 PING를 시도 합니다.
| C:\Users\USER>ping 192.168.10.84 Ping 192.168.10.84 32바이트 데이터 사용: 요청 시간이 만료되었습니다. 요청 시간이 만료되었습니다. 요청 시간이 만료되었습니다. 요청 시간이 만료되었습니다. 192.168.10.84에 대한 Ping 통계: 패킷: 보냄 = 4, 받음 = 0, 손실 = 4 (100% 손실), |
One to One NAT ( Static NAT)를 사용 해서 192.168.10.84 <---> 20.1.1.1로 설정합니다.
서버는 외부 통신할때 Source IP 20.1.1.1 -> 192.168.10.84 변경됩니다.
외부에서 DMZ서버랑 통신 할때 Destination IP 192.168.10.84 -> 20.1.1.1 변경 됩니다.
우선 외부 untrust에서 dmz로 통신하기 위해서 방화벽 정책을 설정 합니다.
| set security zones security-zone dmz address-book address dmz_server_01 20.1.1.1/32 set security policies from-zone untrust to-zone dmz policy untrust_to_dmz_web_server match source-address any set security policies from-zone untrust to-zone dmz policy untrust_to_dmz_web_server match destination-address dmz_server_01 set security policies from-zone untrust to-zone dmz policy untrust_to_dmz_web_server match application any set security policies from-zone untrust to-zone dmz policy untrust_to_dmz_web_server then permit |
그 이유는 SRX에서 Proxy로 IP POOL에 사용하는 IP 주소를 설정 해야지 Ge-0/0/0가 ARP에 대해서 응답합니다.
| set security nat proxy-arp interface ge-0/0/0.0 address 192.168.10.84 |
Static NAT 설정
| set security nat static rule-set static_nat_01 from zone untrust set security nat static rule-set static_nat_01 rule auth_server match destination-address 192.168.10.84/32 set security nat static rule-set static_nat_01 rule auth_server then static-nat prefix 20.1.1.1/32 |
WEB SERVER에서 외부로 PING
| R1#ping 8.8.8.8 Type escape sequence to abort. Sending 5, 100-byte ICMP Echos to 8.8.8.8, timeout is 2 seconds: !!!!! Success rate is 100 percent (5/5), round-trip min/avg/max = 1/3/6 ms R1# |
내 PC에서 통신 시도
| C:\Users\USER>ping 192.168.10.84 Ping 192.168.10.84 32바이트 데이터 사용: 192.168.10.84의 응답: 바이트=32 시간=40ms TTL=253 192.168.10.84의 응답: 바이트=32 시간=163ms TTL=253 192.168.10.84의 응답: 바이트=32 시간=17ms TTL=253 192.168.10.84의 응답: 바이트=32 시간=11ms TTL=253 192.168.10.84에 대한 Ping 통계: 패킷: 보냄 = 4, 받음 = 4, 손실 = 0 (0% 손실), 왕복 시간(밀리초): 최소 = 11ms, 최대 = 163ms, 평균 = 57ms C:\Users\USER> |
내 피시에서 https://192.168.10.84 접속하면 아래처럼 페이지가 열립니다.

SRX session 확인
아래처럼 20.1.1.1은 192.168.10.84로 변환하여 통신하고 있는것을 확인 가능 합니다.
| root> show security flow session Session ID: 57417, Policy name: trust_to_untrust/6, State: Stand-alone, Timeout: 2, Valid In: 20.1.1.1/8 --> 8.8.8.8/0;icmp, Conn Tag: 0x0, If: ge-0/0/2.0, Pkts: 1, Bytes: 100, Out: 8.8.8.8/0 --> 192.168.10.84/8;icmp, Conn Tag: 0x0, If: ge-0/0/0.0, Pkts: 1, Bytes: 100, Session ID: 57418, Policy name: trust_to_untrust/6, State: Stand-alone, Timeout: 2, Valid In: 20.1.1.1/8 --> 8.8.8.8/1;icmp, Conn Tag: 0x0, If: ge-0/0/2.0, Pkts: 1, Bytes: 100, Out: 8.8.8.8/1 --> 192.168.10.84/8;icmp, Conn Tag: 0x0, If: ge-0/0/0.0, Pkts: 1, Bytes: 100, |
제 PC에서 192.168.10.84 통신 했을때, 20.1.1.1로 변경되는것을 확인 가능 합니다.
| root> show security flow session Session ID: 58466, Policy name: untrust_to_dmz_web_server/7, State: Stand-alone, Timeout: 2, Valid In: 172.16.10.20/3 --> 192.168.10.84/11434;icmp, Conn Tag: 0x0, If: ge-0/0/0.0, Pkts: 1, Bytes: 60, Out: 20.1.1.1/11434 --> 172.16.10.20/3;icmp, Conn Tag: 0x0, If: ge-0/0/2.0, Pkts: 1, Bytes: 60, Session ID: 58467, Policy name: untrust_to_dmz_web_server/7, State: Stand-alone, Timeout: 2, Valid In: 172.16.10.20/3 --> 192.168.10.84/11436;icmp, Conn Tag: 0x0, If: ge-0/0/0.0, Pkts: 1, Bytes: 60, Out: 20.1.1.1/11436 --> 172.16.10.20/3;icmp, Conn Tag: 0x0, If: ge-0/0/2.0, Pkts: 1, Bytes: 60, Session ID: 58468, Policy name: untrust_to_dmz_web_server/7, State: Stand-alone, Timeout: 4, Valid In: 172.16.10.20/3 --> 192.168.10.84/11438;icmp, Conn Tag: 0x0, If: ge-0/0/0.0, Pkts: 1, Bytes: 60, Out: 20.1.1.1/11438 --> 172.16.10.20/3;icmp, Conn Tag: 0x0, If: ge-0/0/2.0, Pkts: 1, Bytes: 60, Total sessions: 3 |
| root> show security nat static rule all Total static-nat rules: 1 Total referenced IPv4/IPv6 ip-prefixes: 2/0 Static NAT rule: auth_server Rule-set: static_nat_01 Rule-Id : 1 Rule position : 1 From zone : untrust Destination addresses : 192.168.10.84 Host addresses : 20.1.1.1 Netmask : 32 Host routing-instance : N/A Translation hits : 2083 Successful sessions : 2083 Number of sessions : 4 root> |
Interface 확인
root> show interfaces terse Interface Admin Link Proto Local Remote ge-0/0/0 up up ge-0/0/0.0 up up inet 192.168.10.83/24 gr-0/0/0 up up ip-0/0/0 up up lsq-0/0/0 up up lt-0/0/0 up up mt-0/0/0 up up sp-0/0/0 up up sp-0/0/0.0 up up inet inet6 sp-0/0/0.16383 up up inet ge-0/0/1 up up ge-0/0/1.0 up up inet 10.1.1.254/24 ge-0/0/2 up up ge-0/0/2.0 up up inet 20.1.1.254/24 dsc up up fti0 up up fxp0 up up gre up up ipip up up irb up up lo0 up up lo0.16384 up up inet 127.0.0.1 --> 0/0 lo0.16385 up up inet 10.0.0.1 --> 0/0 10.0.0.16 --> 0/0 128.0.0.1 --> 0/0 128.0.0.4 --> 0/0 128.0.1.16 --> 0/0 lo0.32768 up up lsi up up mtun up up pimd up up pime up up pp0 up up ppd0 up up ppe0 up up st0 up up tap up up vlan up down |
Routing 확인
| root> show route inet.0: 7 destinations, 7 routes (7 active, 0 holddown, 0 hidden) + = Active Route, - = Last Active, * = Both 0.0.0.0/0 *[Static/5] 00:13:56 > to 192.168.10.253 via ge-0/0/0.0 10.1.1.0/24 *[Direct/0] 00:13:56 > via ge-0/0/1.0 10.1.1.254/32 *[Local/0] 00:13:56 Local via ge-0/0/1.0 20.1.1.0/24 *[Direct/0] 00:13:56 > via ge-0/0/2.0 20.1.1.254/32 *[Local/0] 00:13:56 Local via ge-0/0/2.0 192.168.10.0/24 *[Direct/0] 00:13:56 > via ge-0/0/0.0 192.168.10.83/32 *[Local/0] 00:13:56 Local via ge-0/0/0.0 inet6.0: 1 destinations, 1 routes (1 active, 0 holddown, 0 hidden) + = Active Route, - = Last Active, * = Both ff02::2/128 *[INET6/0] 00:30:41 MultiRecv root> |
Security Zone 확인
| root> show security zones terse Zone Type dmz Security trust Security untrust Security junos-host Security root> show security zones Security zone: dmz Zone ID: 10 Send reset for non-SYN session TCP packets: Off Policy configurable: Yes Interfaces bound: 1 Interfaces: ge-0/0/2.0 Advanced-connection-tracking timeout: 1800 Unidirectional-session-refreshing: No Security zone: trust Zone ID: 7 Send reset for non-SYN session TCP packets: Off Policy configurable: Yes Interfaces bound: 1 Interfaces: ge-0/0/1.0 Advanced-connection-tracking timeout: 1800 Unidirectional-session-refreshing: No Security zone: untrust Zone ID: 8 Send reset for non-SYN session TCP packets: Off Policy configurable: Yes Interfaces bound: 1 Interfaces: ge-0/0/0.0 Advanced-connection-tracking timeout: 1800 Unidirectional-session-refreshing: No Security zone: junos-host Zone ID: 2 Send reset for non-SYN session TCP packets: Off Policy configurable: Yes Interfaces bound: 0 Interfaces: Advanced-connection-tracking timeout: 1800 Unidirectional-session-refreshing: No |
방화벽 정책 확인
root> show security policies Default policy: deny-all Default policy log Profile ID: 0 Pre ID default policy: permit-all From zone: trust, To zone: untrust Policy: trust_to_untrust, State: enabled, Index: 4, Scope Policy: 0, Sequence number: 1, Log Profile ID: 0 Source vrf group: any Destination vrf group: any Source addresses: any Destination addresses: any Applications: any Source identity feeds: any Destination identity feeds: any Action: permit From zone: trust, To zone: dmz Policy: trust_to_untrust, State: enabled, Index: 5, Scope Policy: 0, Sequence number: 1, Log Profile ID: 0 Source vrf group: any Destination vrf group: any Source addresses: any Destination addresses: any Applications: any Source identity feeds: any Destination identity feeds: any Action: permit From zone: dmz, To zone: untrust Policy: trust_to_untrust, State: enabled, Index: 6, Scope Policy: 0, Sequence number: 1, Log Profile ID: 0 Source vrf group: any Destination vrf group: any Source addresses: any Destination addresses: any Applications: any Source identity feeds: any Destination identity feeds: any Action: permit From zone: untrust, To zone: dmz Policy: untrust_to_dmz_web_server, State: enabled, Index: 7, Scope Policy: 0, Sequence number: 1, Log Profile ID: 0 Source vrf group: any Destination vrf group: any Source addresses: any Destination addresses: dmz_server_01 Applications: any Source identity feeds: any Destination identity feeds: any Action: permit root> |
방화벽 Hit Count 확인
| root> show security policies hit-count Logical system: root-logical-system Index From zone To zone Name Policy count Action 1 trust untrust trust_to_untrust 1942 Permit 2 trust dmz trust_to_untrust 0 Permit 3 untrust dmz untrust_to_dmz_web_server 196 Permit 4 dmz untrust trust_to_untrust 2010 Permit Number of policy: 4 root> |
방화벽 NAT 확인
| root> show security nat source summary Total port number usage for port translation pool: 64512 Maximum port number for port translation pool: 50331648 Total pools: 1 Pool Address Routing PAT Total Name Range Instance Address source_nat 192.168.10.84-192.168.10.84 default yes 1 Total rules: 1 Rule name Rule set From To Action PAT-INTERFACE SOURCE-NAT trust untrust interface ^ syntax error, expecting <command>. root> show security nat source rule all Total rules: 1 Total referenced IPv4/IPv6 ip-prefixes: 2/0 source NAT rule: PAT-INTERFACE Rule-set: SOURCE-NAT Rule-Id : 1 Rule position : 1 From zone : trust To zone : untrust Match Source addresses : 10.1.1.0 - 10.1.1.255 Destination addresses : 0.0.0.0 - 255.255.255.255 Action : interface Persistent NAT type : N/A Persistent NAT mapping type : address-port-mapping Inactivity timeout : 0 Max session number : 0 Translation hits : 1942 Successful sessions : 1942 Number of sessions : 0 root> show security nat static rule all Total static-nat rules: 1 Total referenced IPv4/IPv6 ip-prefixes: 2/0 Static NAT rule: auth_server Rule-set: static_nat_01 Rule-Id : 1 Rule position : 1 From zone : untrust Destination addresses : 192.168.10.84 Host addresses : 20.1.1.1 Netmask : 32 Host routing-instance : N/A Translation hits : 2302 Successful sessions : 2302 Number of sessions : 5 root> |
방화벽 설정값
| root> show configuration | display set | no-more set version 21.3R1.9 set security nat source pool source_nat address 192.168.10.84/32 set security nat source rule-set SOURCE-NAT from zone trust set security nat source rule-set SOURCE-NAT to zone untrust set security nat source rule-set SOURCE-NAT rule PAT-INTERFACE match source-address 10.1.1.0/24 set security nat source rule-set SOURCE-NAT rule PAT-INTERFACE match destination-address 0.0.0.0/0 set security nat source rule-set SOURCE-NAT rule PAT-INTERFACE then source-nat interface set security nat static rule-set static_nat_01 from zone untrust set security nat static rule-set static_nat_01 rule auth_server match destination-address 192.168.10.84/32 set security nat static rule-set static_nat_01 rule auth_server then static-nat prefix 20.1.1.1/32 set security nat proxy-arp interface ge-0/0/0.0 address 192.168.10.84/32 set security policies from-zone trust to-zone untrust policy trust_to_untrust match source-address any set security policies from-zone trust to-zone untrust policy trust_to_untrust match destination-address any set security policies from-zone trust to-zone untrust policy trust_to_untrust match application any set security policies from-zone trust to-zone untrust policy trust_to_untrust then permit set security policies from-zone trust to-zone dmz policy trust_to_untrust match source-address any set security policies from-zone trust to-zone dmz policy trust_to_untrust match destination-address any set security policies from-zone trust to-zone dmz policy trust_to_untrust match application any set security policies from-zone trust to-zone dmz policy trust_to_untrust then permit set security policies from-zone dmz to-zone untrust policy trust_to_untrust match source-address any set security policies from-zone dmz to-zone untrust policy trust_to_untrust match destination-address any set security policies from-zone dmz to-zone untrust policy trust_to_untrust match application any set security policies from-zone dmz to-zone untrust policy trust_to_untrust then permit set security policies from-zone untrust to-zone dmz policy untrust_to_dmz_web_server match source-address any set security policies from-zone untrust to-zone dmz policy untrust_to_dmz_web_server match destination-address dmz_server_01 set security policies from-zone untrust to-zone dmz policy untrust_to_dmz_web_server match application any set security policies from-zone untrust to-zone dmz policy untrust_to_dmz_web_server then permit set security zones security-zone trust host-inbound-traffic system-services all set security zones security-zone trust host-inbound-traffic protocols all set security zones security-zone trust interfaces ge-0/0/1.0 set security zones security-zone untrust host-inbound-traffic system-services all set security zones security-zone untrust host-inbound-traffic protocols all set security zones security-zone untrust interfaces ge-0/0/0.0 set security zones security-zone dmz address-book address dmz_server_01 20.1.1.1/32 set security zones security-zone dmz host-inbound-traffic system-services all set security zones security-zone dmz host-inbound-traffic protocols all set security zones security-zone dmz interfaces ge-0/0/2.0 set interfaces ge-0/0/0 unit 0 family inet address 192.168.10.83/24 set interfaces ge-0/0/1 unit 0 family inet address 10.1.1.254/24 set interfaces ge-0/0/2 unit 0 family inet address 20.1.1.254/24 set protocols lldp interface all set routing-options static route 0.0.0.0/0 next-hop 192.168.10.253 root> |
지금까지 [2025][Juniper SRX #26] Source Nat - SNAT - IP Pool 글을 읽어주셔서 감사합니다.
'JUNIPER > SRX 방화벽' 카테고리의 다른 글
| [2025][Juniper SRX #28] Destination Nat - DNAT (0) | 2025.02.16 |
|---|---|
| [2025][Juniper SRX #27] Destination Nat - Port Forwarding (0) | 2025.02.16 |
| [2025][Juniper SRX #26] Source Nat - SNAT - IP Pool (0) | 2025.02.14 |
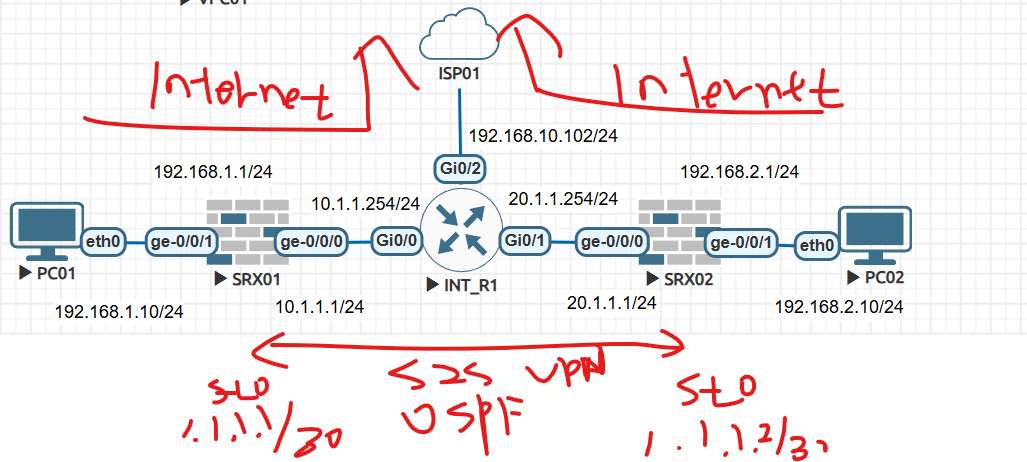
| [2025][Juniper SRX #24] site to site vpn - S2S VPN - OSPF (0) | 2025.02.07 |
| [2025][Juniper SRX #23] site to site vpn - S2S VPN - static route (0) | 2025.02.07 |