안녕하세요. 


오늘은 C9300 스위치 Stack 설치에 대해서 알아보도록 하겠습니다.


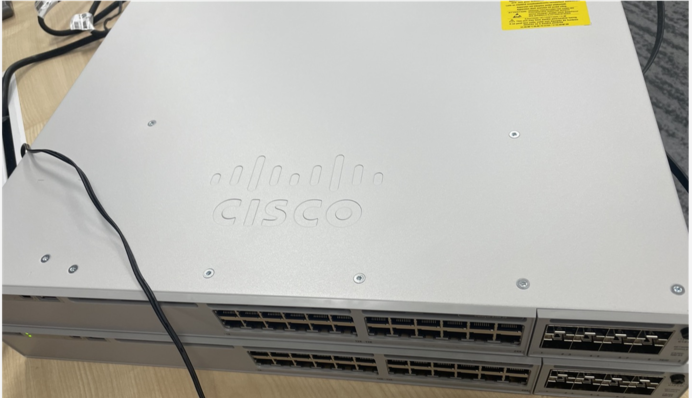
아래 사진처럼 C9300 스위치를 2대 준비합니다. 


Stack 케이블을 아래 사진처럼 연결 합니다.


그리고 전원을 연결 합니다. 


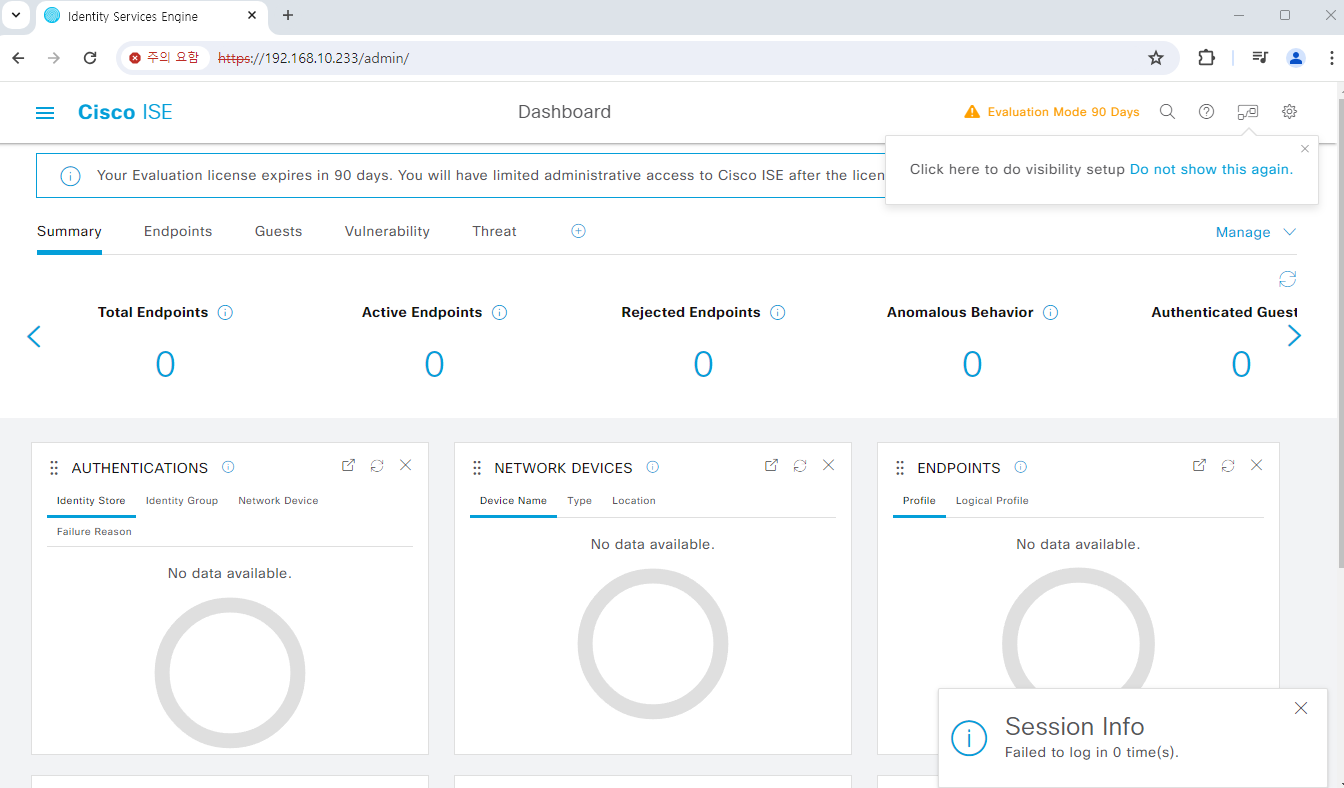
부팅이 완료 되면 아래처럼 show switch 입력하면 자동으로 Stack 설정이 완료 된것을 확인 할수 있습니다. 

Switch#show switch
Switch/Stack Mac Address : 9c66.977a.e000 - Local Mac Address
Mac persistency wait time: Indefinite
                                             H/W   Current
Switch#   Role    Mac Address     Priority Version  State
-------------------------------------------------------------------------------------
*1       Active   9c66.977a.e000     1      V08     Ready
 2       Standby  9c66.977a.e080     1      V08     Ready


2대 스위치중에서 어떤 스위치가 Master로 선택 되는지는 알고리즘에 의해서 선정 됩니다. 


Master Switch Election

The  stack behaves as a single switching unit that is managed by a master  switch elected from one of the member switches. The master switch  automatically creates and updates all the switching and optional routing  tables. Any member of the stack can become the master switch. Upon  installation, or reboot of the entire stack, an election process occurs  among the switches in the stack. There is a hierarchy of selection  criteria for the election.

1. User priority - The network manager can select a switch to be master.

2. Hardware and software priority  - This will default to the unit with the most extensive feature set.  The Cisco Catalyst 3750 IP Services (IPS) image has the highest  priority, followed by Cisco Catalyst 3750 switches with IP Base Software  Image (IPB).

Catalyst  3750-E and Catalyst 3750-X run the Universal Image. The feature set on  the universal image is determined by the purchased license. The "show  version" command will list operating license level for each switch  member in the stack.

3. Default configuration - If a switch has preexisting configuration information, it will take precedence over switches that have not been configured.

4. Uptime - The switch that has been running the longest is selected.

5. MAC address - Each switch reports its MAC address to all its neighbors for comparison. The switch with the lowest MAC address is selected


자세한 내용은 아래 링크를 참고 부탁드립니다.


https://www.cisco.com/c/en/us/products/collateral/switches/catalyst-9000/nb-06-cat-9k-stack-wp-cte-en.html


Products - Cisco Catalyst 9000 Platform StackWise Virtual White Paper

Cisco® Catalyst® 9000 platform StackWise® Virtual technology allows the clustering of two physical switches together into a single logical entity. The two switches operate as one; they share the same configuration and forwarding state. This technology a

www.cisco.com


show switch에서는 switch1이 마스터 스위치 선택되었지만 실제 C9300 스위치 두대중에서 어떤 스위치가 마스터인지 확인이 불가능 합니다.


show version 실행합니다. 

첫번째 정보가 Switch1에 대한 정보 입니다

두번째 정보가 Switch2에 대한 정보 입니다. 


Switch1에 Serial 정보를 실제 장비에 시리얼 번호를 확인 합니다. 

Base Ethernet MAC Address          : 
Motherboard Assembly Number        : 
Motherboard Serial Number          : XXXXXXXXX
Model Revision Number              : 
Motherboard Revision Number        : 
Model Number                       : C9300-24T
System Serial Number               : XXXXXXXX
CLEI Code Number                   : 


Switch Ports Model              SW Version        SW Image              Mode
------ ----- -----              ----------        ----------            ----
*    1 41    C9300-24T          17.12.03          CAT9K_IOSXE           INSTALL
     2 41    C9300-24T          17.12.03          CAT9K_IOSXE           INSTALL


Switch 02
---------
Switch uptime                      : 25 minutes

Base Ethernet MAC Address          : 
Motherboard Assembly Number        :
Motherboard Serial Number          : YYYYYYYYY
Model Revision Number              : 
Motherboard Revision Number        :
Model Number                       : C9300-24T
System Serial Number               :  YYYYYYYYY
Last reload reason                 : 
CLEI Code Number                   : 


그리고 장비에 라벨을 프린터 해서 붙입니다. 


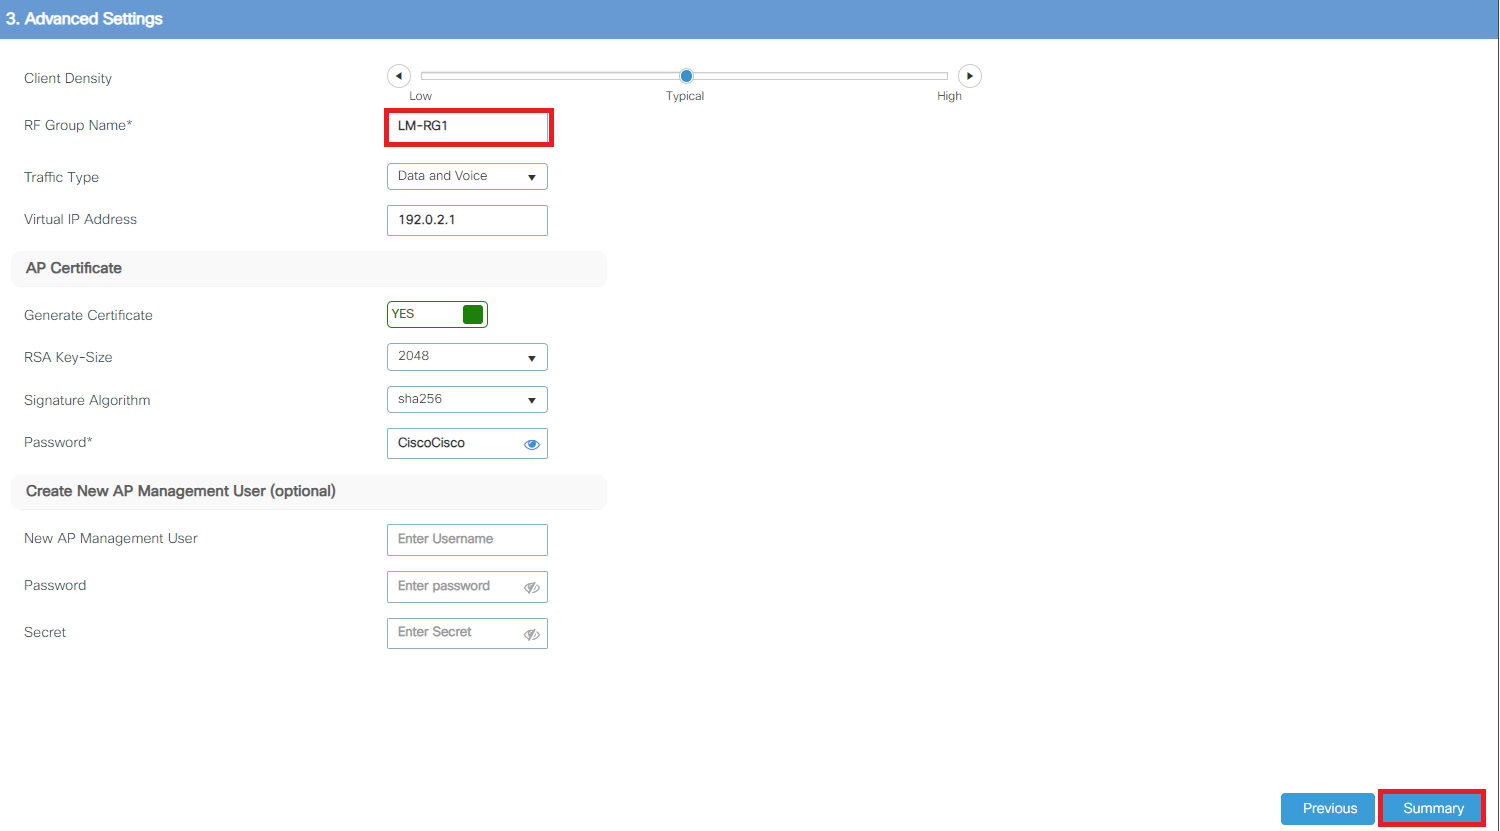
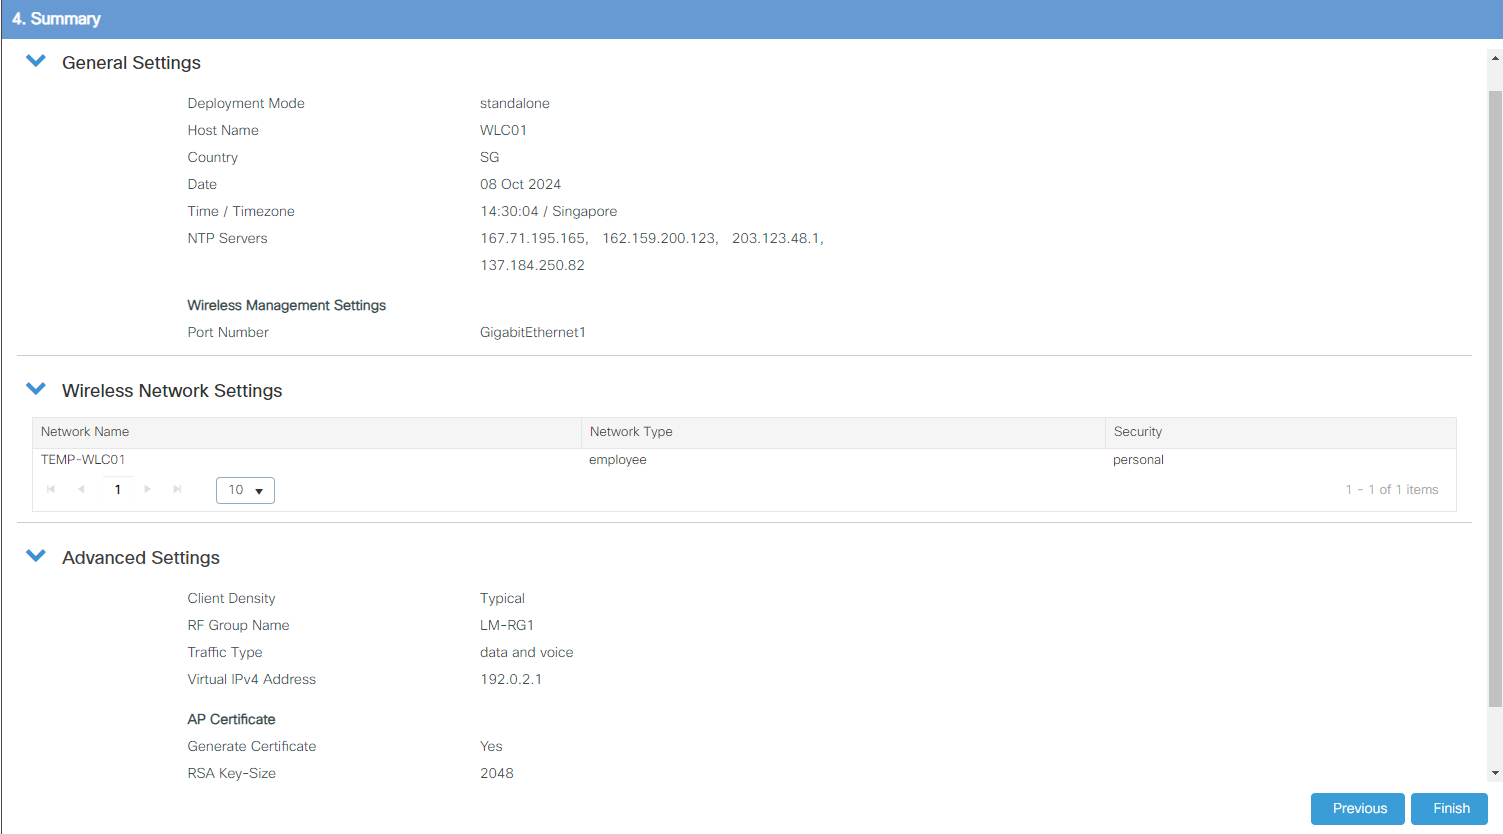
장비가 재부팅 되더라도 항상 Switch1에 Master로 선정하기 위해서 아래 처럼 Switch Priority 값을 수정 합니다. 

Switch#switch 1 priority 14
Switch#switch 2 priority 13

Switch#show switch
Switch#   Role    Mac Address     Priority Version  State
-------------------------------------------------------------------------------------
*1       Active                                     14     V08     Ready
 2       Standby                                  13     V08     Ready


그리고 장비에 설정값을 저장 합니다

Switch#wr
Building configuration...
[OK]


지금까지 C9300 Stack 관련해서 알아보았습니다.

글을 읽어주셔서 감사합니다.

안녕하세요.


오늘은 기존에 설치 되어진 WLC에다가 AP만 추가하는 방법에 대해서 알아보도록 하겠습니다. 


현재 고객사에서 C9800L WLC를 사용하고 있습니다. 기존에 사용하고 있는 오래된 AP를 제거 하고 C9120AXI-S를 설치 해보겠습니다. 


1. WLC를 Datacenter에 설치되어져 있습니다

2. AP는 Office에 설치 할 예정입니다. 물리적으로 떨어져있고 같은 L2 Domain이 아니기때문에 자동으로 AP가 등록 되지 않습니다.

3. 현재 고객사는 AP MGMT를 수동으로 IP를 설정 하고 있습니다. 


   option1: DHCP option를 사용해서 자동으로 AP가 WLC에 등록 하는 방법

   option2: AP에 Static IP를 설정하고 WLC IP를 수동으로 입력 합니다

                그리고 WLC에서 AP MAC를 등록하고 어떤 Profile를 적용 할지 입력합니다. 


현재 고객사가 option2를 사용하고 있기 떄문에 Option2를 사용하여 AP를 기존에 있는 WLC에 등록해보겠습니다.


1. AP를 POE 스위치에 연결하고 노트북 콘솔케이블을 AP에 연결합니다

    또는 파워어탭터를 AP에 연결하고 콘솔케이블을 AP에 연결합니다.


AP 설정

capwap ap hostname CISCO-AP-01
capwap ap ip 10.1.1.10 255.255.255.0 10.1.1.254
capwap ap primary-base CISCO-WLC-01 10.2.1.10

capwap ap hostname CISCO-AP-02
capwap ap ip 10.1.1.11 255.255.255.0 10.1.1.254
capwap ap primary-base CISCO-WLC-01 10.2.1.10

capwap ap hostname CISCO-AP-03
capwap ap ip 10.1.1.12 255.255.255.0 10.1.1.254
capwap ap primary-base CISCO-WLC-01 10.2.1.10

capwap ap hostname CISCO-AP-04
capwap ap ip 10.1.1.13 255.255.255.0 10.1.1.254
capwap ap primary-base CISCO-WLC-01 10.2.1.10


WLC설정하기 전에 AP4대에 MAC를 확인합니다.

WLC 설정

ap xxxx.xxxx.xxxx
 policy-tag office-PolicyTag
 site-tag office
 rf-tag default-rf-tag

ap xxxx.xxxx.xxxx
 policy-tag office-PolicyTag
 site-tag office
 rf-tag default-rf-tag

ap xxxx.xxxx.xxxx
 policy-tag office-PolicyTag
 site-tag office
 rf-tag default-rf-tag

ap xxxx.xxxx.xxxx
 policy-tag office-PolicyTag
 site-tag office
 rf-tag default-rf-tag


그리고 고객사 사용하고 있는 천장에 AP를 제거 하고 새 AP를 설치 합니다.

처음에 AP가 WLC에 연결되면 Firmware upgrade 또는 Firmware downgrade때문에 자동으로 AP가 여러번 재부팅 됩니다.


그리고 WLC GUI에 로그인해서 확인해보면 아래와 같이 연결 완료를 확인 할수 있습니다.

고객사 정보 때문에 아래 제한적으로 사진을 캡처 했습니다. 아래 사진처럼 초록색으로 연결 완료 확인 가능 합니다. 


AP 색을 확인해보면 초록색이면 정상적으로 WLC에 연결이 되었습니다.

유저가 AP에 접속하면 색이 파랑색으로 표시가 됩니다. 


초록색 또는 파랑색은 정상적으로 AP가 WLC에 등록되어 동작중입니다. 


지금까지 글을 읽어주셔서 감사합니다. 


안녕하세요. 


오늘은 C9800CL WLC configuration Setup Wizard을 알아보겠습니다.


테스트를 위해서는 C9800CL를 EVE-NG에 설치해야 합니다.

이전 강의를 참고 부탁드립니다.

https://itblog-kr.tistory.com/50


[2024][EVE-NG #18] EVE-NG에 C9800CL Install

안녕하세요. 오늘은 EVE-NG #18- EVE-NG에 C9800CL WLC를 설치 하겠습니다. EVE-NG 공식 문서는 아래와 같습니다.https://www.eve-ng.net/index.php/documentation/howtos/cisco-wireless-c9800-cl/ Cisco Wireless C9800-CL -Versions this

itblog-kr.tistory.com


기본적은 토폴로지는 아래와 같습니다.

WLC - G1 - MGMT IP - VRF MGMT를 생성해서 MGMT Traffix이랑 Data Traffic를 분리하였습니다. 설정 방법은 이전 강의를 참고 부탁드립니다

IP: 192.168.10.227

WLC - G2 - Data Traffic 입니다. 


1. WLC 장비를 GUI를 통해서 접속 합니다.

https://192.168.10.227

Deployment Mode: Standalone

Hostname: 적절한 WLC이름을 지정합니다

Country: 설치하고자 하는 나라를 선택합니다. 

Date: 오늘 날짜를 선택 합니다.

Time: Timezone를 선택합니다. 

NTP Servers - NTP서버를 선택합니다. 

MGMT interface 변경을 원하면 수정 합니다. 

Static Route Setting: CLI모드에서 추가 했기때문에 수정 할 필요가 없습니다.

만약에 Static Route를 수정를 원하시면 변경 가능 합니다. 

0.sg.pool.ntp.org - 203.123.48.1
1.sg.pool.ntp.org - 167.172.70.21
2.sg.pool.ntp.org - 106.10.186.200
3.sg.pool.ntp.org - 203.123.48.1


Next를 클릭하면 Wireless Network Settings 표시 됩니다


2. Add버튼을 클릭해서 Wireless Network를 추가합니다.


Network Name: TEMP-WLC1

Network Type: Employee

Security: WPA2 Personal 

Pre-Shared Key: CiscoCisco


3. Next 버튼을 클릭 합니다. 


4. RF-GROUP Name: LM-RG1

AP Certificate

Signature Algorithm - SHA256

Password: CiscoCisco

그리고 Summary 버튼을 클릭 합니다. 


5. Click Finish버튼을 클릭 합니다.


6. 아래처럼 경고 메시지가 뜨는데 Yes 버튼을 클릭 합니다. 


7. 페이지가 자동으로 새로고침 되면서 아래처럼 로그인 페이지를 확인 가능 합니다. 


8. 로그인하면 아래처럼 확인가능합니다. 

현재는 테스트 AP가 없기떄문에 Access-points에 숫자가 0으로 표시 됩니다. 


지금까지 9800CL 초기 기본 설정에 대해서 확인 하였습니다.

지금까지 글을 읽어주셔서 감사합니다. 

안녕하세요. 


오늘은 Cat9300L 스위치 라이센스를 CSSM에 등록하는 방법에 대해서 알아보겠습니다.


1. Traditional 방식

2. Smart License 

3. Smart License Using Policy 


위에 3가지 방법에 대해서는 추후에 자세히 설명 하도록 하겠습니다.


현재 구매한 스위치에 디폴트로 어떤 라이센스 방식을 사용 하는지 확인해보겠습니다.

아래 처럼 Smart License Using Policy 방식을 사용 하고 있습니다. 

TSIWL-CSW-01#show license status
Utility:
  Status: DISABLED

Smart Licensing Using Policy:
  Status: ENABLED


현재 사용하고 있는 IOSXE버전은 아래와 같습니다.

Switch Ports Model              SW Version        SW Image              Mode
------ ----- -----              ----------        ----------            ----
*    1 29    C9300L-24T-4G      17.12.03          CAT9K_IOSXE           INSTALL


1. 라이센스를 등록하기전에 라이센스가 CSSM - Cisco Account에 등록 되어져 있어야 합니다.

2. CSSM서버에 통신이 가능한지 확인 합니다.

TSIWL-CSW-01#telnet smartreceiver.cisco.com 443
Trying smartreceiver.cisco.com (72.163.15.144, 443)... Open


3. 스위치에 기본 설정을 합니다

TSIWL-CSW-01(config)#license smart transport smart
TSIWL-CSW-01(config)#license smart url default
TSIWL-CSW-01#wr


4. CSSM 로그인후 New Token 클릭 합니다. 

5. Create Token 클릭 합니다. 


6. 생성된 키를 복사합니다


7. Key를 Cisco 스위치에 등록 합니다.

TSIWL-CSW-01#license smart trust idtoken <copy the token> all force


8. 라이센스 상태를 확인 합니다

Trust Code에보면 정상적으로 라이센스가 설치 된것을 확인 가능 합니다

TSIWL-CSW-01#show license status 

Utility:
  Status: DISABLED

Smart Licensing Using Policy:
  Status: ENABLED

Account Information:
  Smart Account: **** you can see your SA account ***  As of Oct 02 11:43:47 2024 UTC
  Virtual Account: *** the VA account also show ***


Trust Code Installed:
  Active: PID:C9300L-24T-4G,SN:
    INSTALLED on Oct 02 11:43:35 2024 UTC
  Standby: PID:C9300L-24T-4G,SN:
    INSTALLED on Oct 02 11:43:36 2024 UTC


9. CSSM에서 라이센스 확인하기


안녕하세요.


오늘은 [ISR4221]-Performance License Install(SLR) 입니다. 


고객사에 라우터가 인터넷 접속이 불가능 하여 offline 방식으로 라이센스를 설치해보겠습니다.


Step1 장비 버전 확인 -Smart license 지원

BDKDD02#show version
Cisco IOS XE Software, Version 16.06.08


Step2 Smart license disable

BDKDD02(config)#no license smart enable


Step3 download PAK file from CSSM

시리얼번호는 보안상으로 *처리 하였습니다. 

BDKDD02#license smart reservation request local
Enter this request code in the Cisco Smart Software Manager portal:
UDI: PID:ISR4221/K9,SN:FJC**********
    Request code: BC-ZISR4221/K9:FJC*********-AfSn9CzT1-76


Step4 CSSM 접속후 라이센스 다운로드 

고객사 정보가 있어서 생략 하였습니다. 


Step5 USB에 라이센스 파일 저장하기

Step6 USB를 라우터에 삽입하기

Step7 USB 라이센스 확인

BDKDD02#dir usb0:
Directory of usb0:/

   54  -rwx             2184  Jul 11 2024 06:24:56 +00:00  FJC***********_20240710110756.lic


Step8 라이센스를 장비에 복사하기

BDKDD02#copy usb0:FJC*******_20240710110756.lic flash:
Destination filename [FJC******_20240710110756.lic]?
Copy in progress...C
2184 bytes copied in 0.057 secs (38316 bytes/sec)


Step9 Flash메모리에 라이센스 제대로 복사 되었는지 확인하기

BDKDD02#dir flash:
Directory of bootflash:/

   23  -rw-             2184  Jul 11 2024 08:46:32 +00:00  FJC*******_20240710110756.lic


Step10 라우터 성능 확인

BDKDD02#show platform hardware throughput level
The current throughput level is 35000 kb/s


Step11 라이센스 설치 

BDKDD02#license install flash:FJC******_20240710110756.lic
Installing licenses from "flash::FJC******_20240710110756.lic"
Installing...Feature:ipbasek9...Failed:
% Error: Duplicate license
Installing...Feature:throughput...Successful:Supported
1/2 licenses were successfully installed
1/2 licenses were existing licenses
0/2 licenses were failed to install

BDKDD02#
*Jul 11 08:48:39.268: %LICENSE-6-INSTALL: Feature throughput 1.0 was installed in this device. UDI=ISR4221/K9:FJC******; StoreIndex=1:Primary License Storage


Step12 저장후 장비 재부팅

BDKDD02#wr
Building configuration...

[OK]
BDKDD02#reload


Step13 Throughput 75Mbps 변경하기

BDKDD02(config)#platform hardware throughput level 75000


Step14 저장하고 재부팅

BDKDD02#wr
Building configuration...


*Jul 12 06:14:58.126: %SYS-5-CONFIG_I: Configured from console by console[OK]
BDKDD02#
BDKDD02#
*Jul 12 06:15:04.098: %SYS-2-PRIVCFG_ENCRYPT: Successfully encrypted private config filereload
Proceed with reload? [confirm]


Step15 확인하기

BDKDD02#show platform hardware throughput level
The current throughput level is 75000 kb/s


Throughput이 75Mbps 변경되었습니다.


안녕하세요. 


이번에는 CISCO ISR4221 IOS Upgrade입니다. 


실제 장비에 콘솔을 접속해서 IOS 버전을 확인합니다. 

BDKDD02#show version
Cisco IOS XE Software, Version 16.06.08
Cisco IOS Software [Everest], ISR Software (X86_64_LINUX_IOSD-UNIVERSALK9_IAS_NPE-M), Version 16.6.8, RELEASE SOFTWARE (fc3)
Technical Support: http://www.cisco.com/techsupport
Copyright (c) 1986-2020 by Cisco Systems, Inc.
Compiled Thu 23-Apr-20 19:06 by mcpre


현재 IOS XE Softwae version은 16.06.08 입니다.

Cisco 웹사이트에 접속해서 현재 Cisco 추천하는 IOS XE 버전을 확인합니다. 

https://software.cisco.com/download/home/286310700/type/282046477/release/Everest-16.6.4


위에 사진처럼 IOS XE software version에 별 모양이 있으면 현재 기준으로 시스코에서 권장하는 IOS버전입니다. 


Step1 - Download IOS 파일

저는 ISR 4200 Series IOS XE Universal - no Payload Encryption를 다운로드하겠습니다. 


Step2 - IOS파일 USB에 복사

그리고 USB를 통해서 이미지 파일을 업로드합니다. 


Step3 - USB를 라우터에 연결합니다. 


BDKDD02#
*Jul 11 05:20:04.520: %IOSD_INFRA-6-IFS_DEVICE_OIR: Device usb0 added


콘손 프로그램을 확인하면 usb0이 인식되었습니다.

BDKDD02#dir usb0:
Directory of usb0:/

   53  -rwx        705554857  Jul 11 2024 13:05:50 +00:00  isr4200-universalk9_ias_npe.17.06.06a.SPA.bin


dir usb0: 커맨드를 입력하면 IOS파일 확인 가능합니다.


Step4: 이미지 파일을 라우터에 복사합니다. 

BDKDD02#copy usb0:isr4200-universalk9_ias_npe.17.06.06a.SPA.bin flash:
Destination filename [isr4200-universalk9_ias_npe.17.06.06a.SPA.bin]?
Copy in progress...CCCCCCCCCCCCCCCCCCCCCCCCCCCCCCCCCCCCCCCCCCCCCCCCCCCCCCCCCCCCCCCCCCCCCCCCCCCCCCCCCCCCCCCCCCCCCCCCCCCCCCCCCCCCCCCCCCCCCCCCCCCCCCCCCCCCCCCCCCCC
705554857 bytes copied in 42.189 secs (16723669 bytes/sec)
BDKDD02#


실제 IOS파일이 제대로 복사되었는지 확인합니다.

BDKDD02#dir flash:
Directory of bootflash:/

   11  -rw-        479963020  Feb 29 2024 13:22:21 +00:00  isr4200-universalk9_ias_npe.16.06.08.SPA.bin
169345  drwx             4096  Jul 11 2024 03:10:05 +00:00  .installer
153217  drwx             4096  Feb 29 2024 13:26:50 +00:00  .ssh
88705  drwx             4096  Feb 29 2024 13:29:43 +00:00  core
64513  drwx             4096  Jul 11 2024 03:12:36 +00:00  .prst_sync
80641  drwx             4096  Feb 29 2024 13:27:04 +00:00  .rollback_timer
   12  -rw-                0  Feb 29 2024 13:27:20 +00:00  tracelogs.Dde
322561  drwx            24576  Jul 11 2024 04:38:11 +00:00  tracelogs
   14  -rw-               34   Jul 9 2024 05:57:22 +00:00  pnp-tech-time
225793  drwx             4096  Feb 29 2024 13:28:15 +00:00  virtual-instance
   13  -rw-               30  Jul 11 2024 03:12:37 +00:00  throughput_monitor_params
   15  -rw-            53302   Jul 9 2024 05:57:31 +00:00  pnp-tech-discovery-summary
   16  drwx             4096   Jul 9 2024 05:53:18 +00:00  lost+found
   17  -rw-        705554857  Jul 11 2024 05:23:22 +00:00  isr4200-universalk9_ias_npe.17.06.06a.SPA.bin


Step5 파일 무결성 확인

BDKDD02#verify flash:isr4200-universalk9_ias_npe.17.06.06a.SPA.bin
Verifying file integrity of bootflash:isr4200-universalk9_ias_npe.17.06.06a.SPA.bin......
Embedded Hash   SHA1 : 87DE4342A2105C5B4A51261F18FF8F1F86DF5361
Computed Hash   SHA1 : 87DE4342A2105C5B4A51261F18FF8F1F86DF5361
Starting image verification
Hash Computation:    70 %
*Jul 11 06:06:54.615: %PLATFORM-4-ELEMENT_WARNING:  SIP0: smand:  RP/0: Used Memory value 89% exceeds warning level100%Done!
Computed Hash   SHA2: 7245b84636792432ce7d79c4715f6261
                      12be90a195fa9d8d1ab4f29d559ef20c
                      70f5993df11344d056520fab0588da60
                      2573f1ba6a9d2e2d8f648a37bb69bd19

Embedded Hash   SHA2: 7245b84636792432ce7d79c4715f6261
                      12be90a195fa9d8d1ab4f29d559ef20c
                      70f5993df11344d056520fab0588da60
                      2573f1ba6a9d2e2d8f648a37bb69bd19

Digital signature successfully verified in file bootflash:isr4200-universalk9_ias_npe.17.06.06a.SPA.bin

BDKDD02#


Step6 - IOS XE 변경

BDKDD02(config)# boot system flash:isr4200-universalk9_ias_npe.17.06.06a.SPA.bin


Step7 - 저장

BDKDD02#wr
Building configuration...


Step8 - 설정값 확인

BDKDD02#show run | in boot
boot-start-marker
boot system flash:isr4200-universalk9_ias_npe.17.06.06a.SPA.bin
boot-end-marker
license boot level appxk9
license boot level securityk9_npe
diagnostic bootup level minimal


Step9 - 재부팅


BDKDD02#reload


Step10- 재부팅 후 version 확인

BDKDD02#show version
Cisco IOS XE Software, Version 17.06.06a
Cisco IOS Software [Bengaluru], ISR Software (X86_64_LINUX_IOSD-UNIVERSALK9_IAS_NPE-M), Version 17.6.6a, RELEASE SOFTWARE (fc3)
Technical Support: http://www.cisco.com/techsupport
Copyright (c) 1986-2023 by Cisco Systems, Inc.
Compiled Fri 20-Oct-23 18:26 by mcpre


위와 같이 업그레이드 완료 되었습니다. 


지금까지 [ISR4221]-Cisco Router IOS Upgrade 글을 읽어주셔서 감사합니다. 


안녕하세요.


오늘은 [2024][CISCO ISE#2] ISE서버 Patch Update 하기입니다. 


1. 저번에 VMware ESXi에 cisco ISE 3.2.0 버전을 설치하였습니다.

하지만 현재 Patch version이 무엇인지 모릅니다. 


2. SSH 접속합니다.

show version

ISE-3-2/admin#show version

Cisco Application Deployment Engine OS Release: 3.2
ADE-OS Build Version: 3.2.0.401
ADE-OS System Architecture: x86_64

Copyright (c) 2005-2022 by Cisco Systems, Inc.
All rights reserved.
Hostname: ISE-3-2


Version information of installed applications
---------------------------------------------

Cisco Identity Services Engine
---------------------------------------------
Version      : 3.2.0.542
Build Date   : Wed Oct 19 16:27:24 2022
Install Date : Sat Jun  8 10:58:59 2024


Patch 관련 정보가 없습니다.


그럼 현재 version: 3.2.0.542이고 patch는 없습니다.


2. Cisco 홈페이지에 접속해서 patch 버전을 확인합니다.

https://software.cisco.com/download/home/283801620/type/283802505/release/3.2.0


홈페이지 확인 결과 patch는 1부터 6까지 있습니다.

최신 버전은 patch6입니다. 다운로드합니다. 


3. cisco ISE 접속합니다. 그리고 patch6 파일을 cisco ise에 업로드하기 위해서 아래와 같이 접속합니다

Maintenance -> Repository 


Repositoruy List에서 add 버튼을 클릭합니다.


4. 아래와 같이 입력합니다


Repository Name: disk

Protocol Disk:

Path: /


그리고 Save버튼을 클릭합니다.


5. Maintenance -> Localdisk Management 

Node Name: ISE-3-2를 클릭합니다.


upload버튼을 클릭합니다.


6. 파일을 업로드합니다. 


업로드가 완료될 때까지 기다립니다.

Close 버튼을 클릭합니다. 


7. SSH 접속해서 repository에 파일을 확인합니다

ISE-3-2/admin#show repository disk
ise-patchbundle-3.2.0.542-Patch6-24041918.SPA.x86_64.tar.gz                                         
upgraderpms.log  


8. patch6을 설치합니다.

ISE-3-2/admin#patch install ise-patchbundle-3.2.0.542-Patch6-24041918.SPA.x86_64.tar.gz disk
% Warning: Patch will be installed only on this node. Install using Primary Administration node GUI to install on all nodes in deployment. Continue? (yes/no) [yes] ? yes
Initiating Application Patch installation...

Getting bundle to local machine...
Unbundling Application Package...
Verifying Application Signature...
Patch successfully installed
                                                                               
Broadcast message from root@ISE-3-2 (pts/1) (Sat Jun  8 12:26:44 2024):        
                                                                               
Trying to stop processes gracefully. Reload might take approximately 3 mins
                                                                               

% This application Install or Upgrade requires reboot, rebooting now...
                                                                               
Broadcast message from root@ISE-3-2 (pts/1) (Sat Jun  8 12:27:29 2024):        
                                                                               
The system is going down for reboot NOW
                                                                               

Patch successfully installed


patch6가 설치 완료 될 때까지 기다립니다.

약 20~30분 정도가 소요됩니다.

설치가 완료되면 자동으로 재부팅됩니다.


9. ssh 다시 접속해서 show version 입력해서 patch6을 확인합니다. 

ISE-3-2/admin#show version 

Cisco Application Deployment Engine OS Release: 3.2
ADE-OS Build Version: 3.2.0.401
ADE-OS System Architecture: x86_64

Copyright (c) 2005-2022 by Cisco Systems, Inc.
All rights reserved.
Hostname: ISE-3-2


Version information of installed applications
---------------------------------------------

Cisco Identity Services Engine
---------------------------------------------
Version      : 3.2.0.542
Build Date   : Wed Oct 19 16:27:24 2022
Install Date : Sat Jun  8 10:58:59 2024

Cisco Identity Services Engine Patch 
---------------------------------------------
Version      : 6
Install Date : Sat Jun 08 12:24:44 2024


ISE-3-2/admin#


위에 Cisco Identity Service Engine Patch 보시면 아래처럼 

version: 6 표시되고

Install Date: 언제 설치되었는지 날짜가 표시됩니다. 


10. show application status ise

application server 상태가 running인지 확인합니다. 

ISE-3-2/admin#show application status ise

ISE PROCESS NAME                       STATE            PROCESS ID  
--------------------------------------------------------------------
Database Listener                      running          4015        
Database Server                        running          157 PROCESSES
Application Server                     running          23465       
Profiler Database                      running          12538       
ISE Indexing Engine                    running          24587       
AD Connector                           running          25900       
M&T Session Database                   running          18927       
M&T Log Processor                      running          23717       
Certificate Authority Service          running          25725       
EST Service                            running          60586       
SXP Engine Service                     disabled                     
TC-NAC Service                         disabled        
PassiveID WMI Service                  disabled                     
PassiveID Syslog Service               disabled                     
PassiveID API Service                  disabled                     
PassiveID Agent Service                disabled                     
PassiveID Endpoint Service             disabled                     
PassiveID SPAN Service                 disabled                     
DHCP Server (dhcpd)                    disabled                     
DNS Server (named)                     disabled                     
ISE Messaging Service                  running          8622        
ISE API Gateway Database Service       running          11476       
ISE API Gateway Service                running          17605       
ISE pxGrid Direct Service              running          49034       
Segmentation Policy Service            disabled                     
REST Auth Service                      disabled                     
SSE Connector                          disabled                     
Hermes (pxGrid Cloud Agent)            disabled                     
McTrust (Meraki Sync Service)          disabled                     
ISE Node Exporter                      running          26542       
ISE Prometheus Service                 running          27678       
ISE Grafana Service                    running          29824       
ISE MNT LogAnalytics Elasticsearch     disabled                     
ISE Logstash Service                   disabled                     
ISE Kibana Service                     disabled                     
% WARNING: ISE DISK SIZE NOT LARGE ENOUGH FOR PRODUCTION USE
% RECOMMENDED DISK SIZE: 200 GB, CURRENT DISK SIZE: 100 GB 


11.  cisco ISE를 접속합니다.


지금까지 [2024][CISCO ISE#2] ISE서버 Patch Update 하기 글을 읽어 주셔서 감사합니다.


안녕하세요. 


오늘은 [2024][CISCO ISE#1] ISE서버 VMware ESXi에 설치하기. 


Evaluation을 설치하면 라이선스 없이 90일 동안 무료로 사용 가능 합니다. 


1. https://www.cisco.com/c/en/us/td/docs/security/ise/3-0/install_guide/b_ise_InstallationGuide30/b_ise_InstallationGuide30_chapter_2.html


Cisco Identity Services Engine Installation Guide, Release 3.0 - Cisco Secured Network Server Series Appliance

Cisco Secured Network Server Series Appliances and Virtual Machine Requirements

www.cisco.com


Cisco ISE를 설치하기 위해서는 요구 사항을 충족해야 합니다.


Table 2. VMware Virtual Machine RequirementsRequirement TypeSpecifications

CPU
  • Evaluation
    • Clock speed: 2.0 GHz or faster
    • Number of CPU cores: 4 CPU cores
  • Production
    • Clock speed: 2.0 GHz or faster
    • Number of cores:
      • SNS 3500 Series Appliance:
        • Small: 12
        • Medium: 16
        • Large: 16
      • SNS 3600 Series Appliance:
        • Small: 16
        • Medium: 24
        • Large: 24
Memory
  • Evaluation: 16 GB
  • Production
    • Small: 16 GB for SNS 3515 and 32 GB for SNS 3615
    • Medium: 64 GB for SNS 3595 and 96 GB for SNS 3655
    • Large: 256 GB for SNS 3695
Hard Disks
  • Evaluation: 300 GB
  • ProductionSee the recommended disk space for VMs in the following link: Disk Space Requirements.
  • We recommend that your VM host server use hard disks with a minimum speed of 10,000 RPM.
  • 300 GB to 2.4 TB of disk storage (size depends on deployment and tasks).
Storage and File System The storage system for the Cisco ISE virtual appliance requires a minimum write performance of 50 MB per second and a read performance of 300 MB per second. Deploy a storage system that meets these performance criteria and is supported by VMware server.
You can use the show tech-support command to view the read and write performance metrics.
We recommend the VMFS file system because it is most extensively tested, but other file systems, transports, and media can also be deployed provided they meet the above requirements.
Disk Controller Paravirtual or LSI Logic Parallel
For best performance and redundancy, a caching RAID controller is recommended. Controller options such as RAID 10 (also known as 1+0) can offer higher overall write performance and redundancy than RAID 5, for example. Additionally, battery-backed controller cache can significantly improve write operations.
NIC 1 NIC interface required (two or more NICs are recommended; six NICs are supported). Cisco ISE supports E1000 and VMXNET3 adapters.
VMware Virtual Hardware Version/Hypervisor VMware Virtual Machine Hardware Version 8 or higher on ESXi 5.x (5.1 U2 minimum) and 6.x.


2. Cisco ISE evaluation 파일을 다운로드합니다.

https://software.cisco.com/download/home/283801620/type/283802505/release/3.2.0


3. VMware ESXi를 접속합니다.

ISE 3.2 ISO파일을 VMware ESXi에 업로드합니다.


4. 가상시스템 -> VM생성/등록을 선택합니다. 


5. 다음을 선택합니다.


6. 아래처럼 입력합니다.

이름:  VM이름을 정합니다 

게스트 운영 체제 제품군: Linux

게스트 운영 체제 버전: Ubuntu Linux(64비트)


7. VM를 설치할 스토리지를 선택합니다. 


8. CPU 정보를 입력합니다. 


9. 메모리는 최소 16G를 선택하고 하디 디스크는 최소 500G 선택합니다.

저는 하드디스크 용량이 부족해서 100G를 선택하겠습니다. 


10. 그리고 CD/DVD 드라이브에서 ise-3.2 iso파일을 선택합니다. 


11. 완료 버튼을 클릭합니다. 


12. 생성한 VM를 실행합니다. 


13. 1번을 선택합니다. 


14. 설치가 완료될 때까지 기다립니다. 


15. 설치가 완료되면 아래와 같이 사진이 나옵니다. 

기본 설정을 하기 위해서 setup 입력합니다. 


16. 기본 설정을 합니다.

hostname: ISE-3-2

IP address: 192.168.10.233

IP netmask: 255.255.255.0

IP default Gateway: 192.168.10.253

DNS domain: local

nameserver: 8.8.8.8

SSH service: Y


인터페이스가 설정될 때까지 기다립니다. 


설치가 완료되었습니다.


17. SSH를 접속합니다.

192.168.10.233


show application status ise 입력합니다.

그리고 Application Server 데몬이 Running 상태인지 확인합니다. 

ISE-3-2/admin#show application status ise

ISE PROCESS NAME                       STATE            PROCESS ID  
--------------------------------------------------------------------
Database Listener                      running          7714        
Database Server                        running          150 PROCESSES
Application Server                     running          27154       
Profiler Database                      running          16484       
ISE Indexing Engine                    running          28375       
AD Connector                           running          29681       
M&T Session Database                   running          22900       
M&T Log Processor                      running          27403       
Certificate Authority Service          running          29497       
EST Service                            running          59181       
SXP Engine Service                     disabled                     
TC-NAC Service                         disabled        
PassiveID WMI Service                  disabled                     
PassiveID Syslog Service               disabled                     
PassiveID API Service                  disabled                     
PassiveID Agent Service                disabled                     
PassiveID Endpoint Service             disabled                     
PassiveID SPAN Service                 disabled                     
DHCP Server (dhcpd)                    disabled                     
DNS Server (named)                     disabled                     
ISE Messaging Service                  running          11023       
ISE API Gateway Database Service       running          15160       
ISE API Gateway Service                running          21481       
ISE pxGrid Direct Service              running          46232       
Segmentation Policy Service            disabled                     
REST Auth Service                      disabled                     
SSE Connector                          disabled                     
Hermes (pxGrid Cloud Agent)            disabled                     
McTrust (Meraki Sync Service)          disabled                     
ISE Node Exporter                      running          30285       
ISE Prometheus Service                 running          32051       
ISE Grafana Service                    running          36904       
ISE MNT LogAnalytics Elasticsearch     disabled                     
ISE Logstash Service                   disabled                     
ISE Kibana Service                     disabled                     
% WARNING: ISE DISK SIZE NOT LARGE ENOUGH FOR PRODUCTION USE
% RECOMMENDED DISK SIZE: 200 GB, CURRENT DISK SIZE: 100 GB 


ISE-3-2/admin#


18. https://192.168.10.233

입력합니다.


19. 로그인합니다.


20. CISCO ISE가 정상적으로 동작하는 걸 확인하였습니다.

그리고 Evaluation를 설치했기 때문에, 90일 동안 사용 가능 합니다. 


지금까지 [2024][CISCO ISE#1] ISE서버 VMware ESXi에 설치하기 글을 읽어 주셔서 감사합니다. 

+ Recent posts